Kubernetes - Activate Feature Gates - A deep dive
Kubernetes is a powerhouse for container orchestration, but its continuous evolution means new features are constantly being introduced, tested, and refined. How does Kubernetes manage this dynamic landscape while maintaining stability? The answer, in large part, lies in Feature Gates.
Think of Feature Gates as internal switches that control the availability of specific Kubernetes features. They allow the Kubernetes team (and by extension, you) to enable or disable features at various stages of their lifecycle – from experimental prototypes to fully stable and generally available functionalities. These Feature Gates are also visible in the Kubernetes documentation, where you can see the current state of a feature indicated in a blue box.

Why Feature Gates? The Philosophy Behind the Switches
The concept of Feature Gates isn't just about turning things on and off; it's a critical part of Kubernetes' robust development and release strategy. Here's why they're so important:
- Controlled Rollouts: New features, especially complex ones, can have unforeseen impacts. Feature Gates allow for gradual rollouts, giving developers time to gather feedback, identify bugs, and address performance issues in a controlled environment before widespread adoption.
- Risk Mitigation: By keeping new or experimental features off by default, Feature Gates minimize the risk of instability or breakage in production clusters. Users can opt-in to test these features at their own discretion.
- Experimentation and Innovation: They provide a safe sandbox for developers to experiment with cutting-edge ideas without fear of disrupting the core functionality for the majority of users.
- Backward Compatibility: As features mature, some might be deprecated or removed. Feature Gates help manage this transition, allowing users to disable older features and prepare for their eventual removal.
- User Choice: While many Feature Gates are for internal development, some offer direct control to cluster administrators, allowing them to customize their Kubernetes environment based on their specific needs and risk tolerance.
How Do Feature Gates Work? Under the Hood
Feature Gates are typically controlled by flags passed to various Kubernetes components, such as kube-apiserver, kube-controller-manager, kubelet, and kube-scheduler. Each feature has a unique gate name, and its status (enabled or disabled) is specified in the configuration. The Kubernetes documentation provides a full list of all the available Feature Gates here. You can also find it in the official GitHub repository here.
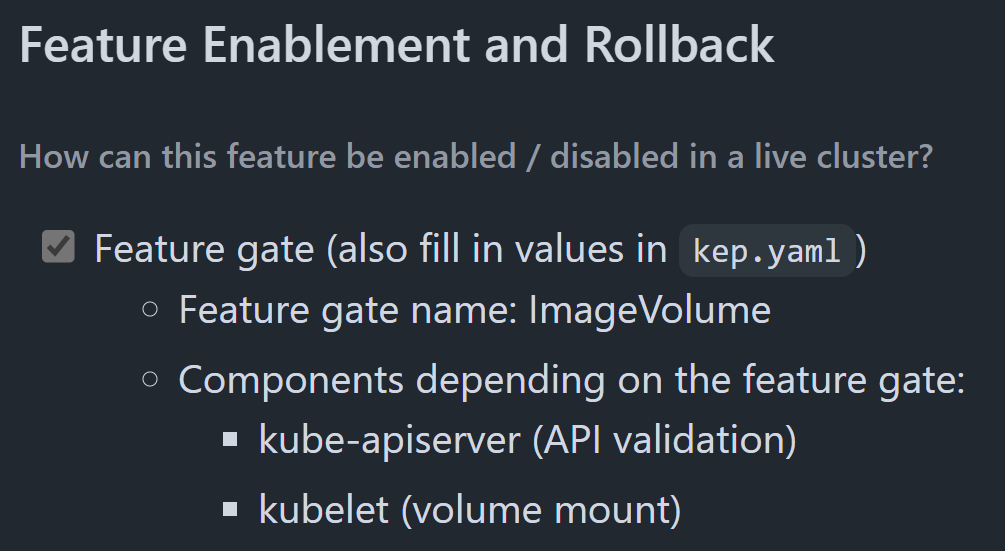
In this list, you can see the default state of each Feature Gate and whether it is enabled or not. If you see one like ImageVolume, which is disabled by default, then you can enable it with the option --feature-gates=ImageVolume=true. Now, you need to find the components on which this option needs to be set. If you want to be safe, then you can set it on all the components listed above. For a list of the needed components you need to take a deeper look into the Kubernetes Enhancement Proposals (KEPs) found here. So, in our case, we find the relevant proposal after some search, which is called: KEP-4639: OCI VolumeSource. In the picture below is the section of this document which lists necessary componenets. Here the kube-apiserver and the kubelet.
It's important to note that the default state of a Feature Gate can change over time. An experimental feature might start as false (disabled by default), then become true (enabled by default) as it matures, and eventually, the gate itself might be removed once the feature is fully stable and universally adopted. To check which Feature Gates are enabled on your running Kubernetes Cluster, you can use a simple command.
kubectl get --raw /metrics | grep kubernetes_feature_enabled{The output below shows an example of different Feature Gates which are enabled, visible by the 1 at the end of the line. Next to the name is also the stage of the Feature Gate, which will be discussed in the next section.

Common Feature Gate States
Kubernetes Feature Gates generally fall into a few categories, indicating their stability and readiness:
- Alpha (e.g.,
APIServingWithRoutine=false: These are highly experimental and subject to change without notice. They are off by default and should not be used in production environments. They exist for early testing and feedback. - Beta (e.g.,
APIServerTracing=true): These are more stable than Alpha features but may still have bugs or undergo minor changes. They are often enabled by default in newer Kubernetes versions but still come with a warning. Use with caution in non-critical environments. - GA (Generally Available): Once a feature reaches GA, its Feature Gate is typically removed, and the feature becomes a standard, stable part of Kubernetes. You won't usually see a Feature Gate for GA features, as they are always on.
- Deprecated: These features are being phased out. Their gates might be enabled by default for backward compatibility but will eventually be removed. It's advisable to migrate away from deprecated features.
Like mentioned in the GA section, after some time, a GA Feature Gate will be removed and thus cannot be disabled anymore. There is also a separate list (found here) which contains all the Feature Gates that can no longer be used in a cluster. For example, the Feature Gate for AppArmor was GA from Version 1.31 to Version 1.32 and was removed afterward. "Removed" here means that it will always be enabled and cannot be disabled with a Feature Gate any longer.
Managing Feature Gates in Your Cluster
While many Feature Gates are handled internally by Kubernetes, as a cluster administrator, you might occasionally need to interact with them, especially when:
- Testing new Kubernetes versions: You might want to enable a Beta feature to test its compatibility with your applications.
- Troubleshooting: Sometimes, a particular feature might be causing unexpected behavior, and disabling it via its Feature Gate can help in debugging.
- Adopting new functionalities: Staying informed about upcoming features and their Feature Gate status allows you to plan for their adoption.
Important Considerations:
- Version Dependency: Feature Gates are specific to Kubernetes versions. A gate available in one version might not exist in another, or its default state might be different. Always consult the official Kubernetes documentation for the version you are running.
- Component Specificity: Remember that Feature Gates are applied to specific Kubernetes components. Enabling a feature on the
kube-apiserverdoesn't automatically enable it on thekubeletif that feature requireskubeletsupport. - Impact Assessment: Before enabling any non-GA Feature Gate in a production environment, thoroughly understand its implications, potential risks, and resource requirements.
How to enable a Feature Gate locally
To enable Feature Gates in your cluster, first, search for the components that need to be updated. Once found, add the option --feature-gates=[FEATURE_GATE_NAME]=true to the component, and then you can use it.
In our example case, we will use the CSIVolumeHealth Feature Gate, which has been in an Alpha state and disabled since Version 1.21. To activate it, we need to find the definition of this Feature Gate. Because it is related to CSI, we need to look into the Kubernetes-CSI GitHub Organization. There, the relevant repository called external-health-monitor describes this feature. Here, we can see that it needs to be only enabled on the kubelet to work. However, we will also enable it on the API-Server so that the kubectl command gives us a valid answer.
kubectl get --raw /metrics | grep kubernetes_feature_enabled{.*CSIVolumeHealthCheck CSIVolumeHealth Feature Gate

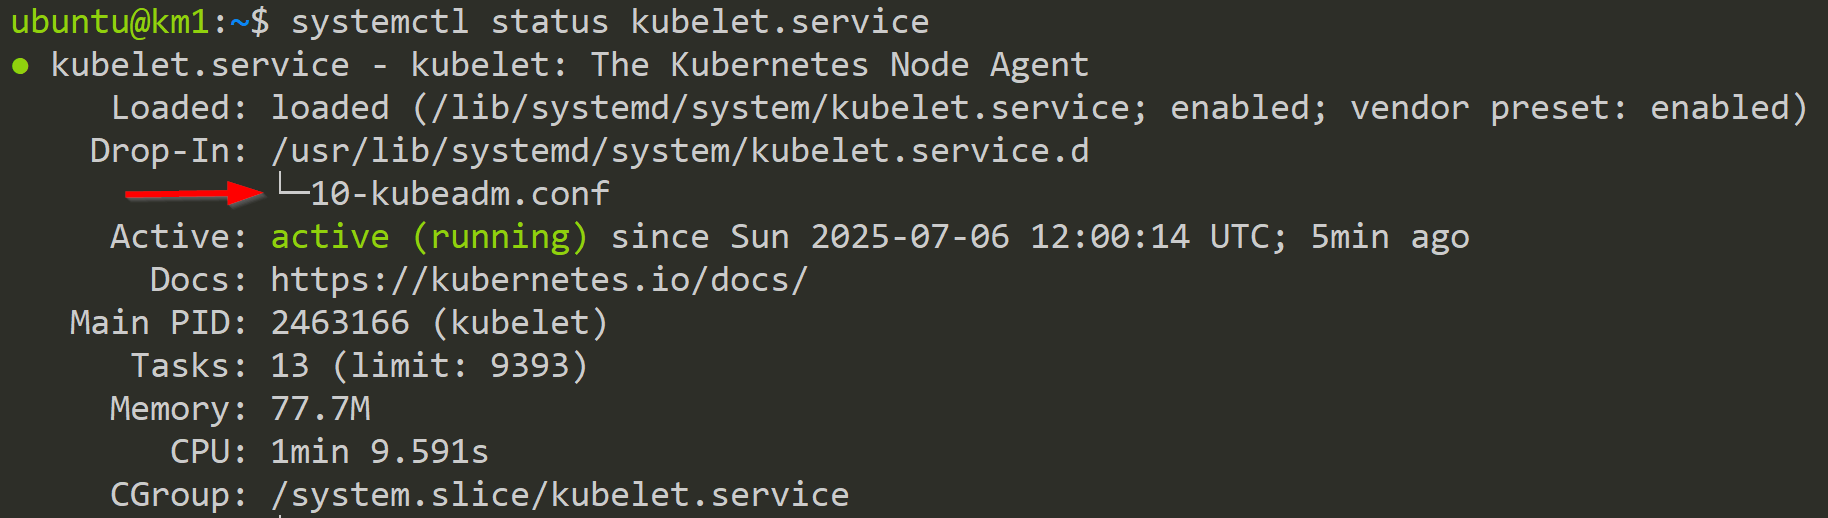
First, we enable it on the kubelet. The kubelet runs as a systemd service, so we first look it up.
systemctl status kubelet.serviceCommand for the status of the kubelet.service
With this output we get a lot of additional information. Here we can see, that an drop-in for the systemd service already exists (see below).
With the file /usr/lib/systemd/system/kubelet.service.d/10-kubeadm.conf being the best place for changes, we now need to open and modify it.
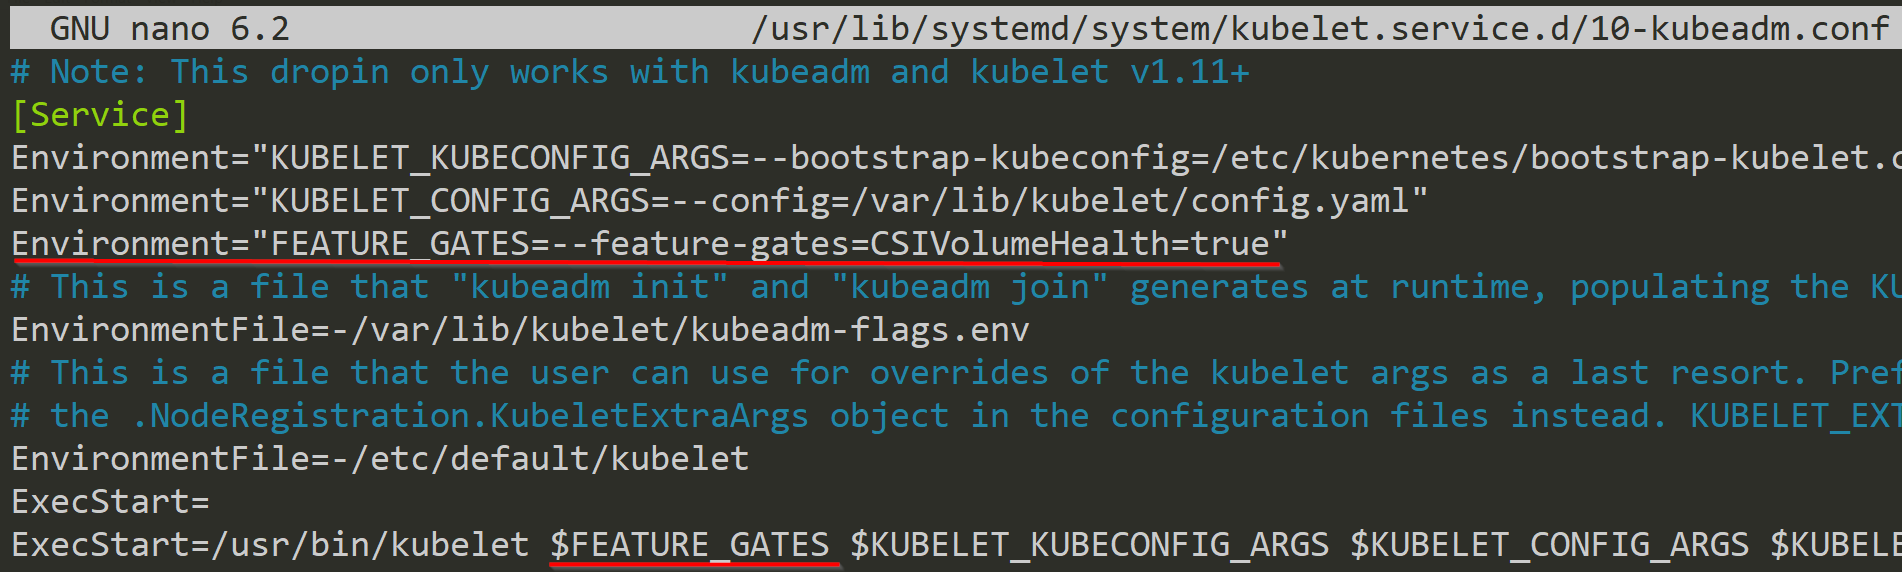
As we can see in the picture above, we add a new environment variable with Environment="FEATURE_GATES=--feature-gates=CSIVolumeHealth=true" and add the CSIVolumeHealth Feature Gate to it. In the end, we need to add this variable to the kubelet executable with $FEATURE_GATES.
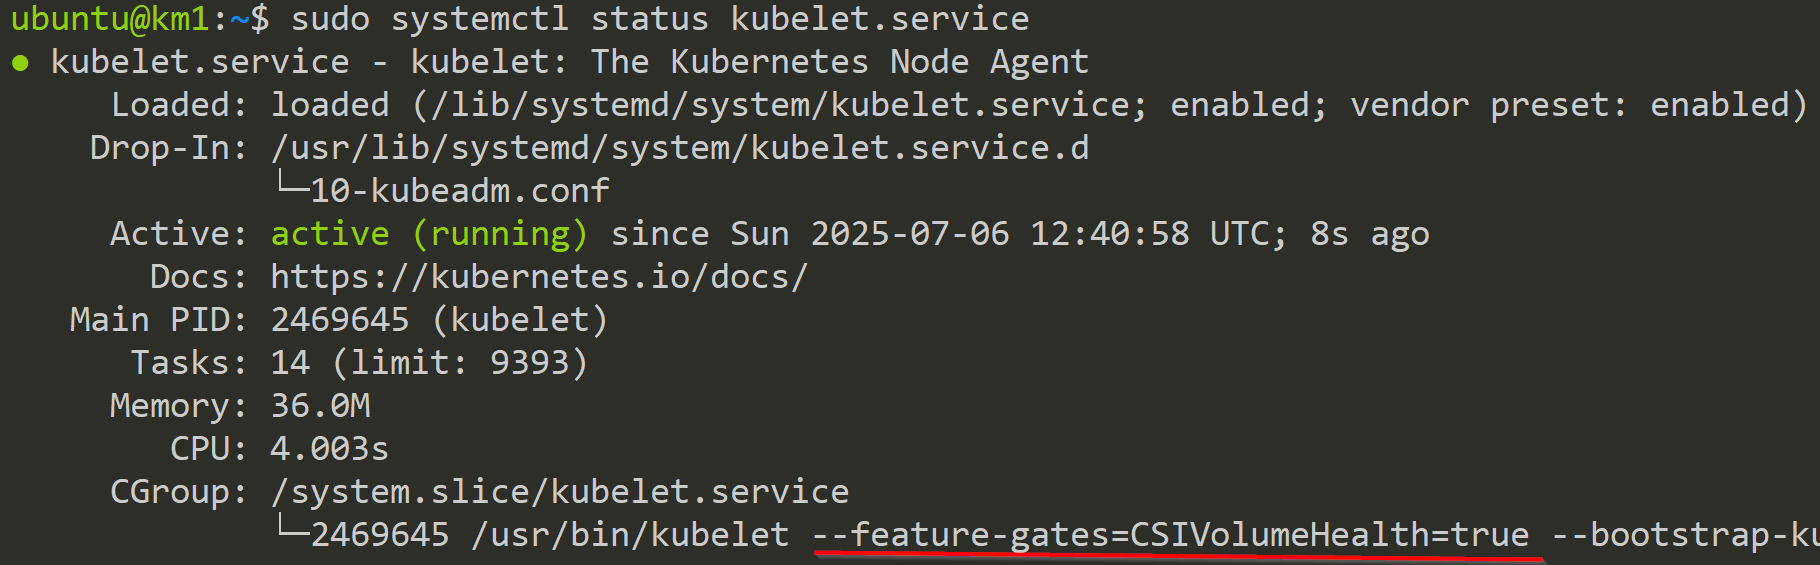
Now, we need to reload the systemd daemon and apply the changes to the kubelet.service. If everything worked, we should see a running kubelet service with the option added.
sudo systemctl daemon-reload
sudo systemctl reload-or-restart kubelet.service
sudo systemctl status kubelet.service
Reload Systemd deamon and kubelet.service
In the picture below, we can see the activated Feature Gate.
In the last step, we need to update the API-Server and add the Feature Gate there, so that the kubectl command shows us the activation of this feature. But keep in mind that you need to enable it for every kubelet for this feature to be available. Setting it on the API-Server will only show us the info, but it doesn't enforce anything.
Now the feature is visiable with our kubectl command.
kubectl get --raw /metrics | grep kubernetes_feature_enabled{.*CSIVolumeHealthCheck CSIVolumeHealth Feature Gate

Enable Feature Gates with kubeadm
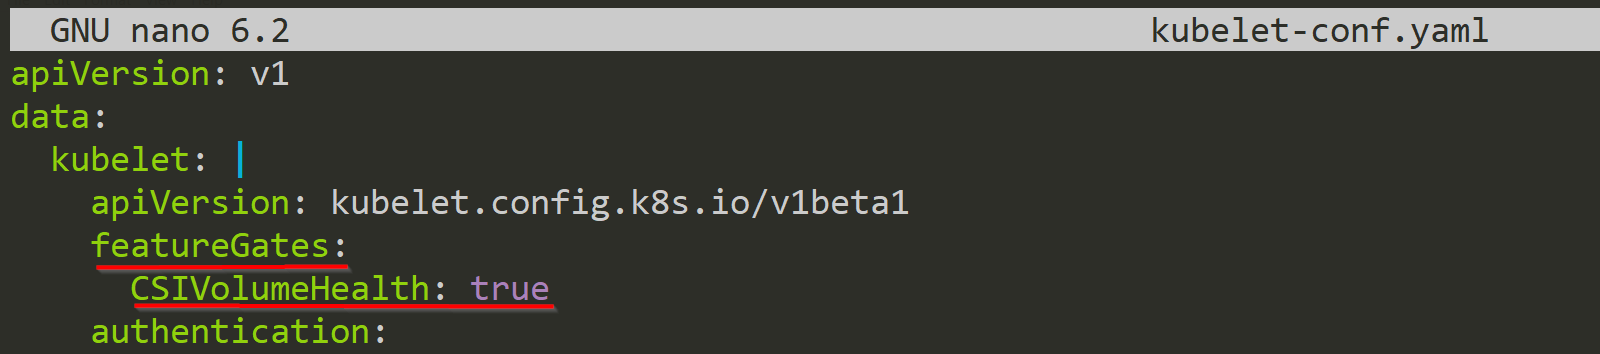
The previous way includes a lot of manual tasks. To make this easier, you can use the kubeadm command and update the nodes with only a few commands. Now, we will get the kubelet configuration, which is saved in the kube-system namespace as kubelet-config.
kubectl get cm -n kube-system kubelet-config -o yaml > kubelet-conf.yamlSave the kubelet-config
In the next step, we open this file and we add our Feature Gate to it, like in the picture below.
Now, we apply these changes to the cluster.
kubectl apply -f kubelet-conf.yamlApply the changed kubelet-config
With this preparation complete, we can now switch to each node that requires modification and apply the command below.
sudo kubeadm upgrade node phase kubelet-configUpdate the kubelet on the node

Restart the kubelet service to apply the changes.
sudo systemctl reload-or-restart kubelet.serviceRestart the kubelet service
Voila! Now we have the Feature Gate enabled on the node. Additionally, with this configuration, all future nodes that will be added to the cluster will receive this configuration, because we changed the kubelet-config in the kube-system namespace.
kubectl get --raw /api/v1/nodes/km1/proxy/configz | jq | grep featureGates -A2Get the kubelet config on node km1

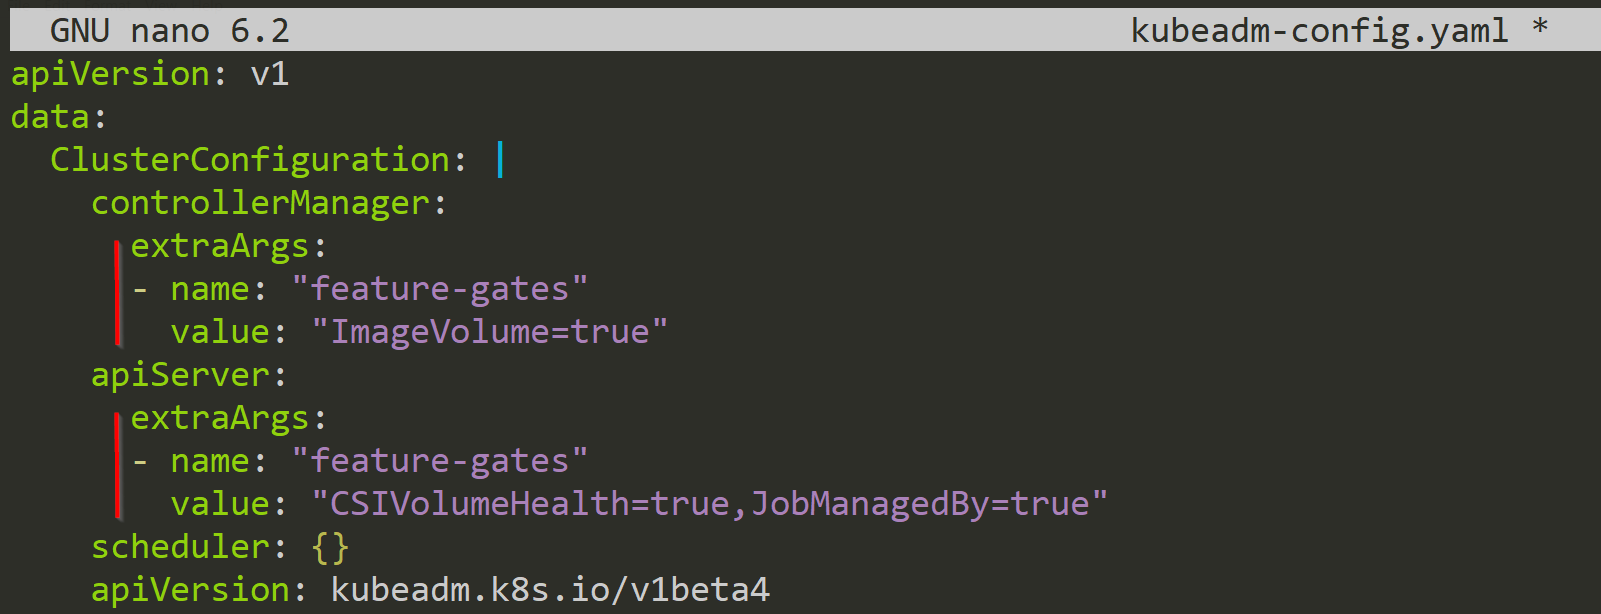
To change the control plane components, we need to use another ConfigMap stored in the kube-system namespace: the kubeadm-config. So, in the first step, we get this config file.
kubectl get cm -n kube-system kubadm-config -o yaml > kubeadm-config.yamlGet the kubeadm-config
Now we can make the required changes. Here, we add one Feature Gate to the Controller Manager and two to the API-Server. It is important that you use the layout below or else it wont work. To see all the available fields, you can consult the official documentation here.
With the changes made, we can now apply them to the Cluster again.
kubectl apply -f kubeadm-config.yamlApply the changes to the kubeadm-config
In this step, we extract the ClusterConfiguration file out of the ConfigMap, because we need this config file for the updating process. For this, I use the yq command to extract only the relevant part. To download this tool, look at the GitHub repository here.
kubectl get cm -n kube-system kubeadm-config -o yaml | yq e '.data.ClusterConfiguration' - > config.yamlGet a valid ClusterConfiguration
Like with the kubelet-config, we also use the kubeadm command, but here we use the init subcommand. Because of this, we need a config file which we pass with the --config option. There is also a Kubernetes documentation site for more explanation here.
sudo kubeadm init phase control-plane all --config config.yamlApply the ClusterConfiguration
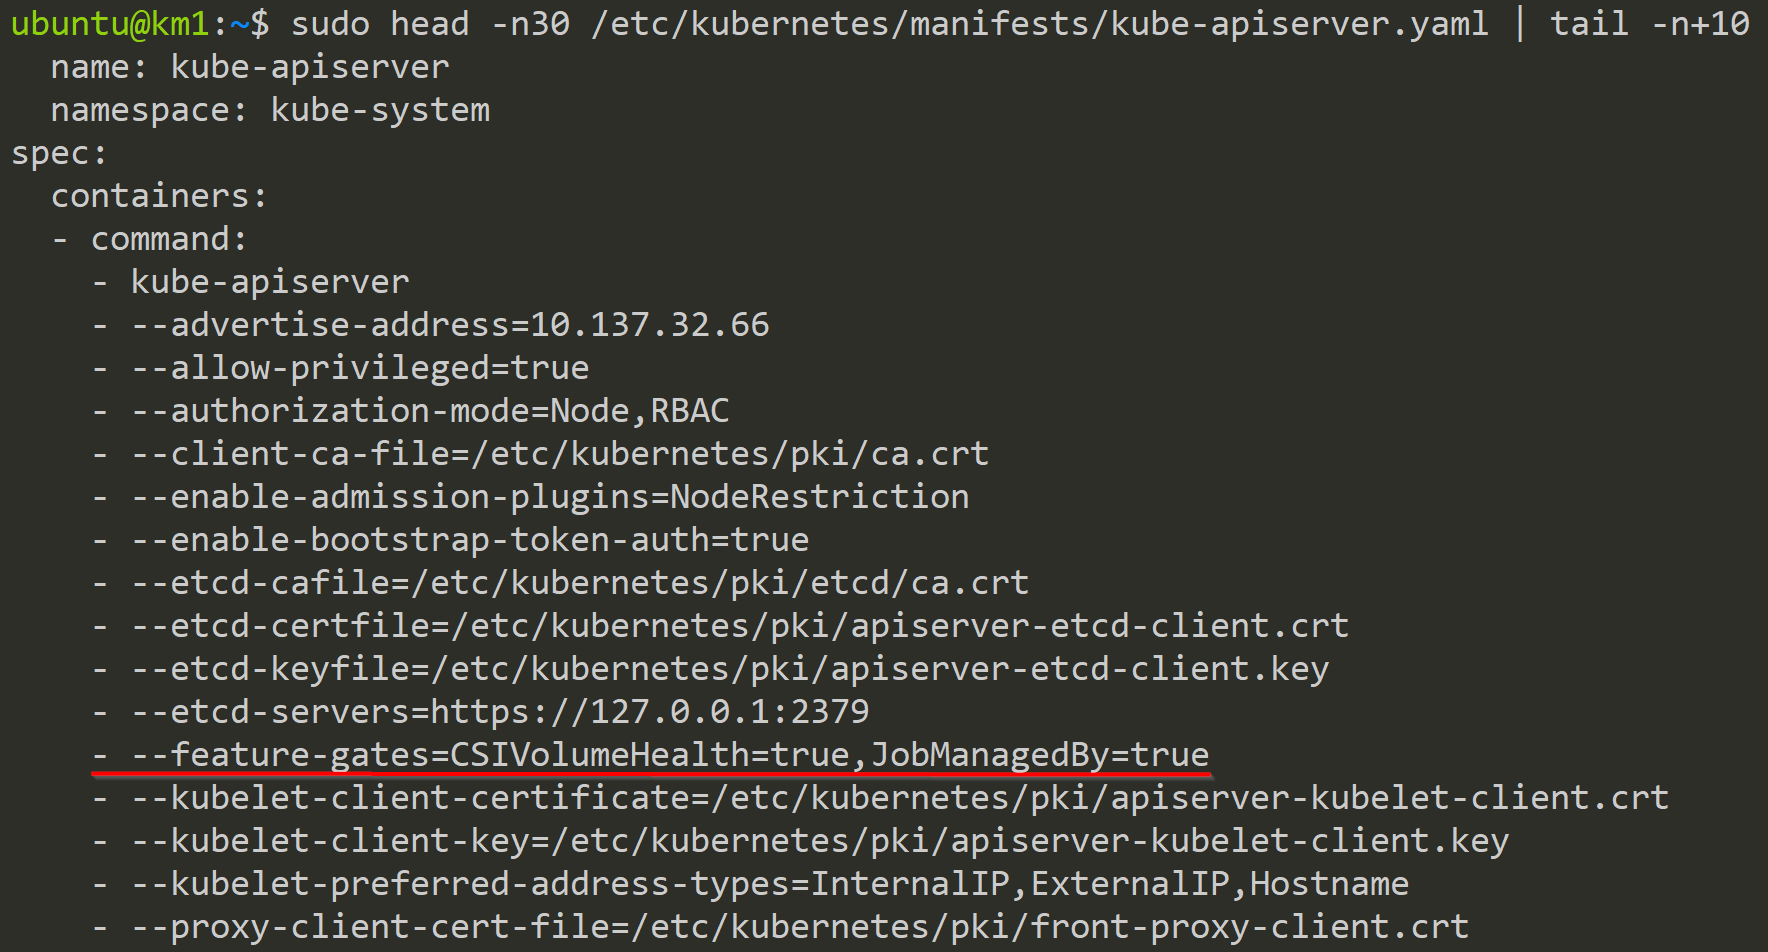
After using the command and a valid config file, our control plane components will be updated.

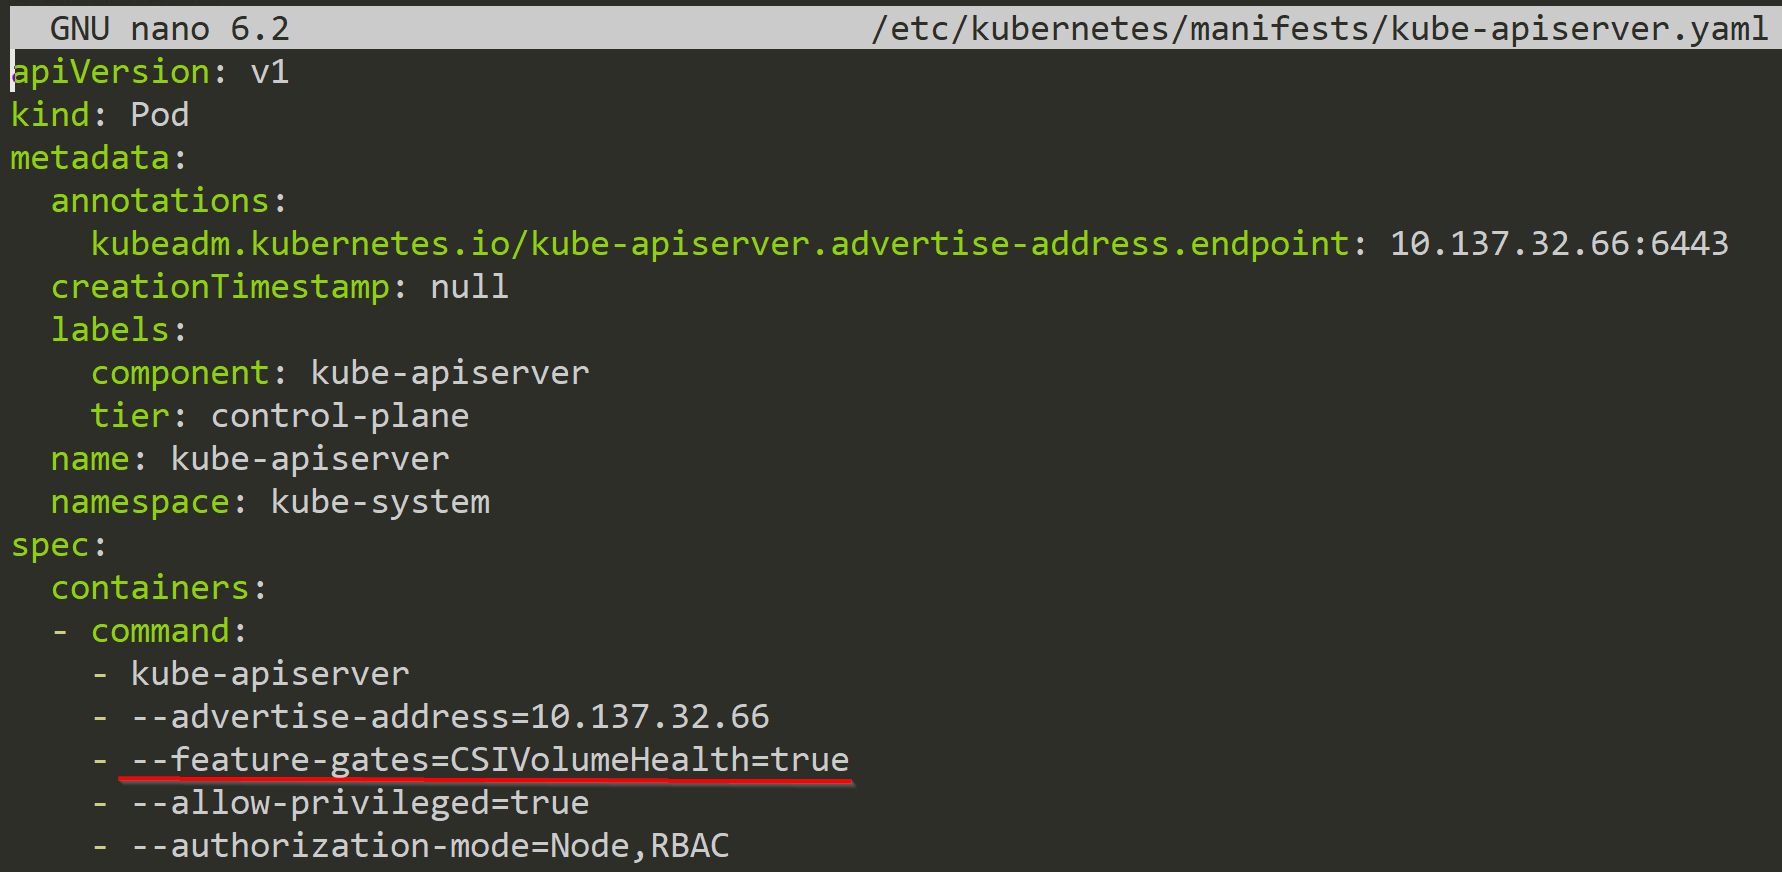
Below we can see the added Feature Gates to the kube-apiserver.
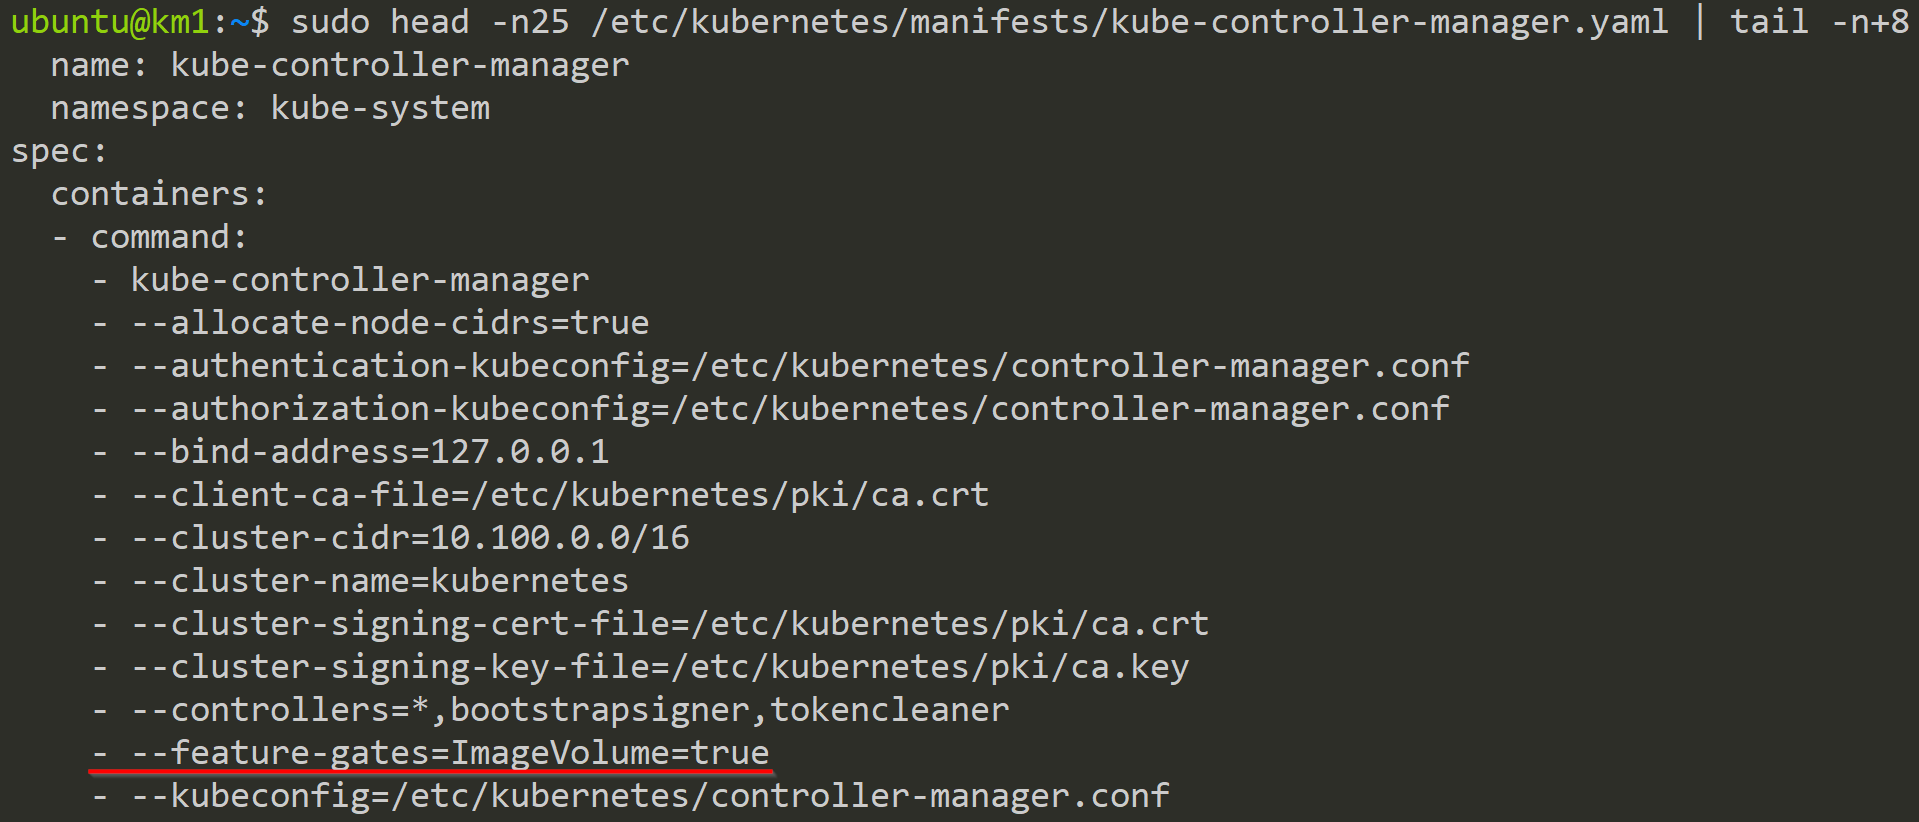
And here we can see the added Feature Gate to the kube-controller-manager.
Because we updated the kubeadm-config in the kube-system namespace, all future control plane nodes we add to this cluster will get this configuration.
How to enable a Feature Gate in the Cloud
Feature Gates in the cloud can be a bit more nuanced. Currently, Google Cloud Platform (GCP) with its Google Kubernetes Engine (GKE) offering provides ways to interact with Alpha and Beta Feature Gates. To enable Alpha Feature Gates in GKE, you generally need to create an Alpha Cluster. These clusters come with significant limitations, such as being automatically deleted after 30 days and not being recommended for production workloads (see GKE limitations in their documentation). For creation, you might use a command like gcloud container clusters create [CLUSTER_NAME] --enable-kubernetes-alpha --alpha-cluster-feature-gates=[FEATURE_GATE_NAME]=true. This --alpha-cluster-feature-gates flag allows for selective enablement, rather than all or nothing.
Azure with AKS has a feature request found here.
AWS with EKS has a feature request found here.
Conclusion
Feature Gates are an indispensable mechanism that underpins the stability, innovation, and controlled evolution of Kubernetes. By understanding how they work and their different states, you can not only appreciate the careful engineering behind Kubernetes but also leverage them effectively to explore new capabilities and manage your clusters with greater confidence. So, the next time you see a new Kubernetes feature emerge, remember the silent power of the Feature Gate, quietly unlocking possibilities in the world of container orchestration.
For further questions contact me at: blog@dominiklandau.de
or reach out to me on LinkedIn.