Kubernetes Part 1 - Installation
How to Install Kubernetes: A Step-by-Step Guide for Beginners
In this series, we will take a look at Kubernetes - how to install it and work with it. The first part will focus on the basics, such as a simple installation, and we will gradually dive deeper into the entire Kubernetes ecosystem.
Components
To install Kubernetes, we first need to understand the different components that need to be installed. Kubernetes has two different types of nodes:
- The Master Node, which is responsible for managing all incoming requests and delegating tasks to the Worker Nodes.
- The Worker Nodes, which are responsible for running the workloads.
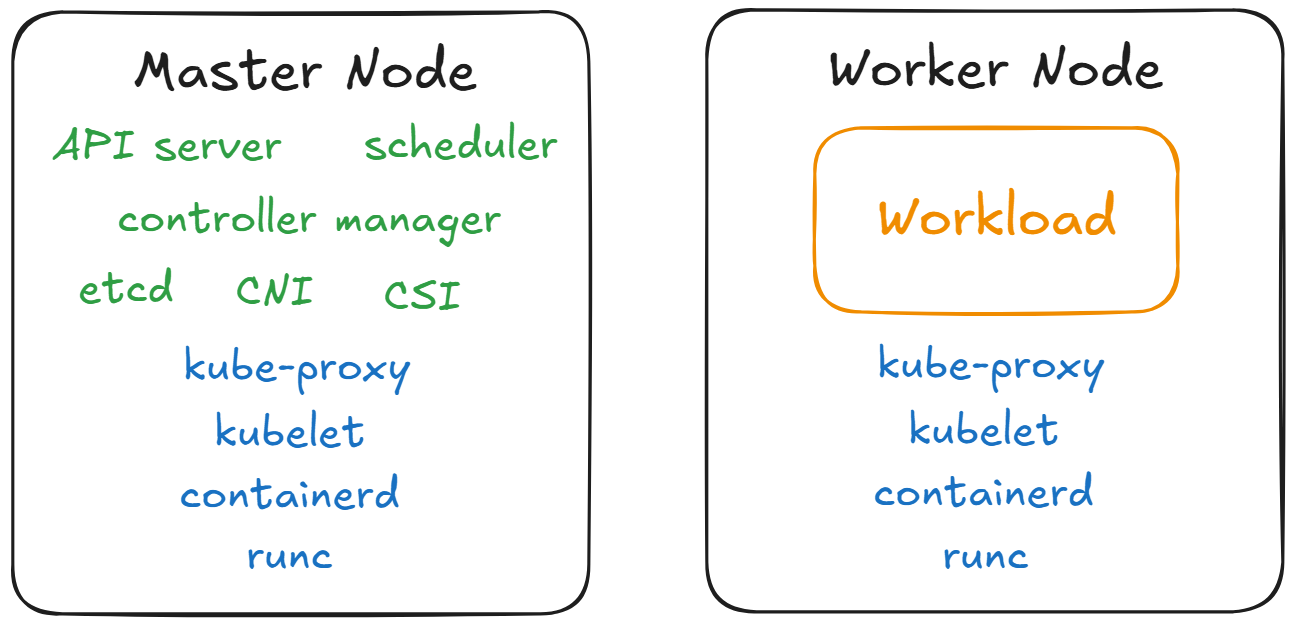
As we can see in the picture above, there are several components that need to be installed on both nodes:
- runc: A low-level container runtime responsible for starting and configuring containers.
- containerd: A high-level container runtime that downloads container images and passes them to runc.
- kubelet: A systemd service running on each node that sends requests for container creation to containerd.
- kube-proxy: A service that enables network communication within the cluster by configuring iptables rules. In some installations, this component is not necessary because networking is handled via eBPF.
For the Master Node, there are several additional components that need to be installed:
- API Server: The central management entity that handles all REST requests to the Kubernetes cluster.
- Controller Manager: Runs background processes that regulate the state of the cluster, such as node health checking, replication, and more.
- etcd: A distributed key-value store used to store all cluster data.
- Scheduler: Assigns newly created pods to available Worker Nodes based on resource availability and other constraints.
- CNI (Container Network Interface): Manages network configuration for containers and ensures that pods can communicate with each other.
- CSI (Container Storage Interface): Provides an abstraction for provisioning and managing storage resources used by pods.
Installation
Now that we understand all the components, we can proceed to install the required tools and set up a Kubernetes cluster. In this cluster, we will use kube-proxy for networking. In a future article, we will explore eBPF as a potential replacement for kube-proxy.
| Component | Version |
|---|---|
| Kubernetes | v1.31 |
| Calico | v3.29.1 |
| containerd | v2.0.0 |
| runc | v1.2.2 |
Prerequsits
Enable forwarding of ip packets
cat <<EOF | sudo tee /etc/sysctl.d/k8s.conf
net.ipv4.ip_forward = 1
net.ipv6.conf.all.forwarding = 1
EOF
Apply the changes
sudo sysctl --systemTurn swap off
sudo swapoff -a
sudo sed -ri '/\sswap\s/s/^#?/#/' /etc/fstab
Container Runtimes
In the next step we need to install the container runtimes.

containerd
Download containerd from GitHub and check the download
curl -LO https://github.com/containerd/containerd/releases/download/v2.0.0/containerd-2.0.0-linux-amd64.tar.gz
curl -LO https://github.com/containerd/containerd/releases/download/v2.0.0/containerd-2.0.0-linux-amd64.tar.gz.sha256sum
cat containerd-2.0.0-linux-amd64.tar.gz.sha256sum | sha256sum --check
Extract the content and save it to /usr/local/bin.
sudo tar Cxzvf /usr/local containerd-2.0.0-linux-amd64.tar.gz
Create a systemd service for containerd.
curl -LO https://raw.githubusercontent.com/containerd/containerd/main/containerd.service
sudo mkdir -p /usr/local/lib/systemd/system/
sudo mv containerd.service /usr/local/lib/systemd/system/containerd.service
Activate the new systemd service.
sudo systemctl daemon-reload
sudo systemctl enable --now containerd
Create a configuration for containerd.
sudo mkdir -p /etc/containerd
containerd config default | sudo tee /etc/containerd/config.toml
sudo sed -i -E "/containerd\.runtimes\.runc\.options]/a \ \ \ \ \ \ \ \ \ \ \ \ SystemdCgroup = true" /etc/containerd/config.toml
Apply the new configuration.
sudo systemctl restart containerd.service
Now there should be a running containerd service.
systemctl status containerd.serviceCheck if containerd works.
containerd -vrunc
Download runc and check the hash.
curl -LO https://github.com/opencontainers/runc/releases/download/v1.2.2/runc.amd64
curl -LO https://github.com/opencontainers/runc/releases/download/v1.2.2/runc.sha256sum
cat runc.sha256sum | grep runc.amd64 | sha256sum --check
Install runc under /usr/local/bin.
sudo install -m 755 runc.amd64 /usr/local/bin/runcCheck if it works.
runc -vInstall kubectl, kubeadm and kubelet
Add the necessary repositories.
sudo apt-get update
sudo apt-get install -y apt-transport-https ca-certificates curl gpg
sudo mkdir -p -m 755 /etc/apt/keyrings
curl -fsSL https://pkgs.k8s.io/core:/stable:/v1.31/deb/Release.key | sudo gpg --dearmor -o /etc/apt/keyrings/kubernetes-apt-keyring.gpg
echo 'deb [signed-by=/etc/apt/keyrings/kubernetes-apt-keyring.gpg] https://pkgs.k8s.io/core:/stable:/v1.31/deb/ /' | sudo tee /etc/apt/sources.list.d/kubernetes.list
Update the repositories.
sudo apt-get updateInstall the version v1.31 and disbale the upgrading of the packages.
sudo apt install -y kubectl=1.31* kubeadm=1.31* kubelet=1.31*
sudo apt-mark hold kubelet kubeadm kubectl
Enable the kubelet systemd service
sudo systemctl enable --now kubeletIf you check the kubelet systemd service with systemctl status kubelet, you will see that the service is not running. This is normal. In the next steps, we will run kubeadm to configure kubelet so that it can start and run properly.
Check the versions
kubectl version
kubeadm version
kubelet -v
Master Node
Now, there are some additional commands that need to be executed only on the Master Node. To create the cluster, we simply use kubeadm init, which will install all the required components and configure the system.
Initialize the Kubernetes cluster.
sudo kubeadm init --pod-network-cidr=10.100.0.0/16After some time, the cluster will be ready, and we can access it using the configuration file. Be mindful with the following command, as it will copy the configuration file of the Kubernetes admin user. This means every action we take will be performed as an administrator. For now, this is fine. In a later article, we will explore how to add users to the Kubernetes cluster.
Copy the kube-config file
mkdir -p $HOME/.kube
sudo cp -i /etc/kubernetes/admin.conf $HOME/.kube/config
sudo chown $(id -u):$(id -g) $HOME/.kube/config
Check the Cluster
kubectl get nodeNow, the Kubernetes cluster is ready... almost. You should see a Control-Plane Node in the "NotReady" state. Why is it not ready?
Check the Node events
kubectl describe node
As you can see from the events, there is a problem with CIDRNotAvailable. When using the kubeadm command, we set the CIDR range for the pods, but there is no entity that enforces this. The next step is to install a CNI (Container Networking Interface) plugin to enable proper networking and enforce the CIDR configuration.
CNI
A CNI is responsible for all network-related tasks, such as assigning IP addresses to nodes and pods. There is a fairly large list of different CNI providers to choose from.
Or you can create one yourselfe: CNI Spec
For this use case, we will use a quite popular CNI called Calico. In later articles, we will dive into different CNIs and their advantages, but for now, Calico is more than enough for our needs.
Install the Calico Operator.
kubectl create -f https://raw.githubusercontent.com/projectcalico/calico/v3.29.1/manifests/tigera-operator.yamlDownload the resources and change the Pod CIDR to the value we defined in the kubeadm init command above.
curl -LO https://raw.githubusercontent.com/projectcalico/calico/v3.29.1/manifests/custom-resources.yaml
sed -i 's/cidr: 192.168.0.0\/16/cidr: 10.100.0.0\/16/' custom-resources.yaml
kubectl apply -f custom-resources.yaml
After some time the Node should switch to the ready state.

Worker Node
The Worker Node should have the following installed: containerd, runc, kubectl, kubeadm, and kubelet. Also, don't forget to activate the kubelet systemd service. With these programs installed, we can now join the Worker Node to the Kubernetes cluster. To do this, create a join command on the Master Node.
Create join command on the Master Node.
kubeadm token create --print-join-commandThe command should look similar to the one below.
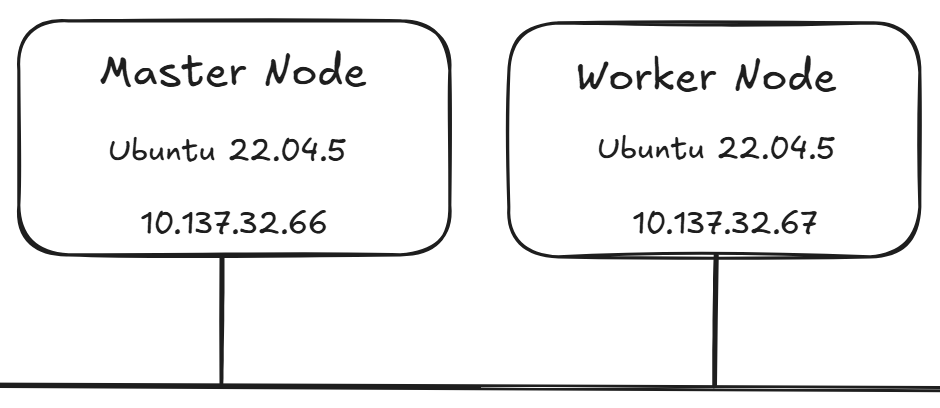
sudo kubeadm join 10.137.32.66:6443 --token d19chu.v7lauxot7qubk2se --discovery-token-ca-cert-hash sha256:5323f19089de5a4a0cd70e7662f6c991d157c6eafb8e9226ae60b7653d9764eaNow, execute this command on the Worker Node to join it to the cluster. Don’t forget to add sudo before the command, or else you’ll get an error. After a short while, you should have a fully functioning Kubernetes cluster.

Test the Cluster
In the last step, we can test if we are able to create a pod in our newly created cluster.
kubectl run tester --image=nginx
kubectl get pod
To delete the newly created pod run the following command.
kubectl delete pod testerCongratulations! We now have a fully functioning Kubernetes cluster to play with.
Next Article
In the following article, we will explore how to add a CSI (Container Storage Interface) to the cluster, enabling us to store data persistently across different Nodes. For now, we can only use the space on the Node directly with hostPath.
For further questions contact me at: blog@dominiklandau.de
or reach out to me on LinkedIn.