Kubernetes Part 2 - Storage, Volumes and CSI
After following the previous article, you should now have a running Kubernetes Cluster: Kubernetes Part 1. Now we will dive into the topic of storage and how to add persistent storage to our Pod in the Cluster.
Get Data into a Pod
Using storage, you can make data in a Pod persistent and save it. In Kubernetes, there is a volumes option in the definition of a Pod which allows mounting external data.
apiVersion: v1
kind: Pod
metadata:
  name: mypod
spec:
  containers:
  - name: nginx
    image: nginx
    volumeMounts:
    - name: myvol # internal name
      mountPath: /data
      readOnly: false
  volumes:
  - name: myvol # internal name
    <option from table below>
In the Pod definition above, there is an example of how to add data to a Pod. First, you need to define a volumes section and add a list of external resources like a Secret or a PersistentVolumeClaim. In addition, you also need to add a name to it which will be used in the volumesMounts option of the container.
There are a few different options for volumes to choose from. For a complete list, consult the official documentation. Below is a list of only the most important ones.
| Option | Description |
|---|---|
| persistentVolumeClaim | Working with PVC and PV |
| configMap | Mount ConfigMaps as volumes |
| secret | Mount Secrets as volumes |
| downwardAPI | Expose Pod field into the running container |
| projected | Group multiple volume sources into one |
| emptyDir | Temporary local volume to share data between container |
| hostPath | Mount a directory or file on the host |
| csi | Directly access the CSI driver |
Storage Concept
To use persistent storage in Kubernetes, which can be used from any Node, we need the concept of a PersistentVolume (PV) and a PersistentVolumeClaim (PVC). There are two ways to create these objects. With the manual mode, you need to create a PV, bind it to a PVC, and then add it to a Pod. The dynamic mode enables you to just define a PVC, and Kubernetes, with the help of a Container Storage Interface (CSI) provider, will do the rest.
Manual Mode
Kubernetes currently moves away from the manual creation of Persisten Volumes. Currently there are only six types available (csi, fc, hostPath, iscsi, local, nfs), which are not deprecated.
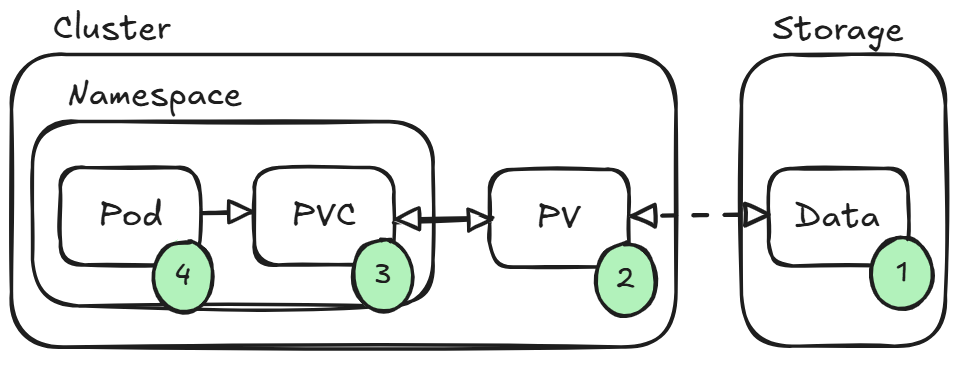
The picture above describes the steps to mount a Volume in a Pod. First, choose a storage solution and make it accessible for Kubernetes. In the next step, create a PersistentVolume which connects to the storage. After that, create a PersistentVolumeClaim and bind it to the newly created PV. As you can see in the picture, a PV is a cluster-wide resource, whereas a PVC is bound to a Namespace. When everything is set up, it is now possible to mount the PVC in the Pod.
Create a PV
Here we create a simple PV which uses the local options to mount a folder from a Kubernetes Node. For better control, the nodeSelectorTerms define the Nodes on which this PV can be created. You need to also connect to the selected Node and create the folder /mnt/pv-local.
apiVersion: v1
kind: PersistentVolume
metadata:
  name: pv-local
  labels:
    type: local
spec:
  storageClassName: manual # optinal
  capacity:
    storage: 1Gi
  accessModes:
    - ReadWriteOnce
  nodeAffinity:
    required:
      nodeSelectorTerms:
        - matchExpressions:
            - key: kubernetes.io/hostname
              operator: In
              values:
              - kn1
  local:
    path: "/mnt/pv-local"
Bind the PV to a PVC
To use a PV in a Pod, we need to bind it to a PVC. In this case, we need to define the correct storageClassName and volumeName.
apiVersion: v1
kind: PersistentVolumeClaim
metadata:
  name: pvc-local
  namespace: default
spec:
  storageClassName: manual
  volumeName: pv-local
  accessModes:
  - ReadWriteOnce
  resources:
    requests:
      storage: 1Gi
PVC in a Pod
To use a PVC in a Pod, use the definition below. Don't forget to create the /mnt/pv-local folder on the Node or else the Pod wont start.
apiVersion: v1
kind: Pod
metadata:
  name: pod-local-pv
spec:
  containers:
  - name: nginx
    image: nginx
    volumeMounts:
    - name: vol1
      mountPath: /data
  volumes:
  - name: vol1
    persistentVolumeClaim:
      claimName: pvc-local
Dynamic Mode
As you can see, with the manual mode there are a lot of steps to get a PV into a Pod. To simplify this whole process, we will use a CSI plugin. This plugin will manage the configuration and creation of the PVs. We only need the right CSI plugin for the storage we want to use. Here is the official GitHub repository with all available plugins.
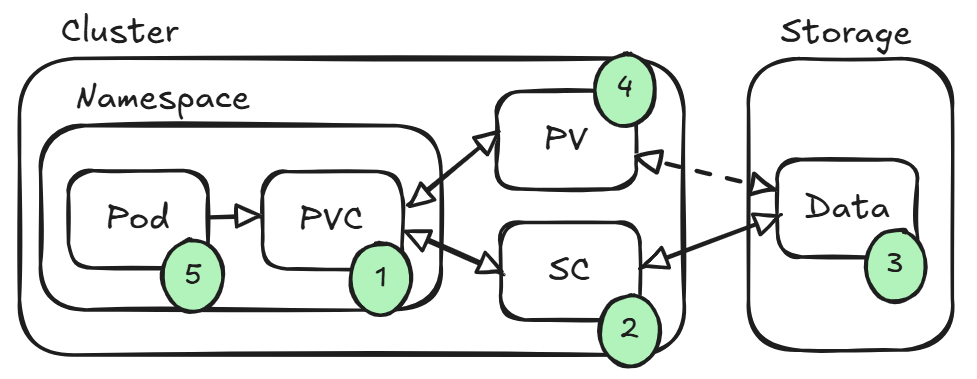
The picture above shows the steps with a CSI plugin. Here, we need to create a PVC and assign a StorageClass (SC) to it. The SC will hold the definition of the storage we want to access and use. The CSI controller in the background will configure the storage and automatically create and bind the PV to the PVC. So, after creating a PVC, we only need to add it to the Pod.
Install NFS CSI
In our example, we will create an additional server and use it as an NFS server. With the csi-nfs-driver, we can use this server directly in our Kubernetes Cluster.
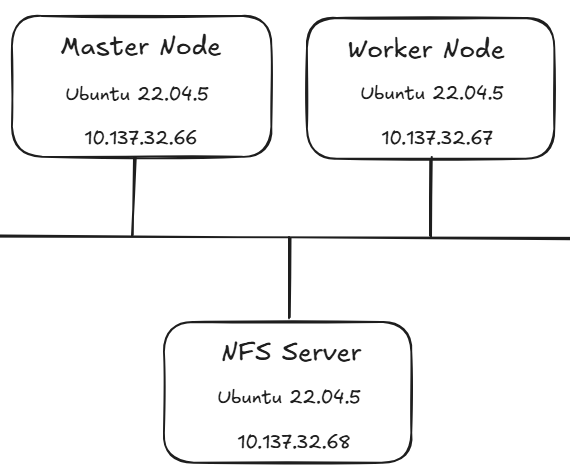
Configure the NFS Server
Install the nfs package for the NFS server.
sudo apt update
sudo apt install nfs-kernel-server
Create a directory for storing the data.
sudo mkdir /var/nfs/kubernetes -p
sudo chown nobody:nogroup /var/nfs/kubernetes
Define the paths which should be exported via the NFS server.
sudo nano /etc/exportsAdd the following line to the exports file.
/var/nfs/kubernetes *(rw,sync,subtree_check,no_root_squash)Restart the systemd service and export the path. The systemd servcies doesn't need to run, it only needs to exit successfully
sudo systemctl restart nfs-kernel-server
sudo systemctl status nfs-kernel-server

sudo exportfs -a
Configure Kubernetes
Install the NFS CSI plugin into the Kubernetes Cluster via Helm.
helm repo add csi-driver-nfs https://raw.githubusercontent.com/kubernetes-csi/csi-driver-nfs/master/charts
helm repo update
helm install csi-driver-nfs csi-driver-nfs/csi-driver-nfs --namespace nfs --version 4.11.0 --create-namespaceAfter some time alle the components should be up and running.
kubectl --namespace=nfs get pods --selector="app.kubernetes.io/instance=csi-driver-nfs" --watchCreate a StorageClass
To use the CSI we need to define a SC which will hold the configuration. The important configuration is under paramaters, here you need to set the right server and share.
To use the CSI, we need to define an SC which will hold the configuration. The important configuration is under parameters. Here, you need to set the correct server and share.
apiVersion: storage.k8s.io/v1
kind: StorageClass
metadata:
  name: nfs-csi
  annotations:
    storageclass.kubernetes.io/is-default-class: "true"
provisioner: nfs.csi.k8s.io
parameters:
  server: 10.137.32.68
  share: /var/nfs/kubernetes
reclaimPolicy: Delete
volumeBindingMode: Immediate
allowVolumeExpansion: true
mountOptions:
  - nfsvers=4.1
After applying the configuration there should be a new StorageClass available.

Create a PVC
With the creation of the SC, we can now create a PVC which references the SC in the storageClassName option.
apiVersion: v1
kind: PersistentVolumeClaim
metadata:
  name: pvc-nfs-dynamic
  namespace: default
spec:
  accessModes:
    - ReadWriteMany
  resources:
    requests:
      storage: 10Gi
  storageClassName: nfs-csi
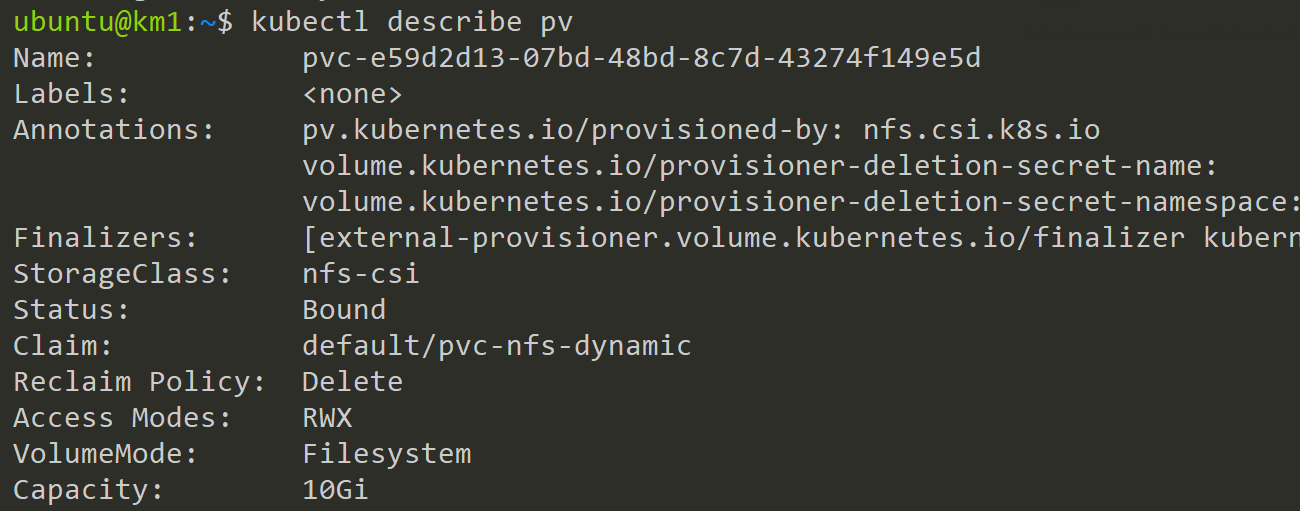
When applying the configuration a new PVC will be created which is automatically bound to a PV.

The automatically created PV.
If you connect to the NFS server you can see a folder with the same name as the PV.

Add the PVC to a Pod
In the example below, we will create a new Pod which will simply create a new file in the mounted storage. After the execution of the command, the Pod will crash.
apiVersion: v1
kind: Pod
metadata:
  name: pod-nfs-pvc
spec:
  containers:
  - name: nginx
    image: nginx
    command: ['sh', '-c', 'echo "Hello" > /data/myfile.txt']
    volumeMounts:
    - name: vol1
      mountPath: /data
  volumes:
  - name: vol1
    persistentVolumeClaim:
      claimName: pvc-nfs-dynamic
If you connect to the NFS server you can see the newly created file.

I hope you now have a general understanding about stroage in Kubernetes.
Next Article
In the following article, we will explore users in Kubernetes and how to manage these. Currently we only work with our Admin Kubeconfig.
For further questions contact me at: blog@dominiklandau.de
or reach out to me on LinkedIn.