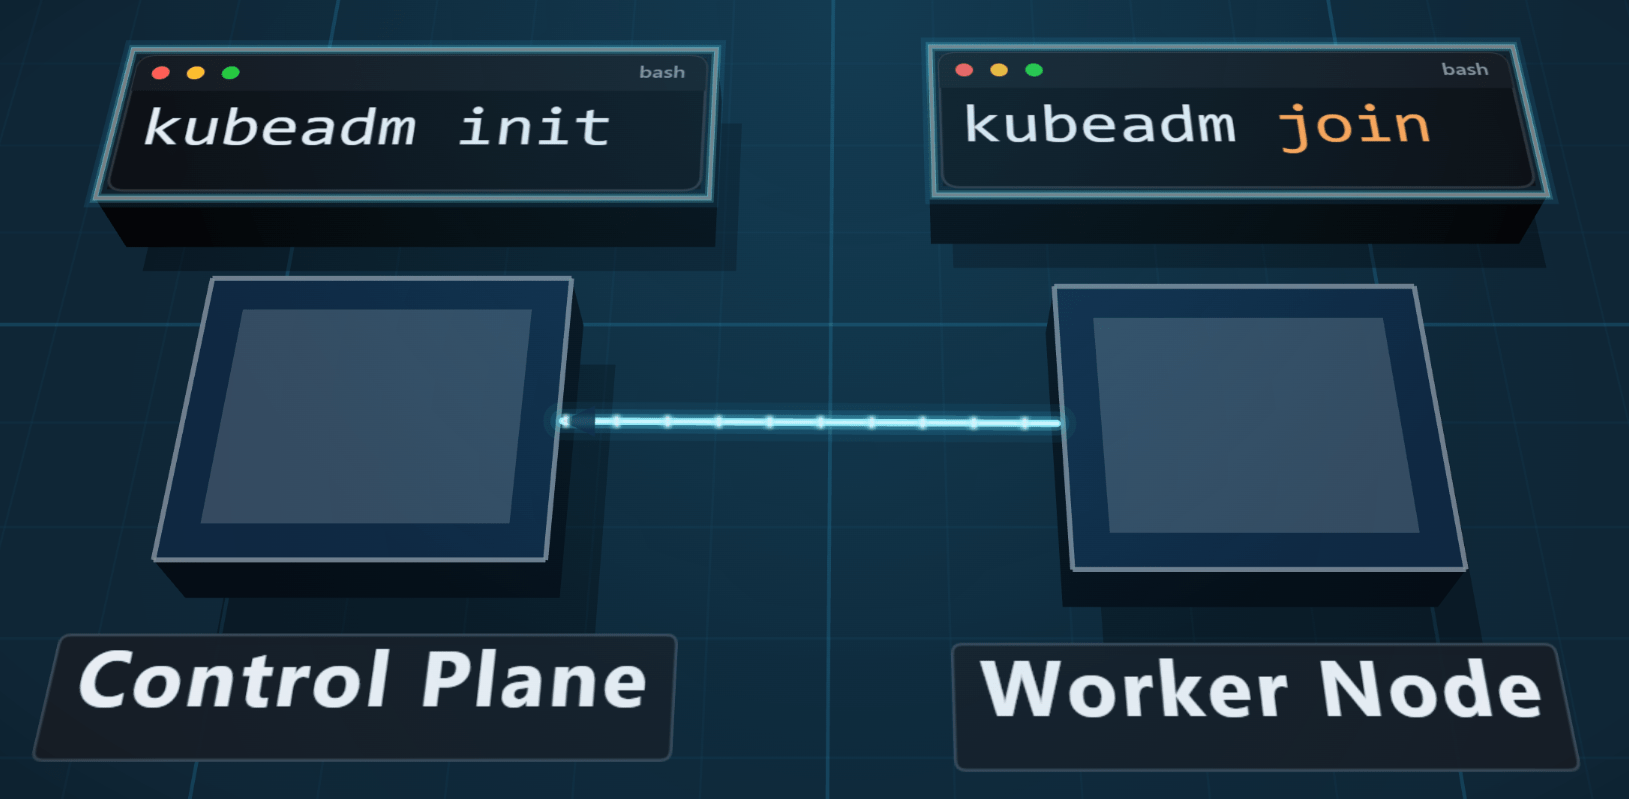
In this series, we will take a look at Kubernetes – how to install it and work with it. The first part will focus on the basics, such as a simple installation, and we will gradually dive deeper into the entire Kubernetes ecosystem.
Components
To install Kubernetes, we first need to understand the different components that need to be presend. On the top level Kubernetes has two different types of nodes:
- Control Plane (Master Node): Responsible for managing all incoming requests and delegating tasks to the Worker Nodes.
- Worker Nodes: Responsible for running the workloads.
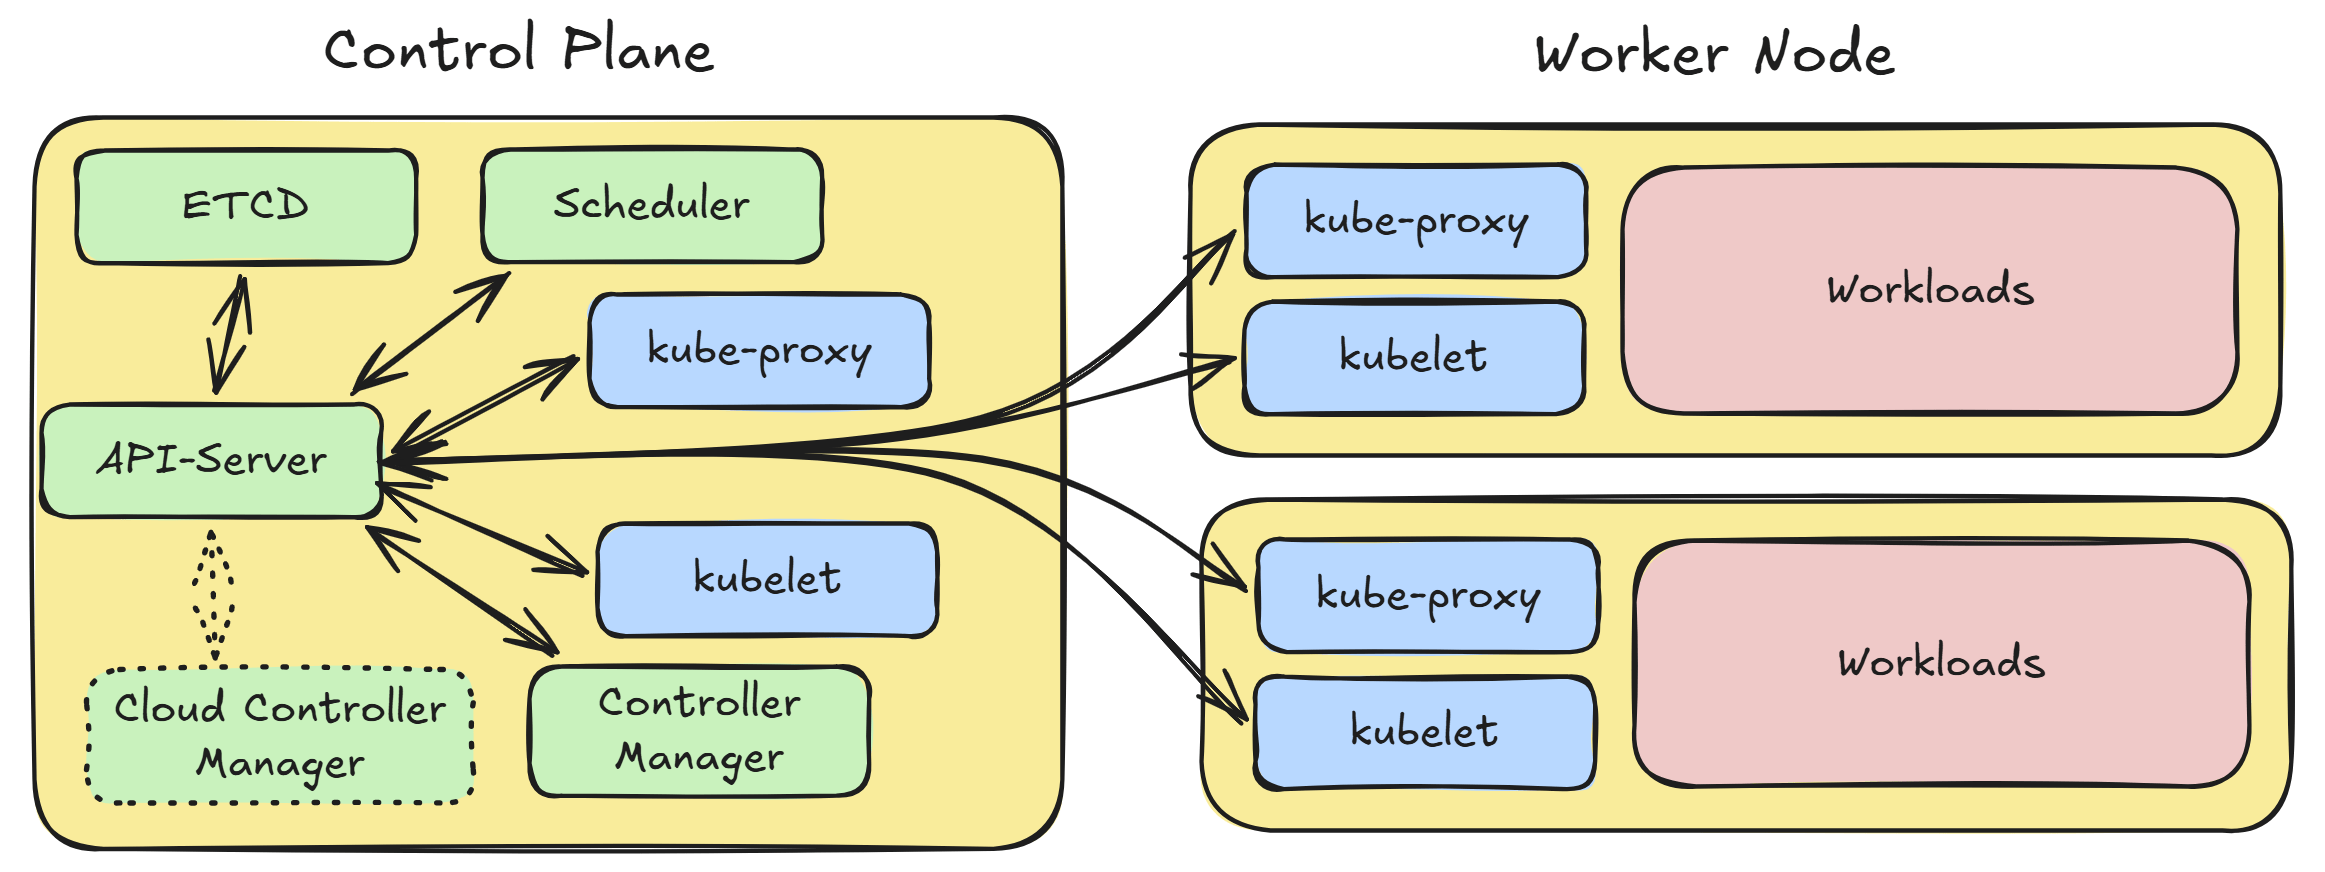
As we can see in the picture above, there are two components (blue) that need to be installed on both nodes:
- kubelet: A systemd service running on each node that is responsible for creating container.
- kube-proxy: A Pod on each node that enables service-level networking within the cluster by configuring iptables rules. In some configurations, this component can be replaced by eBPF.
For the Control Plane there are four additional components needed:
- API Server: The central management entity that handles all REST requests to the Kubernetes cluster.
- Controller Manager: Runs background processes that regulate the state of the cluster, such as node health checking, replication, and more.
- ETCD: A distributed key-value store used to store all cluster data.
- Scheduler: Assigns newly created pods to available Worker Nodes based on resource availability and other constraints.
- (Optional) Cloud Controller Manager: Only needed in cloud environments. Connects the cluster to the cloud API to create objects like a load balancer.
Kubernetes Releases
---
config:
  themeCSS: |
    .tick text {
      transform: rotate(-45deg);
      text-anchor: end !important;
    }
    rect[id*=k8s] {
        fill: green !important;
        stroke: #06ae09ff !important;
    }
    text[id*=k8s] {
        fill: white !important;
    }
---
%%{init: {'securityLevel': 'loose'}}%%
gantt
    title Kubernetes Releases
    dateFormat YYYY-MM-DD
    todayMarker stroke-width:3px,stroke:orange,opacity:0.95

    section v1.33
        Kubernetes v1.33: done, v133, 2025-04-23, 2026-06-28

    section v1.34
        Kubernetes v1.34: crit, v134, 2025-08-27, 2026-10-27

    section v1.35
        Kubernetes v1.35: active, k8s, 2025-12-17, 2027-02-28

    section v1.36
        Kubernetes v1.36: active, k8s, 2026-04-22, 2027-06-28

    section v1.37
        Kubernetes v1.37: active, k8s, 2026-08-26, 2027-10-26
Installation v1.33
Now with all the components introduced, we can create a Kubernetes cluster. In this cluster, we will use kube-proxy for networking. In a future article, we will explore eBPF as a potential replacement for the kube-proxy.
For the installation we use the following versions of the different components:
| Component | Version |
|---|---|
| Linux Kernel | 6.8.0-1064-azure |
| Ubuntu | 22.04.5 LTS |
| Kubernetes | v1.33 |
| Calico | v3.30.0 |
| containerd | v2.0.0 |
| runc | v1.3.2 |
Prerequsits
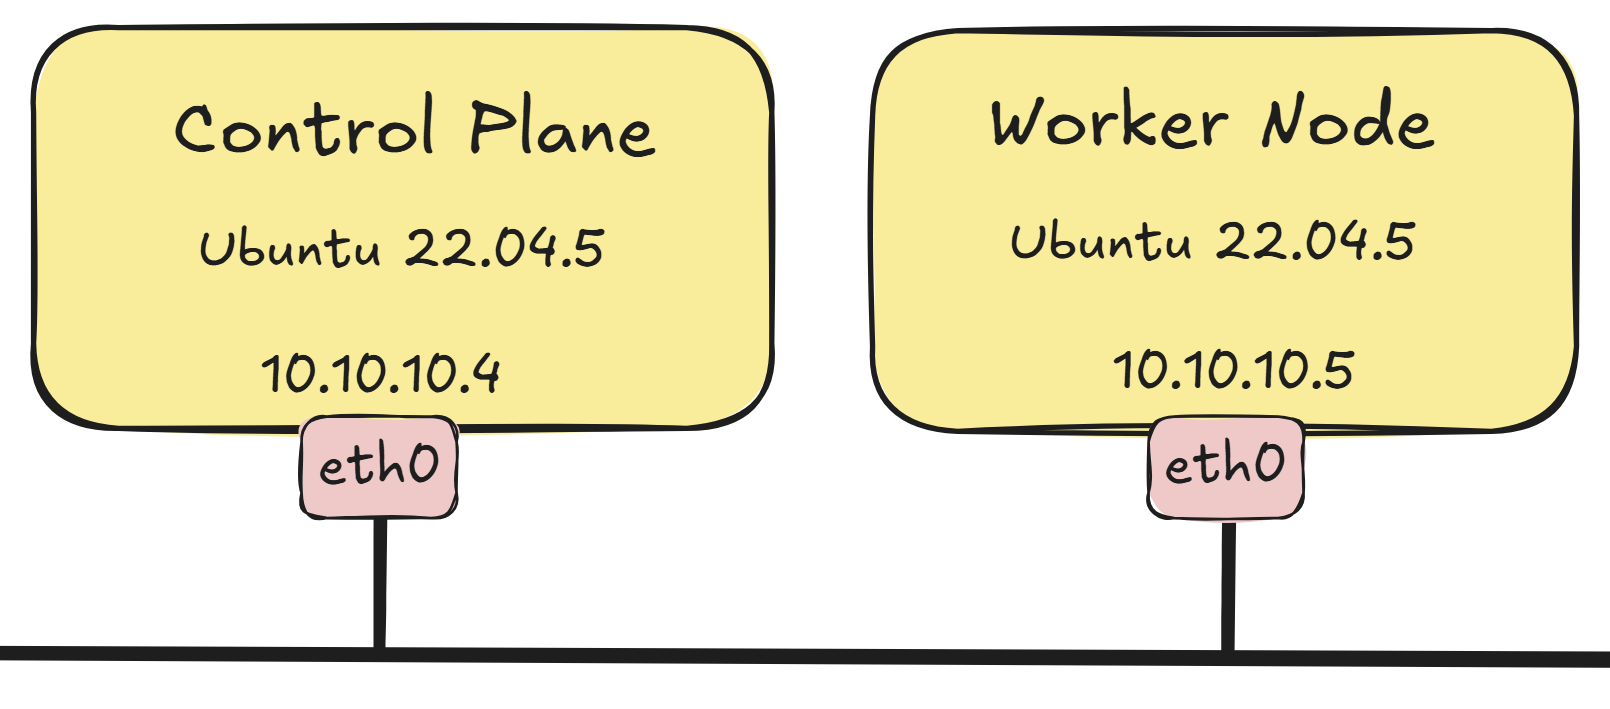
To create a Kubernetes cluster we need two Linux VMs. Here these are two Ubuntu VMs which are connected via their interface eth0. Resource wise we use 2 vCPUs and 4GB RAM.
Enable forwarding of ip packets
To allow the forwarding of packets for the Pods need to enable it via sysctl.
cat <<EOF | sudo tee /etc/sysctl.d/k8s.conf
net.ipv4.ip_forward = 1
net.ipv6.conf.all.forwarding = 1
EOFApply the changes done in the file.
sudo sysctl --systemThe output should show the applied changes.
dominik@cp:~$ sudo sysctl --system
...
* Applying /etc/sysctl.d/k8s.conf ...
net.ipv4.ip_forward = 1
net.ipv6.conf.all.forwarding = 1
* Applying /etc/sysctl.conf ...Turn swap off
Now we need to turn the swap off or else the kubelet wont start.
sudo swapoff -a
sudo sed -ri '/\sswap\s/s/^#?/#/' /etc/fstabContainer Runtimes
The kubelet itself can’t create container, so we need the container runtimes to create them. In this case we install containerd and runc, which are generally the default. If OpenShift is used then these would be replaced by CRI-O.
- runc: A low-level container runtime responsible for starting and configuring the cgroups for the containers.
- containerd: A high-level container runtime that downloads and manages container images and passes them to runc to create container.

containerd
Download containerd from GitHub and check the binary.
curl -LO https://github.com/containerd/containerd/releases/download/v2.0.0/containerd-2.0.0-linux-amd64.tar.gz
curl -LO https://github.com/containerd/containerd/releases/download/v2.0.0/containerd-2.0.0-linux-amd64.tar.gz.sha256sum
cat containerd-2.0.0-linux-amd64.tar.gz.sha256sum | sha256sum --checkThere should be an output with the value OK.
dominik@cp:~$ cat containerd-2.0.0-linux-amd64.tar.gz.sha256sum | sha256sum --check
containerd-2.0.0-linux-amd64.tar.gz: OKExtract the content and save it to /usr/local/bin.
sudo tar Cxzvf /usr/local containerd-2.0.0-linux-amd64.tar.gzCreate a systemd service for containerd.
curl -LO https://raw.githubusercontent.com/containerd/containerd/main/containerd.service
sudo mkdir -p /usr/local/lib/systemd/system/
sudo mv containerd.service /usr/local/lib/systemd/system/containerd.serviceActivate the new systemd service.
sudo systemctl daemon-reload
sudo systemctl enable --now containerd
systemctl status containerd.serviceContainerd should now run.
dominik@cp:~$ systemctl status containerd.service
● containerd.service - containerd container runtime
Loaded: loaded (/usr/local/lib/systemd/system/containerd.service; enabled; vendor preset: enabled)
Active: active (running) since Sun 2025-08-09 12:25:00 UTC; 3s ago
Docs: https://containerd.io
Process: 2091 ExecStartPre=/sbin/modprobe overlay (code=exited, status=0/SUCCESS)
Main PID: 2092 (containerd)
Tasks: 8
Memory: 13.6M
CPU: 79ms
CGroup: /system.slice/containerd.service
└─2092 /usr/local/bin/containerdCreate a configuration for containerd.
sudo mkdir -p /etc/containerd
containerd config default | sudo tee /etc/containerd/config.toml
sudo sed -e 's/SystemdCgroup = false/SystemdCgroup = true/g' -i /etc/containerd/config.tomlApply the new configuration.
sudo systemctl restart containerd.serviceCheck if containerd works.
containerd -vYou should get an output which shows the version v2.0.0.
dominik@cp:~$ containerd -v
containerd github.com/containerd/containerd/v2 v2.0.0 207ad711eabd375a01713109a8a197d197ff6542runc
Download runc and check the hash of the binary.
curl -LO https://github.com/opencontainers/runc/releases/download/v1.3.2/runc.amd64
curl -LO https://github.com/opencontainers/runc/releases/download/v1.3.2/runc.sha256sum
cat runc.sha256sum | grep runc.amd64 | sha256sum --checkThere should be an output with the value OK.
dominik@cp:~$ cat runc.sha256sum | grep runc.amd64 | sha256sum --check
runc.amd64: OKInstall runc under /usr/local/bin.
sudo install -m 755 runc.amd64 /usr/local/bin/runcCheck if it works.
runc -vYou should get an output which shows the version 1.3.2.
dominik@cp:~$ runc -v
runc version 1.3.2
commit: v1.3.2-0-gaeabe4e7
spec: 1.2.1
go: go1.23.12
libseccomp: 2.5.6Install kubectl, kubeadm and kubelet
Add the Kubernetes repository with the version v1.33.
sudo apt-get update
sudo apt-get install -y apt-transport-https ca-certificates curl gpg conntrack
sudo mkdir -p -m 755 /etc/apt/keyrings
curl -fsSL https://pkgs.k8s.io/core:/stable:/v1.33/deb/Release.key | sudo gpg --dearmor -o /etc/apt/keyrings/kubernetes-apt-keyring.gpg
echo 'deb [signed-by=/etc/apt/keyrings/kubernetes-apt-keyring.gpg] https://pkgs.k8s.io/core:/stable:/v1.33/deb/ /' | sudo tee /etc/apt/sources.list.d/kubernetes.listUpdate the repository.
sudo apt-get updateYou should get an output which shows the new Kubernetes repo.
dominik@cp:~$ sudo apt-get update
Hit:1 http://azure.archive.ubuntu.com/ubuntu jammy InRelease
Hit:2 http://azure.archive.ubuntu.com/ubuntu jammy-updates InRelease
Hit:3 http://azure.archive.ubuntu.com/ubuntu jammy-backports InRelease
Hit:4 http://azure.archive.ubuntu.com/ubuntu jammy-security InRelease
Get:5 https://prod-cdn.packages.k8s.io/repositories/isv:/kubernetes:/core:/stable:/v1.33/deb InRelease [1233 B]
Get:6 https://prod-cdn.packages.k8s.io/repositories/isv:/kubernetes:/core:/stable:/v1.33/deb Packages [18.7 kB]
Fetched 19.9 kB in 1s (38.3 kB/s)
Reading package lists... DoneWith the command “apt-cache madison kubelet” you can see all the available versions for the kubelet.
dominik@cp:~$ apt-cache madison kubelet
kubelet | 1.33.13-1.1 | https://pkgs.k8s.io/core:/stable:/v1.33/deb Packages
kubelet | 1.33.12-1.1 | https://pkgs.k8s.io/core:/stable:/v1.33/deb Packages
kubelet | 1.33.11-1.1 | https://pkgs.k8s.io/core:/stable:/v1.33/deb Packages
kubelet | 1.33.10-1.1 | https://pkgs.k8s.io/core:/stable:/v1.33/deb Packages
kubelet | 1.33.9-1.1 | https://pkgs.k8s.io/core:/stable:/v1.33/deb Packages
kubelet | 1.33.8-1.1 | https://pkgs.k8s.io/core:/stable:/v1.33/deb Packages
kubelet | 1.33.7-1.1 | https://pkgs.k8s.io/core:/stable:/v1.33/deb Packages
kubelet | 1.33.6-1.1 | https://pkgs.k8s.io/core:/stable:/v1.33/deb Packages
kubelet | 1.33.5-1.1 | https://pkgs.k8s.io/core:/stable:/v1.33/deb Packages
kubelet | 1.33.4-1.1 | https://pkgs.k8s.io/core:/stable:/v1.33/deb Packages
kubelet | 1.33.3-1.1 | https://pkgs.k8s.io/core:/stable:/v1.33/deb Packages
kubelet | 1.33.2-1.1 | https://pkgs.k8s.io/core:/stable:/v1.33/deb Packages
kubelet | 1.33.1-1.1 | https://pkgs.k8s.io/core:/stable:/v1.33/deb Packages
kubelet | 1.33.0-1.1 | https://pkgs.k8s.io/core:/stable:/v1.33/deb PackagesIn our case we don’t want a specific patch version so we use the * to install the latest version. Additionally we hold the programms, so that these can’t be upgraded.
sudo apt install -y kubectl=1.33* kubeadm=1.33* kubelet=1.33*
sudo apt-mark hold kubelet kubeadm kubectlLatest version gets installed.
dominik@cp:~$ sudo apt install -y kubectl=1.33* kubeadm=1.33* kubelet=1.33*
sudo apt-mark hold kubelet kubeadm kubectl
Reading package lists... Done
Building dependency tree... Done
Reading state information... Done
Selected version '1.33.13-1.1' (isv:kubernetes:core:stable:v1.33:pkgs.k8s.io [amd64]) for 'kubectl'
Selected version '1.33.13-1.1' (isv:kubernetes:core:stable:v1.33:pkgs.k8s.io [amd64]) for 'kubeadm'
Selected version '1.33.13-1.1' (isv:kubernetes:core:stable:v1.33:pkgs.k8s.io [amd64]) for 'kubelet'Enable the kubelet systemd service
sudo systemctl enable --now kubeletIf you check the kubelet systemd service with systemctl status kubelet, you will see that the service is not running. This is normal. In the next steps, we will run kubeadm to configure kubelet so that it can start and run properly.
dominik@cp:~$ systemctl status kubelet.service
● kubelet.service - kubelet: The Kubernetes Node Agent
Loaded: loaded (/lib/systemd/system/kubelet.service; enabled; vendor preset: enabled)
Drop-In: /usr/lib/systemd/system/kubelet.service.d
└─10-kubeadm.conf
Active: activating (auto-restart) (Result: exit-code) since Sun 2025-08-09 12:47:11 UTC; 9s ago
Docs: https://kubernetes.io/docs/
Process: 3410 ExecStart=/usr/bin/kubelet $KUBELET_KUBECONFIG_ARGS $KUBELET_CONFIG_ARGS $KUBELET_KUBEADM_ARGS $KUBELET_EXTRA_ARGS (code=exited, status=1/>
Main PID: 3410 (code=exited, status=1/FAILURE)
CPU: 46msCheck the versions
kubectl version
kubeadm version
kubelet --versionAll the right versions should be installed.
dominik@cp:~$ kubectl version
kubeadm version
kubelet --version
Client Version: v1.33.13
Kustomize Version: v5.6.0
The connection to the server 10.10.10.4:6443 was refused - did you specify the right host or port?
kubeadm version: &version.Info{Major:"1", Minor:"33", EmulationMajor:"", EmulationMinor:"", MinCompatibilityMajor:"", MinCompatibilityMinor:"", GitVersion:"v1.33.13", GitCommit:"c029d48d28322ad0369aabdcf8b656fd3195cd30", GitTreeState:"clean", BuildDate:"2026-06-11T17:01:21Z", GoVersion:"go1.25.11", Compiler:"gc", Platform:"linux/amd64"}
Kubernetes v1.33.13Controle Plane
Now, there are some additional commands which only need to be executed on the Control Plane. To create the cluster, we simply use kubeadm init to install all the required components and configure the system.
Initialize the Kubernetes cluster.
sudo kubeadm init --pod-network-cidr=10.100.0.0/16The kubeadm init command should provide output like below.
dominik@cp:~$ sudo kubeadm init --pod-network-cidr=10.100.0.0/16
I0811 20:55:48.769346 332630 version.go:261] remote version is much newer: v1.34.3; falling back to: stable-1.33
[init] Using Kubernetes version: v1.33.13
[preflight] Running pre-flight checks
[preflight] Pulling images required for setting up a Kubernetes cluster
[preflight] This might take a minute or two, depending on the speed of your internet connection
[preflight] You can also perform this action beforehand using 'kubeadm config images pull'
[certs] Using certificateDir folder "/etc/kubernetes/pki"
[certs] Generating "ca" certificate and key
[certs] Generating "apiserver" certificate and key
[certs] apiserver serving cert is signed for DNS names [cp kubernetes kubernetes.default kubernetes.default.svc kubernetes.default.svc.cluster.local] and IPs [10.96.0.1 10.10.10.4]
[certs] Generating "apiserver-kubelet-client" certificate and key
[certs] Generating "front-proxy-ca" certificate and key
[certs] Generating "front-proxy-client" certificate and key
[certs] Generating "etcd/ca" certificate and key
[certs] Generating "etcd/server" certificate and key
[certs] etcd/server serving cert is signed for DNS names [cp localhost] and IPs [10.10.10.4 127.0.0.1 ::1]
[certs] Generating "etcd/peer" certificate and key
[certs] etcd/peer serving cert is signed for DNS names [cp localhost] and IPs [10.10.10.4 127.0.0.1 ::1]
[certs] Generating "etcd/healthcheck-client" certificate and key
[certs] Generating "apiserver-etcd-client" certificate and key
[certs] Generating "sa" key and public key
[kubeconfig] Using kubeconfig folder "/etc/kubernetes"
[kubeconfig] Writing "admin.conf" kubeconfig file
[kubeconfig] Writing "super-admin.conf" kubeconfig file
[kubeconfig] Writing "kubelet.conf" kubeconfig file
[kubeconfig] Writing "controller-manager.conf" kubeconfig file
[kubeconfig] Writing "scheduler.conf" kubeconfig file
[etcd] Creating static Pod manifest for local etcd in "/etc/kubernetes/manifests"
[control-plane] Using manifest folder "/etc/kubernetes/manifests"
[control-plane] Creating static Pod manifest for "kube-apiserver"
[control-plane] Creating static Pod manifest for "kube-controller-manager"
[control-plane] Creating static Pod manifest for "kube-scheduler"
[kubelet-start] Writing kubelet environment file with flags to file "/var/lib/kubelet/kubeadm-flags.env"
[kubelet-start] Writing kubelet configuration to file "/var/lib/kubelet/config.yaml"
[kubelet-start] Starting the kubelet
[wait-control-plane] Waiting for the kubelet to boot up the control plane as static Pods from directory "/etc/kubernetes/manifests"
[kubelet-check] Waiting for a healthy kubelet at http://127.0.0.1:10248/healthz. This can take up to 4m0s
[kubelet-check] The kubelet is healthy after 5.175219ms
[control-plane-check] Waiting for healthy control plane components. This can take up to 4m0s
[control-plane-check] Checking kube-apiserver at https://10.10.10.4:6443/livez
[control-plane-check] Checking kube-controller-manager at https://127.0.0.1:10257/healthz
[control-plane-check] Checking kube-scheduler at https://127.0.0.1:10259/livez
[control-plane-check] kube-controller-manager is healthy after 7.575672ms
[control-plane-check] kube-scheduler is healthy after 9.500212ms
[control-plane-check] kube-apiserver is healthy after 3.001635598s
[upload-config] Storing the configuration used in ConfigMap "kubeadm-config" in the "kube-system" Namespace
[kubelet] Creating a ConfigMap "kubelet-config" in namespace kube-system with the configuration for the kubelets in the cluster
[upload-certs] Skipping phase. Please see --upload-certs
[mark-control-plane] Marking the node cp as control-plane by adding the labels: [node-role.kubernetes.io/control-plane node.kubernetes.io/exclude-from-external-load-balancers]
[mark-control-plane] Marking the node cp as control-plane by adding the taints [node-role.kubernetes.io/control-plane:NoSchedule]
[bootstrap-token] Using token: rnofat.93z9tajqj8i23jz6
[bootstrap-token] Configuring bootstrap tokens, cluster-info ConfigMap, RBAC Roles
[bootstrap-token] Configured RBAC rules to allow Node Bootstrap tokens to get nodes
[bootstrap-token] Configured RBAC rules to allow Node Bootstrap tokens to post CSRs in order for nodes to get long term certificate credentials
[bootstrap-token] Configured RBAC rules to allow the csrapprover controller automatically approve CSRs from a Node Bootstrap Token
[bootstrap-token] Configured RBAC rules to allow certificate rotation for all node client certificates in the cluster
[bootstrap-token] Configured RBAC rules to allow the API server kubelet client certificate to access the kubelet API
[bootstrap-token] Creating the "cluster-info" ConfigMap in the "kube-public" namespace
[kubelet-finalize] Updating "/etc/kubernetes/kubelet.conf" to point to a rotatable kubelet client certificate and key
[addons] Applied essential addon: CoreDNS
[addons] Applied essential addon: kube-proxy
Your Kubernetes control-plane has initialized successfully!
To start using your cluster, you need to run the following as a regular user:
mkdir -p $HOME/.kube
sudo cp -i /etc/kubernetes/admin.conf $HOME/.kube/config
sudo chown $(id -u):$(id -g) $HOME/.kube/config
Alternatively, if you are the root user, you can run:
export KUBECONFIG=/etc/kubernetes/admin.conf
You should now deploy a pod network to the cluster.
Run "kubectl apply -f [podnetwork].yaml" with one of the options listed at:
https://kubernetes.io/docs/concepts/cluster-administration/addons/
Then you can join any number of worker nodes by running the following on each as root:
kubeadm join 10.10.10.4:6443 --token rnofat.93z9tajqj8i23jz6 \
--discovery-token-ca-cert-hash sha256:6635bc2ccc202c3ea486657163262e8e5c9fd33d24c180d7d45b7600f0920ffbAfter some time, the cluster will be ready, and we can access it using the configuration file. Be mindful with the following commands, as it will copy the configuration file of the Kubernetes admin user. This means every action we take will be performed as an administrator. For now, this is fine. In a later article, we will explore how to add users to the Kubernetes cluster.
Copy the kube-config file.
mkdir -p $HOME/.kube
sudo cp -i /etc/kubernetes/admin.conf $HOME/.kube/config
sudo chown $(id -u):$(id -g) $HOME/.kube/configCheck the Cluster connection
kubectl get nodeIf everything is configured correctly you should see some output.
dominik@cp:~$ kubectl get node
NAME STATUS ROLES AGE VERSION
cp NotReady control-plane 97s v1.33.13Now, the Kubernetes cluster is ready… almost. You should see a Control-Plane Node in the “NotReady” state. Why is it not ready?
Check the Node events
kubectl get event | grep CIDRAs you can see from the events, there is a problem with CIDRNotAvailable. When using the kubeadm command, we set the CIDR range for the Pods, but there is no entity that enforces this.
dominik@cp:~$ kubectl get event | grep CIDR
66s Normal CIDRNotAvailable node/cp Node cp status is now: CIDRNotAvailableTo solve this problem we need to install a CNI (Container Networking Interface) plugin to enable proper networking and enforce the CIDR configuration.
CNI
A CNI is responsible for all Pod-to-Pod related network tasks, such as assigning IP addresses. There is a fairly large list of different CNI providers to choose from.
For this use case, we will use a quite popular CNI called Calico. In later articles, we will dive into different CNIs and their advantages, but for now, Calico is more than enough for our needs.
Install the Calico Operator and the Custom Resource Definitions (CRDs).
kubectl create -f https://raw.githubusercontent.com/projectcalico/calico/v3.30.0/manifests/tigera-operator.yamlDownload the resources and change the Pod CIDR to the value we defined in the kubeadm init command above.
curl -LO https://raw.githubusercontent.com/projectcalico/calico/v3.30.0/manifests/custom-resources.yaml
sleep 3
sed -i 's/cidr: 192.168.0.0\/16/cidr: 10.100.0.0\/16/' custom-resources.yaml
kubectl apply -f custom-resources.yamlAfter a few seconds the status of the Control Plane should switch from NotRready to Ready.
dominik@cp:~$ kubectl get node
NAME STATUS ROLES AGE VERSION
cp Ready control-plane 6m42s v1.33.13Now we have a running Kubernetes cluster with one Control Plane. The next step is to extend it with a Worker Node to run workloads.
Worker Node
To create a Worker Node for the Kubernetes cluster we first need to do a basic configuation of the VM. Like the Control Plane we need to:
- Enable packet forwarding
- Disable swap
- Install containterd and runc
- Install kubectl, kubeadm and kubelet
Run the commands from the code box below to configure the VM.
# enable packet forwarding
cat <<EOF | sudo tee /etc/sysctl.d/k8s.conf
net.ipv4.ip_forward = 1
net.ipv6.conf.all.forwarding = 1
EOF
sudo sysctl --system
# disable swap
sudo swapoff -a
sudo sed -ri '/\sswap\s/s/^#?/#/' /etc/fstab
# install containerd
curl -LO https://github.com/containerd/containerd/releases/download/v2.0.0/containerd-2.0.0-linux-amd64.tar.gz
sudo tar Cxzvf /usr/local containerd-2.0.0-linux-amd64.tar.gz
curl -LO https://raw.githubusercontent.com/containerd/containerd/main/containerd.service
sudo mkdir -p /usr/local/lib/systemd/system/
sudo mv containerd.service /usr/local/lib/systemd/system/containerd.service
sudo systemctl daemon-reload
sudo systemctl enable --now containerd
sudo mkdir -p /etc/containerd
containerd config default | sudo tee /etc/containerd/config.toml
sed -e 's/SystemdCgroup = false/SystemdCgroup = true/g' -i /etc/containerd/config.toml
sudo systemctl restart containerd.service
# install runc
curl -LO https://github.com/opencontainers/runc/releases/download/v1.3.2/runc.amd64
sudo install -m 755 runc.amd64 /usr/local/bin/runc
# install kubectl, kubeadm and kubelet
sudo apt-get update
sudo apt-get install -y apt-transport-https ca-certificates curl gpg conntrack
sudo mkdir -p -m 755 /etc/apt/keyrings
curl -fsSL https://pkgs.k8s.io/core:/stable:/v1.33/deb/Release.key | sudo gpg --dearmor -o /etc/apt/keyrings/kubernetes-apt-keyring.gpg
echo 'deb [signed-by=/etc/apt/keyrings/kubernetes-apt-keyring.gpg] https://pkgs.k8s.io/core:/stable:/v1.33/deb/ /' | sudo tee /etc/apt/sources.list.d/kubernetes.list
sudo apt-get update
sudo apt install -y kubectl=1.33* kubeadm=1.33* kubelet=1.33*
sudo apt-mark hold kubelet kubeadm kubectl
sudo systemctl enable --now kubeletCheck if the programms are installed.
containerd -v
runc -v
kubectl version
kubeadm version
kubelet --versionThe output should look like below.
dominik@worker:~$ containerd -v
runc -v
kubectl version
kubeadm version
kubelet --version
containerd github.com/containerd/containerd/v2 v2.0.0 207ad711eabd375a01713109a8a197d197ff6542
runc version 1.3.2
commit: v1.3.2-0-gaeabe4e7
spec: 1.2.1
go: go1.23.12
libseccomp: 2.5.6
Client Version: v1.33.13
Kustomize Version: v5.6.0
The connection to the server localhost:8080 was refused - did you specify the right host or port?
kubeadm version: &version.Info{Major:"1", Minor:"33", EmulationMajor:"", EmulationMinor:"", MinCompatibilityMajor:"", MinCompatibilityMinor:"", GitVersion:"v1.33.13", GitCommit:"c029d48d28322ad0369aabdcf8b656fd3195cd30", GitTreeState:"clean", BuildDate:"2026-06-11T17:01:21Z", GoVersion:"go1.25.11", Compiler:"gc", Platform:"linux/amd64"}
Kubernetes v1.33.13To add the newly configured VM to the cluster we need to create a join command on the Conrtol Plane.
sudo kubeadm token create --print-join-commandThe output should look like below.
dominik@cp:~$ sudo kubeadm token create --print-join-command
kubeadm join 10.10.10.4:6443 --token 3e27x0.dag2qbyrxukxwjh0 --discovery-token-ca-cert-hash sha256:6635bc2ccc202c3ea486657163262e8e5c9fd33d24c180d7d45b7600f0920ffbNow we can runt the kubeadm join command on the Worker Node with sudo.
sudo kubeadm join 10.10.10.4:6443 --token 3e27x0.dag2qbyrxukxwjh0 --discovery-token-ca-cert-hash sha256:6635bc2ccc202c3ea486657163262e8e5c9fd33d24c180d7d45b7600f0920ffbIf everything is setup correctly the VM will joint the cluster as a Worker Node.
dominik@worker:~$ sudo kubeadm join 10.10.10.4:6443 --token 3e27x0.dag2qbyrxukxwjh0 --discovery-token-ca-cert-hash sha256:6635bc2ccc202c3ea486657163262e8e5c9fd33d24c180d7d45b7600f0920ffb
[preflight] Running pre-flight checks
[preflight] Reading configuration from the "kubeadm-config" ConfigMap in namespace "kube-system"...
[preflight] Use 'kubeadm init phase upload-config --config your-config-file' to re-upload it.
W0811 21:07:28.094011 260237 utils.go:69] The recommended value for "bindAddress" in "KubeProxyConfiguration" is: ::; the provided value is: 0.0.0.0
[kubelet-start] Writing kubelet configuration to file "/var/lib/kubelet/config.yaml"
[kubelet-start] Writing kubelet environment file with flags to file "/var/lib/kubelet/kubeadm-flags.env"
[kubelet-start] Starting the kubelet
[kubelet-check] Waiting for a healthy kubelet at http://127.0.0.1:10248/healthz. This can take up to 4m0s
[kubelet-check] The kubelet is healthy after 502.081929ms
[kubelet-start] Waiting for the kubelet to perform the TLS Bootstrap
This node has joined the cluster:
* Certificate signing request was sent to apiserver and a response was received.
* The Kubelet was informed of the new secure connection details.
Run 'kubectl get nodes' on the control-plane to see this node join the cluster.On the Control Plan we can check if it worked. If the Worker has the status NotReady, then wait a few minutes till it switches to Ready.
dominik@cp:~$ kubectl get node
NAME STATUS ROLES AGE VERSION
cp Ready control-plane 12m v1.33.13
worker Ready <none> 39s v1.33.13Test the Cluster
With everything set up we can now test the cluster.
kubectl run tester --image=nginx
kubectl get pod
sleep 2
kubectl get podAs we can see a new Pod was created.
dominik@cp:~$ kubectl run tester --image=nginx
kubectl get pod
sleep 2
kubectl get pod
pod/tester created
NAME READY STATUS RESTARTS AGE
tester 0/1 ContainerCreating 0 0s
NAME READY STATUS RESTARTS AGE
tester 1/1 Running 0 2sTo delete the newly created Pod run the following command.
kubectl delete pod testerThe Pod is now removed.
dominik@cp:~$ kubectl delete pod tester
pod "tester" deletedCongratulations! You now have a fully functioning Kubernetes cluster to play with.
dominik@cp:~$ kubectl get node
NAME STATUS ROLES AGE VERSION
cp Ready control-plane 13m v1.33.13
worker Ready <none> 115s v1.33.13Installation overview
For a better overview here are the installation steps to create a Kubernetes cluster.
Control Plane
1. Enable packet forwarding (sysctl)
2. Turn swap off
3. Install containerd (High Level Container Runtime)
4. Install runc (Low Level Container Runtime)
5. Install kubectl, kubeadm and kubelet
6. kubadm init (Create Cluster)
7. Install CNI (Container Networking Interface)
Worker Node
1. Enable packet forwarding (sysctl)
2. Turn swap off
3. Install containerd (High Level Container Runtime)
4. Install runc (Low Level Container Runtime)
5. Install kubectl, kubeadm and kubelet
6. kubadm join (Extend Cluster)Installation v1.34
Now with all the components introduced, we can create a Kubernetes cluster. In this cluster, we will use kube-proxy for networking. In a future article, we will explore eBPF as a potential replacement for the kube-proxy.
For the installation we use the following versions of the different components:
| Component | Version |
|---|---|
| Linux Kernel | 6.8.0-1064-azure |
| Ubuntu | 22.04.5 LTS |
| Kubernetes | v1.34 |
| Calico | v3.30.0 |
| containerd | v2.0.0 |
| runc | v1.3.2 |
Prerequsits
To create a Kubernetes cluster we need two Linux VMs. Here these are two Ubuntu VMs which are connected via their interface eth0. Resource wise we use 2 vCPUs and 4GB RAM.
Enable forwarding of ip packets
To allow the forwarding of packets for the Pods need to enable it via sysctl.
cat <<EOF | sudo tee /etc/sysctl.d/k8s.conf
net.ipv4.ip_forward = 1
net.ipv6.conf.all.forwarding = 1
EOFApply the changes done in the file.
sudo sysctl --systemThe output should show the applied changes.
dominik@cp:~$ sudo sysctl --system
...
* Applying /etc/sysctl.d/k8s.conf ...
net.ipv4.ip_forward = 1
net.ipv6.conf.all.forwarding = 1
* Applying /etc/sysctl.conf ...Turn swap off
Now we need to turn the swap off or else the kubelet wont start.
sudo swapoff -a
sudo sed -ri '/\sswap\s/s/^#?/#/' /etc/fstabContainer Runtimes
The kubelet itself can’t create container, so we need the container runtimes to create them. In this case we install containerd and runc, which are generally the default. If OpenShift is used then these would be replaced by CRI-O.
- runc: A low-level container runtime responsible for starting and configuring the cgroups for the containers.
- containerd: A high-level container runtime that downloads and manages container images and passes them to runc to create container.
containerd
Download containerd from GitHub and check the binary.
curl -LO https://github.com/containerd/containerd/releases/download/v2.0.0/containerd-2.0.0-linux-amd64.tar.gz
curl -LO https://github.com/containerd/containerd/releases/download/v2.0.0/containerd-2.0.0-linux-amd64.tar.gz.sha256sum
cat containerd-2.0.0-linux-amd64.tar.gz.sha256sum | sha256sum --checkThere should be an output with the value OK.
dominik@cp:~$ cat containerd-2.0.0-linux-amd64.tar.gz.sha256sum | sha256sum --check
containerd-2.0.0-linux-amd64.tar.gz: OKExtract the content and save it to /usr/local/bin.
sudo tar Cxzvf /usr/local containerd-2.0.0-linux-amd64.tar.gzCreate a systemd service for containerd.
curl -LO https://raw.githubusercontent.com/containerd/containerd/main/containerd.service
sudo mkdir -p /usr/local/lib/systemd/system/
sudo mv containerd.service /usr/local/lib/systemd/system/containerd.serviceActivate the new systemd service.
sudo systemctl daemon-reload
sudo systemctl enable --now containerd
systemctl status containerd.serviceContainerd should now run.
dominik@cp:~$ systemctl status containerd.service
● containerd.service - containerd container runtime
Loaded: loaded (/usr/local/lib/systemd/system/containerd.service; enabled; vendor preset: enabled)
Active: active (running) since Sun 2025-08-09 12:25:00 UTC; 3s ago
Docs: https://containerd.io
Process: 2091 ExecStartPre=/sbin/modprobe overlay (code=exited, status=0/SUCCESS)
Main PID: 2092 (containerd)
Tasks: 8
Memory: 13.6M
CPU: 79ms
CGroup: /system.slice/containerd.service
└─2092 /usr/local/bin/containerdCreate a configuration for containerd.
sudo mkdir -p /etc/containerd
containerd config default | sudo tee /etc/containerd/config.toml
sudo sed -e 's/SystemdCgroup = false/SystemdCgroup = true/g' -i /etc/containerd/config.tomlApply the new configuration.
sudo systemctl restart containerd.serviceCheck if containerd works.
containerd -vYou should get an output which shows the version v2.0.0.
dominik@cp:~$ containerd -v
containerd github.com/containerd/containerd/v2 v2.0.0 207ad711eabd375a01713109a8a197d197ff6542runc
Download runc and check the hash of the binary.
curl -LO https://github.com/opencontainers/runc/releases/download/v1.3.2/runc.amd64
curl -LO https://github.com/opencontainers/runc/releases/download/v1.3.2/runc.sha256sum
cat runc.sha256sum | grep runc.amd64 | sha256sum --checkThere should be an output with the value OK.
dominik@cp:~$ cat runc.sha256sum | grep runc.amd64 | sha256sum --check
runc.amd64: OKInstall runc under /usr/local/bin.
sudo install -m 755 runc.amd64 /usr/local/bin/runcCheck if it works.
runc -vYou should get an output which shows the version 1.3.2.
dominik@cp:~$ runc -v
runc version 1.3.2
commit: v1.3.2-0-gaeabe4e7
spec: 1.2.1
go: go1.23.12
libseccomp: 2.5.6Install kubectl, kubeadm and kubelet
Add the Kubernetes repository with the version v1.34.
sudo apt-get update
sudo apt-get install -y apt-transport-https ca-certificates curl gpg conntrack
sudo mkdir -p -m 755 /etc/apt/keyrings
curl -fsSL https://pkgs.k8s.io/core:/stable:/v1.34/deb/Release.key | sudo gpg --dearmor -o /etc/apt/keyrings/kubernetes-apt-keyring.gpg
echo 'deb [signed-by=/etc/apt/keyrings/kubernetes-apt-keyring.gpg] https://pkgs.k8s.io/core:/stable:/v1.34/deb/ /' | sudo tee /etc/apt/sources.list.d/kubernetes.listUpdate the repository.
sudo apt-get updateYou should get an output which shows the new Kubernetes repo.
dominik@cp:~$ sudo apt-get update
Hit:1 http://azure.archive.ubuntu.com/ubuntu jammy InRelease
Hit:2 http://azure.archive.ubuntu.com/ubuntu jammy-updates InRelease
Hit:3 http://azure.archive.ubuntu.com/ubuntu jammy-backports InRelease
Hit:4 http://azure.archive.ubuntu.com/ubuntu jammy-security InRelease
Get:5 https://prod-cdn.packages.k8s.io/repositories/isv:/kubernetes:/core:/stable:/v1.34/deb InRelease [1230 B]
Get:6 https://prod-cdn.packages.k8s.io/repositories/isv:/kubernetes:/core:/stable:/v1.34/deb Packages [15.5 kB]
Fetched 16.8 kB in 1s (32.2 kB/s)
Reading package lists... DoneWith the command “apt-cache madison kubelet” you can see all the available versions for the kubelet.
dominik@cp:~$ apt-cache madison kubelet
kubelet | 1.34.10-1.1 | https://pkgs.k8s.io/core:/stable:/v1.34/deb Packages
kubelet | 1.34.9-1.1 | https://pkgs.k8s.io/core:/stable:/v1.34/deb Packages
kubelet | 1.34.8-1.1 | https://pkgs.k8s.io/core:/stable:/v1.34/deb Packages
kubelet | 1.34.7-1.1 | https://pkgs.k8s.io/core:/stable:/v1.34/deb Packages
kubelet | 1.34.6-1.1 | https://pkgs.k8s.io/core:/stable:/v1.34/deb Packages
kubelet | 1.34.5-1.1 | https://pkgs.k8s.io/core:/stable:/v1.34/deb Packages
kubelet | 1.34.4-1.1 | https://pkgs.k8s.io/core:/stable:/v1.34/deb Packages
kubelet | 1.34.3-1.1 | https://pkgs.k8s.io/core:/stable:/v1.34/deb Packages
kubelet | 1.34.2-1.1 | https://pkgs.k8s.io/core:/stable:/v1.34/deb Packages
kubelet | 1.34.1-1.1 | https://pkgs.k8s.io/core:/stable:/v1.34/deb Packages
kubelet | 1.34.0-1.1 | https://pkgs.k8s.io/core:/stable:/v1.34/deb PackagesIn our case we don’t want a specific patch version so we use the * to install the latest version. Additionally we hold the programms, so that these can’t be upgraded.
sudo apt install -y kubectl=1.34* kubeadm=1.34* kubelet=1.34*
sudo apt-mark hold kubelet kubeadm kubectlLatest version gets installed.
dominik@cp:~$ sudo apt install -y kubectl=1.34* kubeadm=1.34* kubelet=1.34*
sudo apt-mark hold kubelet kubeadm kubectl
Reading package lists... Done
Building dependency tree... Done
Reading state information... Done
Selected version '1.34.10-1.1' (isv:kubernetes:core:stable:v1.34:pkgs.k8s.io [amd64]) for 'kubectl'
Selected version '1.34.10-1.1' (isv:kubernetes:core:stable:v1.34:pkgs.k8s.io [amd64]) for 'kubeadm'
Selected version '1.34.10-1.1' (isv:kubernetes:core:stable:v1.34:pkgs.k8s.io [amd64]) for 'kubelet'Enable the kubelet systemd service
sudo systemctl enable --now kubeletIf you check the kubelet systemd service with systemctl status kubelet, you will see that the service is not running. This is normal. In the next steps, we will run kubeadm to configure kubelet so that it can start and run properly.
dominik@cp:~$ systemctl status kubelet.service
● kubelet.service - kubelet: The Kubernetes Node Agent
Loaded: loaded (/lib/systemd/system/kubelet.service; enabled; vendor preset: enabled)
Drop-In: /usr/lib/systemd/system/kubelet.service.d
└─10-kubeadm.conf
Active: activating (auto-restart) (Result: exit-code) since Sun 2025-08-09 12:47:11 UTC; 9s ago
Docs: https://kubernetes.io/docs/
Process: 3410 ExecStart=/usr/bin/kubelet $KUBELET_KUBECONFIG_ARGS $KUBELET_CONFIG_ARGS $KUBELET_KUBEADM_ARGS $KUBELET_EXTRA_ARGS (code=exited, status=1/>
Main PID: 3410 (code=exited, status=1/FAILURE)
CPU: 46msCheck the versions
kubectl version
kubeadm version
kubelet --versionAll the right versions should be installed.
dominik@cp:~$ kubectl version
kubeadm version
kubelet --version
Client Version: v1.34.10
Kustomize Version: v5.7.1
The connection to the server 10.10.10.4:6443 was refused - did you specify the right host or port?
kubeadm version: &version.Info{Major:"1", Minor:"34", EmulationMajor:"", EmulationMinor:"", MinCompatibilityMajor:"", MinCompatibilityMinor:"", GitVersion:"v1.34.10", GitCommit:"bd6c4ad159ac77a879838b8f14f23a49bf97de5f", GitTreeState:"clean", BuildDate:"2026-07-22T17:48:45Z", GoVersion:"go1.25.12", Compiler:"gc", Platform:"linux/amd64"}
Kubernetes v1.34.10Controle Plane
Now, there are some additional commands which only need to be executed on the Control Plane. To create the cluster, we simply use kubeadm init to install all the required components and configure the system.
Initialize the Kubernetes cluster.
sudo kubeadm init --pod-network-cidr=10.100.0.0/16The kubeadm init command should provide output like below.
dominik@cp:~$ sudo kubeadm init --pod-network-cidr=10.100.0.0/16
I0811 21:21:51.268609 340272 version.go:260] remote version is much newer: v1.36.3; falling back to: stable-1.34
[init] Using Kubernetes version: v1.34.10
[preflight] Running pre-flight checks
[preflight] Pulling images required for setting up a Kubernetes cluster
[preflight] This might take a minute or two, depending on the speed of your internet connection
[preflight] You can also perform this action beforehand using 'kubeadm config images pull'
[certs] Using certificateDir folder "/etc/kubernetes/pki"
[certs] Generating "ca" certificate and key
[certs] Generating "apiserver" certificate and key
[certs] apiserver serving cert is signed for DNS names [cp kubernetes kubernetes.default kubernetes.default.svc kubernetes.default.svc.cluster.local] and IPs [10.96.0.1 10.10.10.4]
[certs] Generating "apiserver-kubelet-client" certificate and key
[certs] Generating "front-proxy-ca" certificate and key
[certs] Generating "front-proxy-client" certificate and key
[certs] Generating "etcd/ca" certificate and key
[certs] Generating "etcd/server" certificate and key
[certs] etcd/server serving cert is signed for DNS names [cp localhost] and IPs [10.10.10.4 127.0.0.1 ::1]
[certs] Generating "etcd/peer" certificate and key
[certs] etcd/peer serving cert is signed for DNS names [cp localhost] and IPs [10.10.10.4 127.0.0.1 ::1]
[certs] Generating "etcd/healthcheck-client" certificate and key
[certs] Generating "apiserver-etcd-client" certificate and key
[certs] Generating "sa" key and public key
[kubeconfig] Using kubeconfig folder "/etc/kubernetes"
[kubeconfig] Writing "admin.conf" kubeconfig file
[kubeconfig] Writing "super-admin.conf" kubeconfig file
[kubeconfig] Writing "kubelet.conf" kubeconfig file
[kubeconfig] Writing "controller-manager.conf" kubeconfig file
[kubeconfig] Writing "scheduler.conf" kubeconfig file
[etcd] Creating static Pod manifest for local etcd in "/etc/kubernetes/manifests"
[control-plane] Using manifest folder "/etc/kubernetes/manifests"
[control-plane] Creating static Pod manifest for "kube-apiserver"
[control-plane] Creating static Pod manifest for "kube-controller-manager"
[control-plane] Creating static Pod manifest for "kube-scheduler"
[kubelet-start] Writing kubelet environment file with flags to file "/var/lib/kubelet/kubeadm-flags.env"
[kubelet-start] Writing kubelet configuration to file "/var/lib/kubelet/instance-config.yaml"
[patches] Applied patch of type "application/strategic-merge-patch+json" to target "kubeletconfiguration"
[kubelet-start] Writing kubelet configuration to file "/var/lib/kubelet/config.yaml"
[kubelet-start] Starting the kubelet
[wait-control-plane] Waiting for the kubelet to boot up the control plane as static Pods from directory "/etc/kubernetes/manifests"
[kubelet-check] Waiting for a healthy kubelet at http://127.0.0.1:10248/healthz. This can take up to 4m0s
[kubelet-check] The kubelet is healthy after 849.525µs
[control-plane-check] Waiting for healthy control plane components. This can take up to 4m0s
[control-plane-check] Checking kube-apiserver at https://10.10.10.4:6443/livez
[control-plane-check] Checking kube-controller-manager at https://127.0.0.1:10257/healthz
[control-plane-check] Checking kube-scheduler at https://127.0.0.1:10259/livez
[control-plane-check] kube-controller-manager is healthy after 7.137539ms
[control-plane-check] kube-scheduler is healthy after 10.522969ms
[control-plane-check] kube-apiserver is healthy after 2.001273639s
[upload-config] Storing the configuration used in ConfigMap "kubeadm-config" in the "kube-system" Namespace
[kubelet] Creating a ConfigMap "kubelet-config" in namespace kube-system with the configuration for the kubelets in the cluster
[upload-certs] Skipping phase. Please see --upload-certs
[mark-control-plane] Marking the node cp as control-plane by adding the labels: [node-role.kubernetes.io/control-plane node.kubernetes.io/exclude-from-external-load-balancers]
[mark-control-plane] Marking the node cp as control-plane by adding the taints [node-role.kubernetes.io/control-plane:NoSchedule]
[bootstrap-token] Using token: bro5w5.7r2uvg8jvs129sj5
[bootstrap-token] Configuring bootstrap tokens, cluster-info ConfigMap, RBAC Roles
[bootstrap-token] Configured RBAC rules to allow Node Bootstrap tokens to get nodes
[bootstrap-token] Configured RBAC rules to allow Node Bootstrap tokens to post CSRs in order for nodes to get long term certificate credentials
[bootstrap-token] Configured RBAC rules to allow the csrapprover controller automatically approve CSRs from a Node Bootstrap Token
[bootstrap-token] Configured RBAC rules to allow certificate rotation for all node client certificates in the cluster
[bootstrap-token] Configured RBAC rules to allow the API server kubelet client certificate to access the kubelet API
[bootstrap-token] Creating the "cluster-info" ConfigMap in the "kube-public" namespace
[kubelet-finalize] Updating "/etc/kubernetes/kubelet.conf" to point to a rotatable kubelet client certificate and key
[addons] Applied essential addon: CoreDNS
[addons] Applied essential addon: kube-proxy
Your Kubernetes control-plane has initialized successfully!
To start using your cluster, you need to run the following as a regular user:
mkdir -p $HOME/.kube
sudo cp -i /etc/kubernetes/admin.conf $HOME/.kube/config
sudo chown $(id -u):$(id -g) $HOME/.kube/config
Alternatively, if you are the root user, you can run:
export KUBECONFIG=/etc/kubernetes/admin.conf
You should now deploy a pod network to the cluster.
Run "kubectl apply -f [podnetwork].yaml" with one of the options listed at:
https://kubernetes.io/docs/concepts/cluster-administration/addons/
Then you can join any number of worker nodes by running the following on each as root:
kubeadm join 10.10.10.4:6443 --token bro5w5.7r2uvg8jvs129sj5 \
--discovery-token-ca-cert-hash sha256:d5f0ad004d977951dacd1aa318e0787f6e1883afeefd0ab2e1b115f7760eec1cAfter some time, the cluster will be ready, and we can access it using the configuration file. Be mindful with the following commands, as it will copy the configuration file of the Kubernetes admin user. This means every action we take will be performed as an administrator. For now, this is fine. In a later article, we will explore how to add users to the Kubernetes cluster.
Copy the kube-config file.
mkdir -p $HOME/.kube
sudo cp -i /etc/kubernetes/admin.conf $HOME/.kube/config
sudo chown $(id -u):$(id -g) $HOME/.kube/configCheck the Cluster connection
kubectl get nodeIf everything is configured correctly you should see some output.
dominik@cp:~$ kubectl get node
NAME STATUS ROLES AGE VERSION
cp NotReady control-plane 52s v1.34.10Now, the Kubernetes cluster is ready… almost. You should see a Control-Plane Node in the “NotReady” state. Why is it not ready?
Check the Node events
kubectl get event | grep CIDRAs you can see from the events, there is a problem with CIDRNotAvailable. When using the kubeadm command, we set the CIDR range for the Pods, but there is no entity that enforces this.
dominik@cp:~$ kubectl get event | grep CIDR
66s Normal CIDRNotAvailable node/cp Node cp status is now: CIDRNotAvailableTo solve this problem we need to install a CNI (Container Networking Interface) plugin to enable proper networking and enforce the CIDR configuration.
CNI
A CNI is responsible for all Pod-to-Pod related network tasks, such as assigning IP addresses. There is a fairly large list of different CNI providers to choose from.
For this use case, we will use a quite popular CNI called Calico. In later articles, we will dive into different CNIs and their advantages, but for now, Calico is more than enough for our needs.
Install the Calico Operator and the Custom Resource Definitions (CRDs).
kubectl create -f https://raw.githubusercontent.com/projectcalico/calico/v3.30.0/manifests/tigera-operator.yamlDownload the resources and change the Pod CIDR to the value we defined in the kubeadm init command above.
curl -LO https://raw.githubusercontent.com/projectcalico/calico/v3.30.0/manifests/custom-resources.yaml
sleep 3
sed -i 's/cidr: 192.168.0.0\/16/cidr: 10.100.0.0\/16/' custom-resources.yaml
kubectl apply -f custom-resources.yamlAfter a few seconds the status of the Control Plane should switch from NotRready to Ready.
dominik@cp:~$ kubectl get node
NAME STATUS ROLES AGE VERSION
cp Ready control-plane 6m20s v1.34.10Now we have a running Kubernetes cluster with one Control Plane. The next step is to extend it with a Worker Node to run workloads.
Worker Node
To create a Worker Node for the Kubernetes cluster we first need to do a basic configuation of the VM. Like the Control Plane we need to:
- Enable packet forwarding
- Disable swap
- Install containterd and runc
- Install kubectl, kubeadm and kubelet
Run the commands from the code box below to configure the VM.
# enable packet forwarding
cat <<EOF | sudo tee /etc/sysctl.d/k8s.conf
net.ipv4.ip_forward = 1
net.ipv6.conf.all.forwarding = 1
EOF
sudo sysctl --system
# disable swap
sudo swapoff -a
sudo sed -ri '/\sswap\s/s/^#?/#/' /etc/fstab
# install containerd
curl -LO https://github.com/containerd/containerd/releases/download/v2.0.0/containerd-2.0.0-linux-amd64.tar.gz
sudo tar Cxzvf /usr/local containerd-2.0.0-linux-amd64.tar.gz
curl -LO https://raw.githubusercontent.com/containerd/containerd/main/containerd.service

sudo mkdir -p /usr/local/lib/systemd/system/

sudo mv containerd.service /usr/local/lib/systemd/system/containerd.service
sudo systemctl daemon-reload
sudo systemctl enable --now containerd
sudo mkdir -p /etc/containerd
containerd config default | sudo tee /etc/containerd/config.toml
sed -e 's/SystemdCgroup = false/SystemdCgroup = true/g' -i /etc/containerd/config.toml
sudo systemctl restart containerd.service
# install runc
curl -LO https://github.com/opencontainers/runc/releases/download/v1.3.2/runc.amd64
sudo install -m 755 runc.amd64 /usr/local/bin/runc
# install kubectl, kubeadm and kubelet
sudo apt-get update
sudo apt-get install -y apt-transport-https ca-certificates curl gpg conntrack
sudo mkdir -p -m 755 /etc/apt/keyrings
curl -fsSL https://pkgs.k8s.io/core:/stable:/v1.34/deb/Release.key | sudo gpg --dearmor -o /etc/apt/keyrings/kubernetes-apt-keyring.gpg
echo 'deb [signed-by=/etc/apt/keyrings/kubernetes-apt-keyring.gpg] https://pkgs.k8s.io/core:/stable:/v1.34/deb/ /' | sudo tee /etc/apt/sources.list.d/kubernetes.list
sudo apt-get update
sudo apt install -y kubectl=1.34* kubeadm=1.34* kubelet=1.34*
sudo apt-mark hold kubelet kubeadm kubectl
sudo systemctl enable --now kubeletCheck if the programms are installed.
containerd -v
runc -v
kubectl version
kubeadm version
kubelet --versionThe output should look like below.
dominik@worker:~$ containerd -v
runc -v
kubectl version
kubeadm version
kubelet --version
containerd github.com/containerd/containerd/v2 v2.0.0 207ad711eabd375a01713109a8a197d197ff6542
runc version 1.3.2
commit: v1.3.2-0-gaeabe4e7
spec: 1.2.1
go: go1.23.12
libseccomp: 2.5.6
Client Version: v1.34.10
Kustomize Version: v5.7.1
The connection to the server localhost:8080 was refused - did you specify the right host or port?
kubeadm version: &version.Info{Major:"1", Minor:"34", EmulationMajor:"", EmulationMinor:"", MinCompatibilityMajor:"", MinCompatibilityMinor:"", GitVersion:"v1.34.10", GitCommit:"bd6c4ad159ac77a879838b8f14f23a49bf97de5f", GitTreeState:"clean", BuildDate:"2026-07-22T17:48:45Z", GoVersion:"go1.25.12", Compiler:"gc", Platform:"linux/amd64"}
Kubernetes v1.34.10To add the newly configured VM to the cluster we need to create a join command on the Conrtol Plane.
sudo kubeadm token create --print-join-commandThe output should look like below.
dominik@cp:~$ sudo kubeadm token create --print-join-command
kubeadm join 10.10.10.4:6443 --token jewtsv.te3izcbg0rlzhjpj --discovery-token-ca-cert-hash sha256:d5f0ad004d977951dacd1aa318e0787f6e1883afeefd0ab2e1b115f7760eec1cNow we can runt the kubeadm join command on the Worker Node with sudo.
sudo kubeadm join 10.10.10.4:6443 --token jewtsv.te3izcbg0rlzhjpj --discovery-token-ca-cert-hash sha256:d5f0ad004d977951dacd1aa318e0787f6e1883afeefd0ab2e1b115f7760eec1cIf everything is setup correctly the VM will joint the cluster as a Worker Node.
dominik@worker:~$ sudo kubeadm join 10.10.10.4:6443 --token jewtsv.te3izcbg0rlzhjpj --discovery-token-ca-cert-hash sha256:d5f0ad004d977951dacd1aa318e0787f6e1883afeefd0ab2e1b115f7760eec1c
[preflight] Running pre-flight checks
[preflight] Reading configuration from the "kubeadm-config" ConfigMap in namespace "kube-system"...
[preflight] Use 'kubeadm init phase upload-config kubeadm --config your-config-file' to re-upload it.
W0811 21:39:43.887061 278723 utils.go:69] The recommended value for "bindAddress" in "KubeProxyConfiguration" is: ::; the provided value is: 0.0.0.0
[kubelet-start] Writing kubelet configuration to file "/var/lib/kubelet/instance-config.yaml"
[patches] Applied patch of type "application/strategic-merge-patch+json" to target "kubeletconfiguration"
[kubelet-start] Writing kubelet configuration to file "/var/lib/kubelet/config.yaml"
[kubelet-start] Writing kubelet environment file with flags to file "/var/lib/kubelet/kubeadm-flags.env"
[kubelet-start] Starting the kubelet
[kubelet-check] Waiting for a healthy kubelet at http://127.0.0.1:10248/healthz. This can take up to 4m0s
[kubelet-check] The kubelet is healthy after 501.221595ms
[kubelet-start] Waiting for the kubelet to perform the TLS Bootstrap
This node has joined the cluster:
* Certificate signing request was sent to apiserver and a response was received.
* The Kubelet was informed of the new secure connection details.
Run 'kubectl get nodes' on the control-plane to see this node join the cluster.On the Control Plan we can check if it worked. If the Worker has the status NotReady, then wait a few minutes till it switches to Ready.
dominik@cp:~$ kubectl get node
NAME STATUS ROLES AGE VERSION
cp Ready control-plane 18m v1.34.10
worker Ready <none> 34s v1.34.10Test the Cluster
With everything set up we can now test the cluster.
kubectl run tester --image=nginx
kubectl get pod
sleep 2
kubectl get podAs we can see a new Pod was created.
dominik@cp:~$ kubectl run tester --image=nginx
kubectl get pod
sleep 2
kubectl get pod
pod/tester created
NAME READY STATUS RESTARTS AGE
tester 0/1 ContainerCreating 0 0s
NAME READY STATUS RESTARTS AGE
tester 1/1 Running 0 2sTo delete the newly created Pod run the following command.
kubectl delete pod testerThe Pod is now removed.
dominik@cp:~$ kubectl delete pod tester
pod "tester" deletedCongratulations! You now have a fully functioning Kubernetes cluster to play with.
dominik@cp:~$ kubectl get node
NAME STATUS ROLES AGE VERSION
cp Ready control-plane 19m v1.34.10
worker Ready <none> 107s v1.34.10Installation overview
For a better overview here are the installation steps to create a Kubernetes cluster.
Control Plane
1. Enable packet forwarding (sysctl)
2. Turn swap off
3. Install containerd (High Level Container Runtime)
4. Install runc (Low Level Container Runtime)
5. Install kubectl, kubeadm and kubelet
6. kubadm init (Create Cluster)
7. Install CNI (Container Networking Interface)
Worker Node
1. Enable packet forwarding (sysctl)
2. Turn swap off
3. Install containerd (High Level Container Runtime)
4. Install runc (Low Level Container Runtime)
5. Install kubectl, kubeadm and kubelet
6. kubadm join (Extend Cluster)Installation v1.35
Now with all the components introduced, we can create a Kubernetes cluster. In this cluster, we will use kube-proxy for networking. In a future article, we will explore eBPF as a potential replacement for the kube-proxy.
For the installation we use the following versions of the different components:
| Component | Version |
|---|---|
| Linux Kernel | 6.17.0-1022-azure |
| Ubuntu | 24.04.4 LTS |
| Kubernetes | v1.35 |
| Calico | v3.31.3 |
| containerd | v2.2.0 |
| runc | v1.4.0 |
Prerequsits
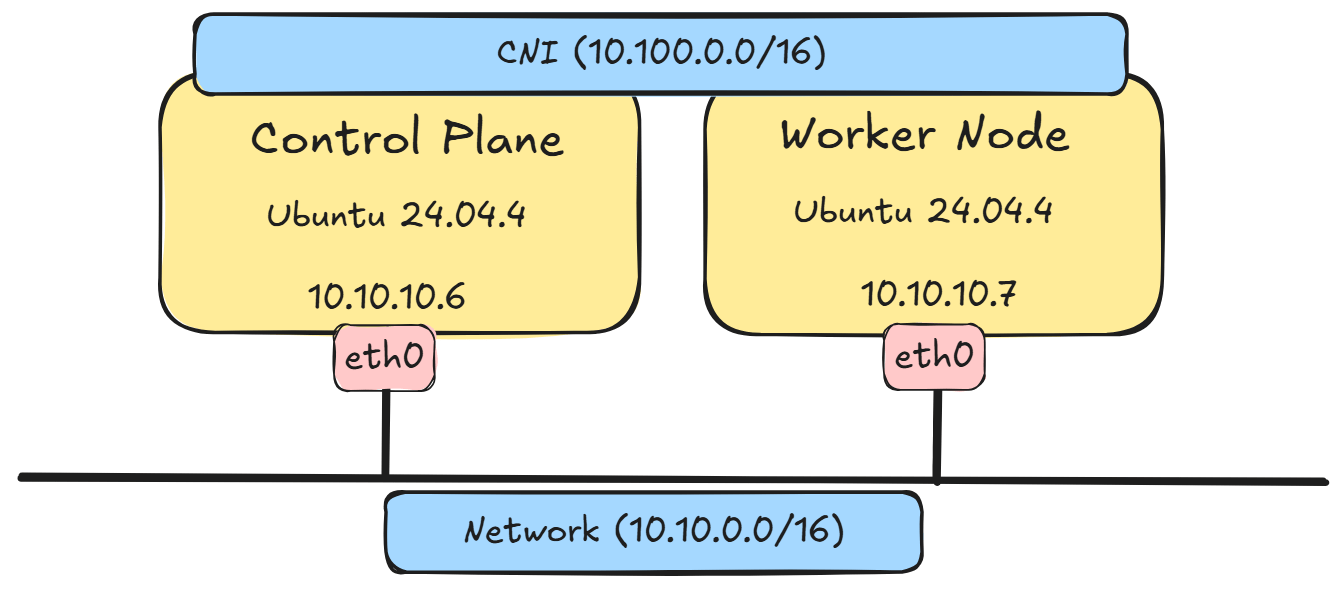
To create a Kubernetes cluster we need two Linux VMs. Here these are two Ubuntu VMs which are connected via their interface eth0. Resource wise we use 2 vCPUs and 4GB RAM.
Enable forwarding of ip packets
To allow the forwarding of packets for the Pods need to enable it via sysctl.
cat <<EOF | sudo tee /etc/sysctl.d/k8s.conf
net.ipv4.ip_forward = 1
net.ipv6.conf.all.forwarding = 1
EOFApply the changes done in the file.
sudo sysctl --systemThe output should show the applied changes.
dominik@cp:~$ sudo sysctl --system
...
* Applying /etc/sysctl.d/k8s.conf ...
net.ipv4.ip_forward = 1
net.ipv6.conf.all.forwarding = 1
* Applying /etc/sysctl.conf ...Turn swap off
Now we need to turn the swap off or else the kubelet wont start.
sudo swapoff -a
sudo sed -ri '/\sswap\s/s/^#?/#/' /etc/fstabContainer Runtimes
The kubelet itself can’t create container, so we need the container runtimes to create them. In this case we install containerd and runc, which are generally the default. If OpenShift is used then these would be replaced by CRI-O.
- runc: A low-level container runtime responsible for starting and configuring the cgroups for the containers.
- containerd: A high-level container runtime that downloads and manages container images and passes them to runc to create container.
containerd
Download containerd from GitHub and check the binary.
curl -LO https://github.com/containerd/containerd/releases/download/v2.2.0/containerd-2.2.0-linux-amd64.tar.gz
curl -LO https://github.com/containerd/containerd/releases/download/v2.2.0/containerd-2.2.0-linux-amd64.tar.gz.sha256sum
cat containerd-2.2.0-linux-amd64.tar.gz.sha256sum | sha256sum --checkThere should be an output with the value OK.
dominik@cp:~$ cat containerd-2.2.0-linux-amd64.tar.gz.sha256sum | sha256sum --check
containerd-2.2.0-linux-amd64.tar.gz: OKExtract the content and save it to /usr/local/bin.
sudo tar Cxzvf /usr/local containerd-2.2.0-linux-amd64.tar.gzCreate a systemd service for containerd.
curl -LO https://raw.githubusercontent.com/containerd/containerd/main/containerd.service

sudo mkdir -p /usr/local/lib/systemd/system/

sudo mv containerd.service /usr/local/lib/systemd/system/containerd.service
Activate the new systemd service.
sudo systemctl daemon-reload
sudo systemctl enable --now containerd

systemctl status containerd.serviceContainerd should now run.
dominik@cp:~$ systemctl status containerd.service
● containerd.service - containerd container runtime
Loaded: loaded (/usr/local/lib/systemd/system/containerd.service; enabled; preset: enabled)
Active: active (running) since Tue 2026-08-11 22:02:11 UTC; 31ms ago
Docs: https://containerd.io
Process: 1926 ExecStartPre=/sbin/modprobe overlay (code=exited, status=0/SUCCESS)
Main PID: 1928 (containerd)
Tasks: 8
Memory: 15.8M (peak: 18.1M)
CPU: 65ms
CGroup: /system.slice/containerd.service
└─1928 /usr/local/bin/containerdCreate a configuration for containerd.
sudo mkdir -p /etc/containerd
containerd config default | sudo tee /etc/containerd/config.toml
sudo sed -e 's/SystemdCgroup = false/SystemdCgroup = true/g' -i /etc/containerd/config.tomlApply the new configuration.
sudo systemctl restart containerd.serviceCheck if containerd works.
containerd -vYou should get an output which shows the version v2.2.0.
dominik@cp:~$ containerd -v
containerd github.com/containerd/containerd/v2 v2.2.0 1c4457e00facac03ce1d75f7b6777a7a851e5c41runc
Download runc and check the hash of the binary.
curl -LO https://github.com/opencontainers/runc/releases/download/v1.4.0/runc.amd64
curl -LO https://github.com/opencontainers/runc/releases/download/v1.4.0/runc.sha256sum
cat runc.sha256sum | grep runc.amd64 | sha256sum --checkThere should be an output with the value OK.
dominik@cp:~$ cat runc.sha256sum | grep runc.amd64 | sha256sum --check
runc.amd64: OKInstall runc under /usr/local/bin.
sudo install -m 755 runc.amd64 /usr/local/bin/runcCheck if it works.
runc -vYou should get an output which shows the version 1.4.0.
dominik@cp:~$ runc -v
runc version 1.4.0
commit: v1.4.0-0-g8bd78a99
spec: 1.3.0
go: go1.24.10
libseccomp: 2.5.6Install kubectl, kubeadm and kubelet
Add the Kubernetes repository with the version v1.35.
sudo apt-get update
sudo apt-get install -y apt-transport-https ca-certificates curl gpg conntrack
sudo mkdir -p -m 755 /etc/apt/keyrings
curl -fsSL https://pkgs.k8s.io/core:/stable:/v1.35/deb/Release.key | sudo gpg --dearmor -o /etc/apt/keyrings/kubernetes-apt-keyring.gpg
echo 'deb [signed-by=/etc/apt/keyrings/kubernetes-apt-keyring.gpg] https://pkgs.k8s.io/core:/stable:/v1.35/deb/ /' | sudo tee /etc/apt/sources.list.d/kubernetes.listUpdate the repository.
sudo apt-get updateYou should get an output which shows the new Kubernetes repo.
dominik@cp:~$ sudo apt-get update
Hit:1 http://azure.archive.ubuntu.com/ubuntu noble InRelease
Hit:2 http://azure.archive.ubuntu.com/ubuntu noble-updates InRelease
Hit:3 http://azure.archive.ubuntu.com/ubuntu noble-backports InRelease
Hit:4 http://azure.archive.ubuntu.com/ubuntu noble-security InRelease
Get:5 https://prod-cdn.packages.k8s.io/repositories/isv:/kubernetes:/core:/stable:/v1.35/deb InRelease [1230 B]
Get:6 https://prod-cdn.packages.k8s.io/repositories/isv:/kubernetes:/core:/stable:/v1.35/deb Packages [11.3 kB]
Fetched 12.6 kB in 0s (30.8 kB/s)
Reading package lists... DoneWith the command “apt-cache madison kubelet” you can see all the available versions for the kubelet.
dominik@cp:~$ apt-cache madison kubelet
kubelet | 1.35.7-1.1 | https://pkgs.k8s.io/core:/stable:/v1.35/deb Packages
kubelet | 1.35.6-1.1 | https://pkgs.k8s.io/core:/stable:/v1.35/deb Packages
kubelet | 1.35.5-1.1 | https://pkgs.k8s.io/core:/stable:/v1.35/deb Packages
kubelet | 1.35.4-1.1 | https://pkgs.k8s.io/core:/stable:/v1.35/deb Packages
kubelet | 1.35.3-1.1 | https://pkgs.k8s.io/core:/stable:/v1.35/deb Packages
kubelet | 1.35.2-1.1 | https://pkgs.k8s.io/core:/stable:/v1.35/deb Packages
kubelet | 1.35.1-1.1 | https://pkgs.k8s.io/core:/stable:/v1.35/deb Packages
kubelet | 1.35.0-1.1 | https://pkgs.k8s.io/core:/stable:/v1.35/deb PackagesIn our case we don’t want a specific patch version so we use the * to install the latest version. Additionally we hold the programms, so that these can’t be upgraded.
sudo apt install -y kubectl=1.35* kubeadm=1.35* kubelet=1.35*
sudo apt-mark hold kubelet kubeadm kubectlLatest version gets installed.
dominik@cp:~$ sudo apt install -y kubectl=1.35* kubeadm=1.35* kubelet=1.35*
sudo apt-mark hold kubelet kubeadm kubectl
Reading package lists... Done
Building dependency tree... Done
Reading state information... Done
Selected version '1.35.7-1.1' (isv:kubernetes:core:stable:v1.35:pkgs.k8s.io [amd64]) for 'kubectl'
Selected version '1.35.7-1.1' (isv:kubernetes:core:stable:v1.35:pkgs.k8s.io [amd64]) for 'kubeadm'
Selected version '1.35.7-1.1' (isv:kubernetes:core:stable:v1.35:pkgs.k8s.io [amd64]) for 'kubelet'Enable the kubelet systemd service
sudo systemctl enable --now kubeletIf you check the kubelet systemd service with systemctl status kubelet, you will see that the service is not running. This is normal. In the next steps, we will run kubeadm to configure kubelet so that it can start and run properly.
dominik@cp:~$ systemctl status kubelet.service
● kubelet.service - kubelet: The Kubernetes Node Agent
Loaded: loaded (/usr/lib/systemd/system/kubelet.service; enabled; preset: enabled)
Drop-In: /usr/lib/systemd/system/kubelet.service.d
└─10-kubeadm.conf
Active: activating (auto-restart) (Result: exit-code) since Tue 2026-08-11 22:13:49 UTC; 8s ago
Docs: https://kubernetes.io/docs/
Process: 3300 ExecStart=/usr/bin/kubelet $KUBELET_KUBECONFIG_ARGS $KUBELET_CONFIG_ARGS $KUBELET_KUBE>
Main PID: 3300 (code=exited, status=1/FAILURE)
CPU: 37msCheck the versions
kubectl version
kubeadm version
kubelet --versionAll the right versions should be installed.
dominik@cp:~$ kubectl version
kubeadm version
kubelet --version
Client Version: v1.35.7
Kustomize Version: v5.7.1
The connection to the server localhost:8080 was refused - did you specify the right host or port?
kubeadm version: &version.Info{Major:"1", Minor:"35", EmulationMajor:"", EmulationMinor:"", MinCompatibilityMajor:"", MinCompatibilityMinor:"", GitVersion:"v1.35.7", GitCommit:"96cb9ab4201d88ce5e549fde047a686171838fdb", GitTreeState:"clean", BuildDate:"2026-07-22T17:53:59Z", GoVersion:"go1.25.12", Compiler:"gc", Platform:"linux/amd64"}
Kubernetes v1.35.7Controle Plane
Now, there are some additional commands which only need to be executed on the Control Plane. To create the cluster, we simply use kubeadm init to install all the required components and configure the system.
Initialize the Kubernetes cluster.
sudo kubeadm init --pod-network-cidr=10.100.0.0/16The kubeadm init command should provide output like below.
dominik@cp:~$ sudo kubeadm init --pod-network-cidr=10.100.0.0/16
I0811 22:15:32.677962 3411 version.go:260] remote version is much newer: v1.36.3; falling back to: stable-1.35
[init] Using Kubernetes version: v1.35.7
[preflight] Running pre-flight checks
[preflight] Pulling images required for setting up a Kubernetes cluster
[preflight] This might take a minute or two, depending on the speed of your internet connection
[preflight] You can also perform this action beforehand using 'kubeadm config images pull'
[certs] Using certificateDir folder "/etc/kubernetes/pki"
[certs] Generating "ca" certificate and key
[certs] Generating "apiserver" certificate and key
[certs] apiserver serving cert is signed for DNS names [cp kubernetes kubernetes.default kubernetes.default.svc kubernetes.default.svc.cluster.local] and IPs [10.96.0.1 10.10.10.6]
[certs] Generating "apiserver-kubelet-client" certificate and key
[certs] Generating "front-proxy-ca" certificate and key
[certs] Generating "front-proxy-client" certificate and key
[certs] Generating "etcd/ca" certificate and key
[certs] Generating "etcd/server" certificate and key
[certs] etcd/server serving cert is signed for DNS names [cp localhost] and IPs [10.10.10.6 127.0.0.1 ::1]
[certs] Generating "etcd/peer" certificate and key
[certs] etcd/peer serving cert is signed for DNS names [cp localhost] and IPs [10.10.10.6 127.0.0.1 ::1]
[certs] Generating "etcd/healthcheck-client" certificate and key
[certs] Generating "apiserver-etcd-client" certificate and key
[certs] Generating "sa" key and public key
[kubeconfig] Using kubeconfig folder "/etc/kubernetes"
[kubeconfig] Writing "admin.conf" kubeconfig file
[kubeconfig] Writing "super-admin.conf" kubeconfig file
[kubeconfig] Writing "kubelet.conf" kubeconfig file
[kubeconfig] Writing "controller-manager.conf" kubeconfig file
[kubeconfig] Writing "scheduler.conf" kubeconfig file
[etcd] Creating static Pod manifest for local etcd in "/etc/kubernetes/manifests"
[control-plane] Using manifest folder "/etc/kubernetes/manifests"
[control-plane] Creating static Pod manifest for "kube-apiserver"
[control-plane] Creating static Pod manifest for "kube-controller-manager"
[control-plane] Creating static Pod manifest for "kube-scheduler"
[kubelet-start] Writing kubelet environment file with flags to file "/var/lib/kubelet/kubeadm-flags.env"
[kubelet-start] Writing kubelet configuration to file "/var/lib/kubelet/instance-config.yaml"
[patches] Applied patch of type "application/strategic-merge-patch+json" to target "kubeletconfiguration"
[kubelet-start] Writing kubelet configuration to file "/var/lib/kubelet/config.yaml"
[kubelet-start] Starting the kubelet
[wait-control-plane] Waiting for the kubelet to boot up the control plane as static Pods from directory "/etc/kubernetes/manifests"
[kubelet-check] Waiting for a healthy kubelet at http://127.0.0.1:10248/healthz. This can take up to 4m0s
[kubelet-check] The kubelet is healthy after 654.394µs
[control-plane-check] Waiting for healthy control plane components. This can take up to 4m0s
[control-plane-check] Checking kube-apiserver at https://10.10.10.6:6443/livez
[control-plane-check] Checking kube-controller-manager at https://127.0.0.1:10257/healthz
[control-plane-check] Checking kube-scheduler at https://127.0.0.1:10259/livez
[control-plane-check] kube-controller-manager is healthy after 3.989464ms
[control-plane-check] kube-scheduler is healthy after 5.512646ms
[control-plane-check] kube-apiserver is healthy after 2.002655456s
[upload-config] Storing the configuration used in ConfigMap "kubeadm-config" in the "kube-system" Namespace
[kubelet] Creating a ConfigMap "kubelet-config" in namespace kube-system with the configuration for the kubelets in the cluster
[upload-certs] Skipping phase. Please see --upload-certs
[mark-control-plane] Marking the node cp as control-plane by adding the labels: [node-role.kubernetes.io/control-plane node.kubernetes.io/exclude-from-external-load-balancers]
[mark-control-plane] Marking the node cp as control-plane by adding the taints [node-role.kubernetes.io/control-plane:NoSchedule]
[bootstrap-token] Using token: 6dzk0s.78gezz7plrpyhw23
[bootstrap-token] Configuring bootstrap tokens, cluster-info ConfigMap, RBAC Roles
[bootstrap-token] Configured RBAC rules to allow Node Bootstrap tokens to get nodes
[bootstrap-token] Configured RBAC rules to allow Node Bootstrap tokens to post CSRs in order for nodes to get long term certificate credentials
[bootstrap-token] Configured RBAC rules to allow the csrapprover controller automatically approve CSRs from a Node Bootstrap Token
[bootstrap-token] Configured RBAC rules to allow certificate rotation for all node client certificates in the cluster
[bootstrap-token] Configured RBAC rules to allow the API server kubelet client certificate to access the kubelet API
[bootstrap-token] Creating the "cluster-info" ConfigMap in the "kube-public" namespace
[kubelet-finalize] Updating "/etc/kubernetes/kubelet.conf" to point to a rotatable kubelet client certificate and key
[addons] Applied essential addon: CoreDNS
[addons] Applied essential addon: kube-proxy
Your Kubernetes control-plane has initialized successfully!
To start using your cluster, you need to run the following as a regular user:
mkdir -p $HOME/.kube
sudo cp -i /etc/kubernetes/admin.conf $HOME/.kube/config
sudo chown $(id -u):$(id -g) $HOME/.kube/config
Alternatively, if you are the root user, you can run:
export KUBECONFIG=/etc/kubernetes/admin.conf
You should now deploy a pod network to the cluster.
Run "kubectl apply -f [podnetwork].yaml" with one of the options listed at:
https://kubernetes.io/docs/concepts/cluster-administration/addons/
Then you can join any number of worker nodes by running the following on each as root:
kubeadm join 10.10.10.6:6443 --token 6dzk0s.78gezz7plrpyhw23 \
--discovery-token-ca-cert-hash sha256:15279e547ccfee9c83362ae471fdaf36b0336c14bb9eef395f5373575262b6d0After some time, the cluster will be ready, and we can access it using the configuration file. Be mindful with the following commands, as it will copy the configuration file of the Kubernetes admin user. This means every action we take will be performed as an administrator. For now, this is fine. In a later article, we will explore how to add users to the Kubernetes cluster.
Copy the kube-config file.
mkdir -p $HOME/.kube
sudo cp -i /etc/kubernetes/admin.conf $HOME/.kube/config
sudo chown $(id -u):$(id -g) $HOME/.kube/configCheck the Cluster connection
kubectl get nodeIf everything is configured correctly you should see some output.
dominik@cp:~$ kubectl get node
NAME STATUS ROLES AGE VERSION
cp NotReady control-plane 89s v1.35.7Now, the Kubernetes cluster is ready… almost. You should see a Control-Plane Node in the “NotReady” state. Why is it not ready?
Check the Node events
kubectl get event | grep CIDRAs you can see from the events, there is a problem with CIDRNotAvailable. When using the kubeadm command, we set the CIDR range for the Pods, but there is no entity that enforces this.
dominik@cp:~$ kubectl get event | grep CIDR
66s Normal CIDRNotAvailable node/cp Node cp status is now: CIDRNotAvailableTo solve this problem we need to install a CNI (Container Networking Interface) plugin to enable proper networking and enforce the CIDR configuration.
CNI
A CNI is responsible for all Pod-to-Pod related network tasks, such as assigning IP addresses. There is a fairly large list of different CNI providers to choose from.
For this use case, we will use a quite popular CNI called Calico. In later articles, we will dive into different CNIs and their advantages, but for now, Calico is more than enough for our needs.
Install the Calico Operator and the Custom Resource Definitions (CRDs).
kubectl create -f https://raw.githubusercontent.com/projectcalico/calico/v3.31.3/manifests/tigera-operator.yamlDownload the resources and change the Pod CIDR to the value we defined in the kubeadm init command above.
curl -LO https://raw.githubusercontent.com/projectcalico/calico/v3.31.3/manifests/custom-resources.yaml
sleep 3
sed -i 's/cidr: 192.168.0.0\/16/cidr: 10.100.0.0\/16/' custom-resources.yaml
kubectl apply -f custom-resources.yamlAfter a few seconds the status of the Control Plane should switch from NotRready to Ready.
dominik@cp:~$ kubectl get node
NAME STATUS ROLES AGE VERSION
cp Ready control-plane 4m16s v1.35.7Now we have a running Kubernetes cluster with one Control Plane. The next step is to extend it with a Worker Node to run workloads.
Worker Node
To create a Worker Node for the Kubernetes cluster we first need to do a basic configuation of the VM. Like the Control Plane we need to:
- Enable packet forwarding
- Disable swap
- Install containterd and runc
- Install kubectl, kubeadm and kubelet
Run the commands from the code box below to configure the VM.
# enable packet forwarding
cat <<EOF | sudo tee /etc/sysctl.d/k8s.conf
net.ipv4.ip_forward = 1
net.ipv6.conf.all.forwarding = 1
EOF
sudo sysctl --system
# disable swap
sudo swapoff -a
sudo sed -ri '/\sswap\s/s/^#?/#/' /etc/fstab
# install containerd
curl -LO https://github.com/containerd/containerd/releases/download/v2.2.0/containerd-2.2.0-linux-amd64.tar.gz
sudo tar Cxzvf /usr/local containerd-2.2.0-linux-amd64.tar.gz
curl -LO https://raw.githubusercontent.com/containerd/containerd/main/containerd.service
sudo mkdir -p /usr/local/lib/systemd/system/
sudo mv containerd.service /usr/local/lib/systemd/system/containerd.service
sudo systemctl daemon-reload
sudo systemctl enable --now containerd
sudo mkdir -p /etc/containerd
containerd config default | sudo tee /etc/containerd/config.toml
sed -e 's/SystemdCgroup = false/SystemdCgroup = true/g' -i /etc/containerd/config.toml
sudo systemctl restart containerd.service
# install runc
curl -LO https://github.com/opencontainers/runc/releases/download/v1.4.0/runc.amd64
sudo install -m 755 runc.amd64 /usr/local/bin/runc
# install kubectl, kubeadm and kubelet
sudo apt-get update
sudo apt-get install -y apt-transport-https ca-certificates curl gpg conntrack
sudo mkdir -p -m 755 /etc/apt/keyrings
curl -fsSL https://pkgs.k8s.io/core:/stable:/v1.35/deb/Release.key | sudo gpg --dearmor -o /etc/apt/keyrings/kubernetes-apt-keyring.gpg
echo 'deb [signed-by=/etc/apt/keyrings/kubernetes-apt-keyring.gpg] https://pkgs.k8s.io/core:/stable:/v1.35/deb/ /' | sudo tee /etc/apt/sources.list.d/kubernetes.list
sudo apt-get update
sudo apt install -y kubectl=1.35* kubeadm=1.35* kubelet=1.35*
sudo apt-mark hold kubelet kubeadm kubectl
sudo systemctl enable --now kubeletCheck if the programms are installed.
containerd -v
runc -v
kubectl version
kubeadm version
kubelet --versionThe output should look like below.
dominik@worker:~$ containerd -v
runc -v
kubectl version
kubeadm version
kubelet --version
containerd github.com/containerd/containerd/v2 v2.2.0 1c4457e00facac03ce1d75f7b6777a7a851e5c41
runc version 1.4.0
commit: v1.4.0-0-g8bd78a99
spec: 1.3.0
go: go1.24.10
libseccomp: 2.5.6
Client Version: v1.35.7
Kustomize Version: v5.7.1
The connection to the server localhost:8080 was refused - did you specify the right host or port?
kubeadm version: &version.Info{Major:"1", Minor:"35", EmulationMajor:"", EmulationMinor:"", MinCompatibilityMajor:"", MinCompatibilityMinor:"", GitVersion:"v1.35.7", GitCommit:"96cb9ab4201d88ce5e549fde047a686171838fdb", GitTreeState:"clean", BuildDate:"2026-07-22T17:53:59Z", GoVersion:"go1.25.12", Compiler:"gc", Platform:"linux/amd64"}
Kubernetes v1.35.7To add the newly configured VM to the cluster we need to create a join command on the Conrtol Plane.
sudo kubeadm token create --print-join-commandThe output should look like below.
dominik@cp:~$ sudo kubeadm token create --print-join-command
kubeadm join 10.10.10.6:6443 --token 7afaqm.c6s1e19u01jh4bdo --discovery-token-ca-cert-hash sha256:15279e547ccfee9c83362ae471fdaf36b0336c14bb9eef395f5373575262b6d0Now we can runt the kubeadm join command on the Worker Node with sudo.
sudo kubeadm join 10.10.10.6:6443 --token 7afaqm.c6s1e19u01jh4bdo --discovery-token-ca-cert-hash sha256:15279e547ccfee9c83362ae471fdaf36b0336c14bb9eef395f5373575262b6d0If everything is setup correctly the VM will joint the cluster as a Worker Node.
dominik@worker:~$ sudo kubeadm join 10.10.10.6:6443 --token 7afaqm.c6s1e19u01jh4bdo --discovery-token-ca-cert-hash sha256:15279e547ccfee9c83362ae471fdaf36b0336c14bb9eef395f5373575262b6d0
[preflight] Running pre-flight checks
[preflight] Reading configuration from the "kubeadm-config" ConfigMap in namespace "kube-system"...
[preflight] Use 'kubeadm init phase upload-config kubeadm --config your-config-file' to re-upload it.
W0811 22:24:32.041094 4036 utils.go:69] The recommended value for "bindAddress" in "KubeProxyConfiguration" is: ::; the provided value is: 0.0.0.0
[kubelet-start] Writing kubelet configuration to file "/var/lib/kubelet/instance-config.yaml"
[patches] Applied patch of type "application/strategic-merge-patch+json" to target "kubeletconfiguration"
[kubelet-start] Writing kubelet configuration to file "/var/lib/kubelet/config.yaml"
[kubelet-start] Writing kubelet environment file with flags to file "/var/lib/kubelet/kubeadm-flags.env"
[kubelet-start] Starting the kubelet
[kubelet-check] Waiting for a healthy kubelet at http://127.0.0.1:10248/healthz. This can take up to 4m0s
[kubelet-check] The kubelet is healthy after 501.750339ms
[kubelet-start] Waiting for the kubelet to perform the TLS Bootstrap
This node has joined the cluster:
* Certificate signing request was sent to apiserver and a response was received.
* The Kubelet was informed of the new secure connection details.
Run 'kubectl get nodes' on the control-plane to see this node join the cluster.On the Control Plan we can check if it worked. If the Worker has the status NotReady, then wait a few minutes till it switches to Ready.
dominik@cp:~$ kubectl get node
NAME STATUS ROLES AGE VERSION
cp Ready control-plane 9m10s v1.35.7
worker Ready <none> 31s v1.35.7Test the Cluster
With everything set up we can now test the cluster.
kubectl run tester --image=nginx
kubectl get pod
sleep 5
kubectl get podAs we can see a new Pod was created.
dominik@cp:~$ kubectl run tester --image=nginx
kubectl get pod
sleep 5
kubectl get pod
pod/tester created
NAME READY STATUS RESTARTS AGE
tester 0/1 ContainerCreating 0 0s
NAME READY STATUS RESTARTS AGE
tester 1/1 Running 0 5sTo delete the newly created Pod run the following command.
kubectl delete pod testerThe Pod is now removed.
dominik@cp:~$ kubectl delete pod tester
pod "tester" deletedCongratulations! You now have a fully functioning Kubernetes cluster to play with.
dominik@cp:~$ kubectl get node
NAME STATUS ROLES AGE VERSION
cp Ready control-plane 10m v1.35.7
worker Ready <none> 111s v1.35.7Installation overview
For a better overview here are the installation steps to create a Kubernetes cluster.
Control Plane
1. Enable packet forwarding (sysctl)
2. Turn swap off
3. Install containerd (High Level Container Runtime)
4. Install runc (Low Level Container Runtime)
5. Install kubectl, kubeadm and kubelet
6. kubadm init (Create Cluster)
7. Install CNI (Container Networking Interface)
Worker Node
1. Enable packet forwarding (sysctl)
2. Turn swap off
3. Install containerd (High Level Container Runtime)
4. Install runc (Low Level Container Runtime)
5. Install kubectl, kubeadm and kubelet
6. kubadm join (Extend Cluster)Installation v1.36
Now with all the components introduced, we can create a Kubernetes cluster. In this cluster, we will use kube-proxy for networking. In a future article, we will explore eBPF as a potential replacement for the kube-proxy.
For the installation we use the following versions of the different components:
| Component | Version |
|---|---|
| Linux Kernel | 6.17.0-1022-azure |
| Ubuntu | 24.04.4 LTS |
| Kubernetes | v1.36 |
| Calico | v3.32.0 |
| containerd | v2.3.0 |
| runc | v1.4.2 |
Prerequsits
To create a Kubernetes cluster we need two Linux VMs. Here these are two Ubuntu VMs which are connected via their interface eth0. Resource wise we use 2 vCPUs and 4GB RAM.
Enable forwarding of ip packets
To allow the forwarding of packets for the Pods need to enable it via sysctl.
cat <<EOF | sudo tee /etc/sysctl.d/k8s.conf
net.ipv4.ip_forward = 1
net.ipv6.conf.all.forwarding = 1
EOFApply the changes done in the file.
sudo sysctl --systemThe output should show the applied changes.
dominik@cp:~$ sudo sysctl --system
...
* Applying /etc/sysctl.d/k8s.conf ...
net.ipv4.ip_forward = 1
net.ipv6.conf.all.forwarding = 1
* Applying /etc/sysctl.conf ...Turn swap off
Now we need to turn the swap off or else the kubelet wont start.
sudo swapoff -a
sudo sed -ri '/\sswap\s/s/^#?/#/' /etc/fstabContainer Runtimes
The kubelet itself can’t create container, so we need the container runtimes to create them. In this case we install containerd and runc, which are generally the default. If OpenShift is used then these would be replaced by CRI-O.
- runc: A low-level container runtime responsible for starting and configuring the cgroups for the containers.
- containerd: A high-level container runtime that downloads and manages container images and passes them to runc to create container.
containerd
Download containerd from GitHub and check the binary.
curl -LO https://github.com/containerd/containerd/releases/download/v2.3.0/containerd-2.3.0-linux-amd64.tar.gz
curl -LO https://github.com/containerd/containerd/releases/download/v2.3.0/containerd-2.3.0-linux-amd64.tar.gz.sha256sum
cat containerd-2.3.0-linux-amd64.tar.gz.sha256sum | sha256sum --checkThere should be an output with the value OK.
dominik@cp:~$ cat containerd-2.3.0-linux-amd64.tar.gz.sha256sum | sha256sum --check
containerd-2.3.0-linux-amd64.tar.gz: OKExtract the content and save it to /usr/local/bin.
sudo tar Cxzvf /usr/local containerd-2.3.0-linux-amd64.tar.gzCreate a systemd service for containerd.
curl -LO https://raw.githubusercontent.com/containerd/containerd/main/containerd.service
sudo mkdir -p /usr/local/lib/systemd/system/
sudo mv containerd.service /usr/local/lib/systemd/system/containerd.serviceActivate the new systemd service.
sudo systemctl daemon-reload
sudo systemctl enable --now containerd

systemctl status containerd.service
Containerd should now run.
dominik@cp:~$ systemctl status containerd.service
● containerd.service - containerd container runtime
Loaded: loaded (/usr/local/lib/systemd/system/containerd.service; enabled; preset:>
Active: active (running) since Wed 2026-08-12 06:40:17 UTC; 6min ago
Docs: https://containerd.io
Main PID: 117702 (containerd)
Tasks: 8
Memory: 26.7M (peak: 29.4M)
CPU: 641ms
CGroup: /system.slice/containerd.service
└─117702 /usr/local/bin/containerdCreate a configuration for containerd.
sudo mkdir -p /etc/containerd

containerd config default | sudo tee /etc/containerd/config.toml

sudo sed -e 's/SystemdCgroup = false/SystemdCgroup = true/g' -i /etc/containerd/config.tomlApply the new configuration.
sudo systemctl restart containerd.serviceCheck if containerd works.
containerd -vYou should get an output which shows the version v2.3.0.
dominik@cp:~$ containerd -v
containerd github.com/containerd/containerd/v2 v2.3.0 2976f38ccbfcda5ef1364d63d60b0a304e4bf94arunc
Download runc and check the hash of the binary.
curl -LO https://github.com/opencontainers/runc/releases/download/v1.4.2/runc.amd64
curl -LO https://github.com/opencontainers/runc/releases/download/v1.4.2/runc.sha256sum
cat runc.sha256sum | grep runc.amd64 | sha256sum --checkThere should be an output with the value OK.
dominik@cp:~$ cat runc.sha256sum | grep runc.amd64 | sha256sum --check
runc.amd64: OKInstall runc under /usr/local/bin.
sudo install -m 755 runc.amd64 /usr/local/bin/runcCheck if it works.
runc -vYou should get an output which shows the version 1.4.2.
dominik@cp:~$ runc -v
runc version 1.4.2
commit: v1.4.2-0-gc241c0bb
spec: 1.3.0
go: go1.25.8
libseccomp: 2.6.0Install kubectl, kubeadm and kubelet
Add the Kubernetes repository with the version v1.36.
sudo apt-get update
sudo apt-get install -y apt-transport-https ca-certificates curl gpg conntrack
sudo mkdir -p -m 755 /etc/apt/keyrings
curl -fsSL https://pkgs.k8s.io/core:/stable:/v1.36/deb/Release.key | sudo gpg --dearmor -o /etc/apt/keyrings/kubernetes-apt-keyring-v1.36.gpg
echo 'deb [signed-by=/etc/apt/keyrings/kubernetes-apt-keyring-v1.36.gpg] https://pkgs.k8s.io/core:/stable:/v1.36/deb/ /' | sudo tee /etc/apt/sources.list.d/kubernetesv1.36.listUpdate the repository.
sudo apt-get updateYou should get an output which shows the new Kubernetes repo.
dominik@cp:~$ sudo apt-get update
Hit:1 http://azure.archive.ubuntu.com/ubuntu noble InRelease
Hit:2 http://azure.archive.ubuntu.com/ubuntu noble-updates InRelease
Hit:3 http://azure.archive.ubuntu.com/ubuntu noble-backports InRelease
Hit:4 http://azure.archive.ubuntu.com/ubuntu noble-security InRelease
Hit:5 https://prod-cdn.packages.k8s.io/repositories/isv:/kubernetes:/core:/stable:/v1.35/deb InRelease
Get:6 https://prod-cdn.packages.k8s.io/repositories/isv:/kubernetes:/core:/stable:/v1.36/deb InRelease [1227 B]
Get:7 https://prod-cdn.packages.k8s.io/repositories/isv:/kubernetes:/core:/stable:/v1.36/deb Packages [6910 B]
Fetched 8137 B in 0s (18.1 kB/s)
Reading package lists... DoneWith the command “apt-cache madison kubelet” you can see all the available versions for the kubelet.
dominik@cp:~$ apt-cache madison kubelet | grep 1.36
kubelet | 1.36.3-1.1 | https://pkgs.k8s.io/core:/stable:/v1.36/deb Packages
kubelet | 1.36.2-2.1 | https://pkgs.k8s.io/core:/stable:/v1.36/deb Packages
kubelet | 1.36.1-1.1 | https://pkgs.k8s.io/core:/stable:/v1.36/deb Packages
kubelet | 1.36.0-1.1 | https://pkgs.k8s.io/core:/stable:/v1.36/deb PackagesIn our case we don’t want a specific patch version so we use the * to install the latest version. Additionally we hold the programms, so that these can’t be upgraded.
sudo apt install -y kubectl=1.36* kubeadm=1.36* kubelet=1.36*
sudo apt-mark hold kubelet kubeadm kubectlLatest version gets installed.
dominik@cp:~$ sudo apt install -y kubectl=1.36* kubeadm=1.36* kubelet=1.36*
sudo apt-mark hold kubelet kubeadm kubectl
Reading package lists... Done
Building dependency tree... Done
Reading state information... Done
Selected version '1.36.3-1.1' (isv:kubernetes:core:stable:v1.36:pkgs.k8s.io [amd64]) for 'kubectl'
Selected version '1.36.3-1.1' (isv:kubernetes:core:stable:v1.36:pkgs.k8s.io [amd64]) for 'kubeadm'
Selected version '1.36.3-1.1' (isv:kubernetes:core:stable:v1.36:pkgs.k8s.io [amd64]) for 'kubelet'Enable the kubelet systemd service
sudo systemctl enable --now kubeletIf you check the kubelet systemd service with systemctl status kubelet, you will see that the service is not running. This is normal. In the next steps, we will run kubeadm to configure kubelet so that it can start and run properly.
dominik@cp:~$ systemctl status kubelet.service
● kubelet.service - kubelet: The Kubernetes Node Agent
Loaded: loaded (/usr/lib/systemd/system/kubelet.service; enabled; preset: enabled)
Drop-In: /usr/lib/systemd/system/kubelet.service.d
└─10-kubeadm.conf
Active: activating (auto-restart) (Result: exit-code) since Wed 2026-08-12 07:02:4>
Docs: https://kubernetes.io/docs/
Process: 124330 ExecStart=/usr/bin/kubelet $KUBELET_KUBECONFIG_ARGS $KUBELET_CONFIG>
Main PID: 124330 (code=exited, status=1/FAILURE)
CPU: 41msCheck the versions
kubectl version
kubeadm version
kubelet --versionAll the right versions should be installed.
dominik@cp:~$ kubectl version
kubeadm version
kubelet --version
Client Version: v1.36.3
Kustomize Version: v5.8.1
The connection to the server 10.10.10.6:6443 was refused - did you specify the right host or port?
kubeadm version: &version.Info{Major:"1", Minor:"36", EmulationMajor:"", EmulationMinor:"", MinCompatibilityMajor:"", MinCompatibilityMinor:"", GitVersion:"v1.36.3", GitCommit:"0f29094e5b73085e3802ecc1298ecae13866bfe6", GitTreeState:"clean", BuildDate:"2026-07-22T18:09:52Z", GoVersion:"go1.26.5", Compiler:"gc", Platform:"linux/amd64"}
Kubernetes v1.36.3Controle Plane
Now, there are some additional commands which only need to be executed on the Control Plane. To create the cluster, we simply use kubeadm init to install all the required components and configure the system.
Initialize the Kubernetes cluster.
sudo kubeadm init --pod-network-cidr=10.100.0.0/16The kubeadm init command should provide output like below.
dominik@cp:~$ sudo kubeadm init --pod-network-cidr=10.100.0.0/16
[init] Using Kubernetes version: v1.36.3
[preflight] Running pre-flight checks
[preflight] Pulling images required for setting up a Kubernetes cluster
[preflight] This might take a minute or two, depending on the speed of your internet connection
[preflight] You can also perform this action beforehand using 'kubeadm config images pull'
[certs] Using certificateDir folder "/etc/kubernetes/pki"
[certs] Generating "ca" certificate and key
[certs] Generating "apiserver" certificate and key
[certs] apiserver serving cert is signed for DNS names [cp kubernetes kubernetes.default kubernetes.default.svc kubernetes.default.svc.cluster.local] and IPs [10.96.0.1 10.10.10.6]
[certs] Generating "apiserver-kubelet-client" certificate and key
[certs] Generating "front-proxy-ca" certificate and key
[certs] Generating "front-proxy-client" certificate and key
[certs] Generating "etcd/ca" certificate and key
[certs] Generating "etcd/server" certificate and key
[certs] etcd/server serving cert is signed for DNS names [cp localhost] and IPs [10.10.10.6 127.0.0.1 ::1]
[certs] Generating "etcd/peer" certificate and key
[certs] etcd/peer serving cert is signed for DNS names [cp localhost] and IPs [10.10.10.6 127.0.0.1 ::1]
[certs] Generating "etcd/healthcheck-client" certificate and key
[certs] Generating "apiserver-etcd-client" certificate and key
[certs] Generating "sa" key and public key
[kubeconfig] Using kubeconfig folder "/etc/kubernetes"
[kubeconfig] Writing "admin.conf" kubeconfig file
[kubeconfig] Writing "super-admin.conf" kubeconfig file
[kubeconfig] Writing "kubelet.conf" kubeconfig file
[kubeconfig] Writing "controller-manager.conf" kubeconfig file
[kubeconfig] Writing "scheduler.conf" kubeconfig file
[etcd] Creating static Pod manifest for local etcd in "/etc/kubernetes/manifests"
[control-plane] Using manifest folder "/etc/kubernetes/manifests"
[control-plane] Creating static Pod manifest for "kube-apiserver"
[control-plane] Creating static Pod manifest for "kube-controller-manager"
[control-plane] Creating static Pod manifest for "kube-scheduler"
[kubelet-start] Writing kubelet environment file with flags to file "/var/lib/kubelet/kubeadm-flags.env"
[kubelet-start] Writing kubelet configuration to file "/var/lib/kubelet/instance-config.yaml"
[patches] Applied patch of type "application/strategic-merge-patch+json" to target "kubeletconfiguration"
[kubelet-start] Writing kubelet configuration to file "/var/lib/kubelet/config.yaml"
[kubelet-start] Starting the kubelet
[wait-control-plane] Waiting for the kubelet to boot up the control plane as static Pods from directory "/etc/kubernetes/manifests"
[kubelet-check] Waiting for a healthy kubelet at http://127.0.0.1:10248/healthz. This can take up to 4m0s
[kubelet-check] The kubelet is healthy after 783.575µs
[control-plane-check] Waiting for healthy control plane components. This can take up to 4m0s
[control-plane-check] Checking kube-apiserver at https://10.10.10.6:6443/livez
[control-plane-check] Checking kube-controller-manager at https://127.0.0.1:10257/healthz
[control-plane-check] Checking kube-scheduler at https://127.0.0.1:10259/livez
[control-plane-check] kube-controller-manager is healthy after 5.435036ms
[control-plane-check] kube-scheduler is healthy after 6.633014ms
[control-plane-check] kube-apiserver is healthy after 2.002418427s
[upload-config] Storing the configuration used in ConfigMap "kubeadm-config" in the "kube-system" Namespace
[kubelet] Creating a ConfigMap "kubelet-config" in namespace kube-system with the configuration for the kubelets in the cluster
[upload-certs] Skipping phase. Please see --upload-certs
[mark-control-plane] Marking the node cp as control-plane by adding the labels: [node-role.kubernetes.io/control-plane node.kubernetes.io/exclude-from-external-load-balancers]
[mark-control-plane] Marking the node cp as control-plane by adding the taints [node-role.kubernetes.io/control-plane:NoSchedule]
[bootstrap-token] Using token: nfhezv.8sutf1efzgtkkswk
[bootstrap-token] Configuring bootstrap tokens, cluster-info ConfigMap, RBAC Roles
[bootstrap-token] Configured RBAC rules to allow Node Bootstrap tokens to get nodes
[bootstrap-token] Configured RBAC rules to allow Node Bootstrap tokens to post CSRs in order for nodes to get long term certificate credentials
[bootstrap-token] Configured RBAC rules to allow the csrapprover controller automatically approve CSRs from a Node Bootstrap Token
[bootstrap-token] Configured RBAC rules to allow certificate rotation for all node client certificates in the cluster
[bootstrap-token] Configured RBAC rules to allow the API server kubelet client certificate to access the kubelet API
[bootstrap-token] Creating the "cluster-info" ConfigMap in the "kube-public" namespace
[kubelet-finalize] Updating "/etc/kubernetes/kubelet.conf" to point to a rotatable kubelet client certificate and key
[addons] Applied essential addon: CoreDNS
[addons] Applied essential addon: kube-proxy
Your Kubernetes control-plane has initialized successfully!
To start using your cluster, you need to run the following as a regular user:
mkdir -p $HOME/.kube
sudo cp -i /etc/kubernetes/admin.conf $HOME/.kube/config
sudo chown $(id -u):$(id -g) $HOME/.kube/config
Alternatively, if you are the root user, you can run:
export KUBECONFIG=/etc/kubernetes/admin.conf
You should now deploy a pod network to the cluster.
Run "kubectl apply -f [podnetwork].yaml" with one of the options listed at:
https://kubernetes.io/docs/concepts/cluster-administration/addons/
Then you can join any number of worker nodes by running the following on each as root:
kubeadm join 10.10.10.6:6443 --token nfhezv.8sutf1efzgtkkswk \
--discovery-token-ca-cert-hash sha256:da18dd133ddfd1cb05a4365328c65fc6c959a2eaf1e561f5b519ee7e16e8ae6cAfter some time, the cluster will be ready, and we can access it using the configuration file. Be mindful with the following commands, as it will copy the configuration file of the Kubernetes admin user. This means every action we take will be performed as an administrator. For now, this is fine. In a later article, we will explore how to add users to the Kubernetes cluster.
Copy the kube-config file.
mkdir -p $HOME/.kube
sudo cp -i /etc/kubernetes/admin.conf $HOME/.kube/config
sudo chown $(id -u):$(id -g) $HOME/.kube/configCheck the Cluster connection
kubectl get nodeIf everything is configured correctly you should see some output.
dominik@cp:~$ kubectl get node
NAME STATUS ROLES AGE VERSION
cp NotReady control-plane 30s v1.36.3Now, the Kubernetes cluster is ready… almost. You should see a Control-Plane Node in the “NotReady” state. Why is it not ready?
Check the Node events
kubectl get event | grep CIDRAs you can see from the events, there is a problem with CIDRNotAvailable. When using the kubeadm command, we set the CIDR range for the Pods, but there is no entity that enforces this.
dominik@cp:~$ kubectl get event | grep CIDR
66s Normal CIDRNotAvailable node/cp Node cp status is now: CIDRNotAvailableTo solve this problem we need to install a CNI (Container Networking Interface) plugin to enable proper networking and enforce the CIDR configuration.
CNI
A CNI is responsible for all Pod-to-Pod related network tasks, such as assigning IP addresses. There is a fairly large list of different CNI providers to choose from.
For this use case, we will use a quite popular CNI called Calico. In later articles, we will dive into different CNIs and their advantages, but for now, Calico is more than enough for our needs.
Install the Calico Operator and the Custom Resource Definitions (CRDs).
kubectl create -f https://raw.githubusercontent.com/projectcalico/calico/v3.32.0/manifests/tigera-operator.yamlDownload the resources and change the Pod CIDR to the value we defined in the kubeadm init command above.
curl -LO https://raw.githubusercontent.com/projectcalico/calico/v3.32.0/manifests/custom-resources.yaml
sleep 3
sed -i 's/cidr: 192.168.0.0\/16/cidr: 10.100.0.0\/16/' custom-resources.yaml
kubectl apply -f custom-resources.yamlAfter a few seconds the status of the Control Plane should switch from NotRready to Ready.
dominik@cp:~$ kubectl get node
NAME STATUS ROLES AGE VERSION
cp Ready control-plane 4m29s v1.36.3Now we have a running Kubernetes cluster with one Control Plane. The next step is to extend it with a Worker Node to run workloads.
Worker Node
To create a Worker Node for the Kubernetes cluster we first need to do a basic configuation of the VM. Like the Control Plane we need to:
- Enable packet forwarding
- Disable swap
- Install containterd and runc
- Install kubectl, kubeadm and kubelet
Run the commands from the code box below to configure the VM.
# enable packet forwarding
cat <<EOF | sudo tee /etc/sysctl.d/k8s.conf
net.ipv4.ip_forward = 1
net.ipv6.conf.all.forwarding = 1
EOF
sudo sysctl --system
# disable swap
sudo swapoff -a
sudo sed -ri '/\sswap\s/s/^#?/#/' /etc/fstab
# install containerd
curl -LO https://github.com/containerd/containerd/releases/download/v2.3.0/containerd-2.3.0-linux-amd64.tar.gz
sudo tar Cxzvf /usr/local containerd-2.3.0-linux-amd64.tar.gz
curl -LO https://raw.githubusercontent.com/containerd/containerd/main/containerd.service
sudo mkdir -p /usr/local/lib/systemd/system/
sudo mv containerd.service /usr/local/lib/systemd/system/containerd.service
sudo systemctl daemon-reload
sudo systemctl enable --now containerd
sudo mkdir -p /etc/containerd
containerd config default | sudo tee /etc/containerd/config.toml
sed -e 's/SystemdCgroup = false/SystemdCgroup = true/g' -i /etc/containerd/config.toml
sudo systemctl restart containerd.service
# install runc
curl -LO https://github.com/opencontainers/runc/releases/download/v1.4.2/runc.amd64
sudo install -m 755 runc.amd64 /usr/local/bin/runc
# install kubectl, kubeadm and kubelet
sudo apt-get update
sudo apt-get install -y apt-transport-https ca-certificates curl gpg conntrack
sudo mkdir -p -m 755 /etc/apt/keyrings
curl -fsSL https://pkgs.k8s.io/core:/stable:/v1.36/deb/Release.key | sudo gpg --dearmor -o /etc/apt/keyrings/kubernetes-apt-keyring-v1.36.gpg
echo 'deb [signed-by=/etc/apt/keyrings/kubernetes-apt-keyring-v1.36.gpg] https://pkgs.k8s.io/core:/stable:/v1.36/deb/ /' | sudo tee /etc/apt/sources.list.d/kubernetesv1.36.list
sudo apt-get update
sudo apt install -y kubectl=1.36* kubeadm=1.36* kubelet=1.36*
sudo apt-mark hold kubelet kubeadm kubectl
sudo systemctl enable --now kubeletCheck if the programms are installed.
containerd -v
runc -v
kubectl version
kubeadm version
kubelet --versionThe output should look like below.
dominik@worker:~$ containerd -v
runc -v
kubectl version
kubeadm version
kubelet --version
containerd github.com/containerd/containerd/v2 v2.3.0 2976f38ccbfcda5ef1364d63d60b0a304e4bf94a
runc version 1.4.2
commit: v1.4.2-0-gc241c0bb
spec: 1.3.0
go: go1.25.8
libseccomp: 2.6.0
Client Version: v1.36.3
Kustomize Version: v5.8.1
The connection to the server localhost:8080 was refused - did you specify the right host or port?
kubeadm version: &version.Info{Major:"1", Minor:"36", EmulationMajor:"", EmulationMinor:"", MinCompatibilityMajor:"", MinCompatibilityMinor:"", GitVersion:"v1.36.3", GitCommit:"0f29094e5b73085e3802ecc1298ecae13866bfe6", GitTreeState:"clean", BuildDate:"2026-07-22T18:09:52Z", GoVersion:"go1.26.5", Compiler:"gc", Platform:"linux/amd64"}
Kubernetes v1.36.3To add the newly configured VM to the cluster we need to create a join command on the Conrtol Plane.
sudo kubeadm token create --print-join-commandThe output should look like below.
dominik@cp:~$ sudo kubeadm token create --print-join-command
kubeadm join 10.10.10.6:6443 --token 46vm5c.qmimcuiq464wps08 --discovery-token-ca-cert-hash sha256:da18dd133ddfd1cb05a4365328c65fc6c959a2eaf1e561f5b519ee7e16e8ae6cNow we can runt the kubeadm join command on the Worker Node with sudo.
sudo kubeadm join 10.10.10.6:6443 --token 7afaqm.c6s1e19u01jh4bdo --discovery-token-ca-cert-hash sha256:15279e547ccfee9c83362ae471fdaf36b0336c14bb9eef395f5373575262b6d0If everything is setup correctly the VM will joint the cluster as a Worker Node.
dominik@worker:~$ sudo kubeadm join 10.10.10.6:6443 --token 46vm5c.qmimcuiq464wps08 --discovery-token-ca-cert-hash sha256:da18dd133ddfd1cb05a4365328c65fc6c959a2eaf1e561f5b519ee7e16e8ae6c
[preflight] Running pre-flight checks
[preflight] Reading configuration from the "kubeadm-config" ConfigMap in namespace "kube-system"...
[preflight] Use 'kubeadm init phase upload-config kubeadm --config your-config-file' to re-upload it.
W0812 07:12:36.140618 153628 utils.go:69] The recommended value for "bindAddress" in "KubeProxyConfiguration" is: ::; the provided value is: 0.0.0.0
[kubelet-start] Writing kubelet configuration to file "/var/lib/kubelet/instance-config.yaml"
[patches] Applied patch of type "application/strategic-merge-patch+json" to target "kubeletconfiguration"
[kubelet-start] Writing kubelet configuration to file "/var/lib/kubelet/config.yaml"
[kubelet-start] Writing kubelet environment file with flags to file "/var/lib/kubelet/kubeadm-flags.env"
[kubelet-start] Starting the kubelet
[kubelet-check] Waiting for a healthy kubelet at http://127.0.0.1:10248/healthz. This can take up to 4m0s
[kubelet-check] The kubelet is healthy after 501.098395ms
[kubelet-start] Waiting for the kubelet to perform the TLS Bootstrap
This node has joined the cluster:
* Certificate signing request was sent to apiserver and a response was received.
* The Kubelet was informed of the new secure connection details.
Run 'kubectl get nodes' on the control-plane to see this node join the cluster.On the Control Plan we can check if it worked. If the Worker has the status NotReady, then wait a few minutes till it switches to Ready.
dominik@cp:~$ kubectl get node
NAME STATUS ROLES AGE VERSION
cp Ready control-plane 9m14s v1.36.3
worker Ready <none> 29s v1.36.3Test the Cluster
With everything set up we can now test the cluster.
kubectl run tester --image=nginx
kubectl get pod
sleep 5
kubectl get podAs we can see a new Pod was created.
dominik@cp:~$ kubectl run tester --image=nginx
kubectl get pod
sleep 5
kubectl get pod
pod/tester created
NAME READY STATUS RESTARTS AGE
tester 0/1 ContainerCreating 0 0s
NAME READY STATUS RESTARTS AGE
tester 1/1 Running 0 5sTo delete the newly created Pod run the following command.
kubectl delete pod testerThe Pod is now removed.
dominik@cp:~$ kubectl delete pod tester
pod "tester" deletedCongratulations! You now have a fully functioning Kubernetes cluster to play with.
dominik@cp:~$ kubectl get node
NAME STATUS ROLES AGE VERSION
cp Ready control-plane 9m57s v1.36.3
worker Ready <none> 72s v1.36.3Installation overview
For a better overview here are the installation steps to create a Kubernetes cluster.
Control Plane
1. Enable packet forwarding (sysctl)
2. Turn swap off
3. Install containerd (High Level Container Runtime)
4. Install runc (Low Level Container Runtime)
5. Install kubectl, kubeadm and kubelet
6. kubadm init (Create Cluster)
7. Install CNI (Container Networking Interface)
Worker Node
1. Enable packet forwarding (sysctl)
2. Turn swap off
3. Install containerd (High Level Container Runtime)
4. Install runc (Low Level Container Runtime)
5. Install kubectl, kubeadm and kubelet
6. kubadm join (Extend Cluster)Installation v1.37
Now with all the components introduced, we can create a Kubernetes cluster. In this cluster, we will use kube-proxy for networking. In a future article, we will explore eBPF as a potential replacement for the kube-proxy.
For the installation we use the following versions of the different components:
| Component | Version |
|---|---|
| Linux Kernel | 6.17.0-1022-azure |
| Ubuntu | 24.04.4 LTS |
| Kubernetes | v1.37 |
| Calico | v3.32.1 |
| containerd | v2.3.3 |
| runc | v1.5.0 |
Prerequsits
To create a Kubernetes cluster we need two Linux VMs. Here these are two Ubuntu VMs which are connected via their interface eth0. Resource wise we use 2 vCPUs and 4GB RAM.
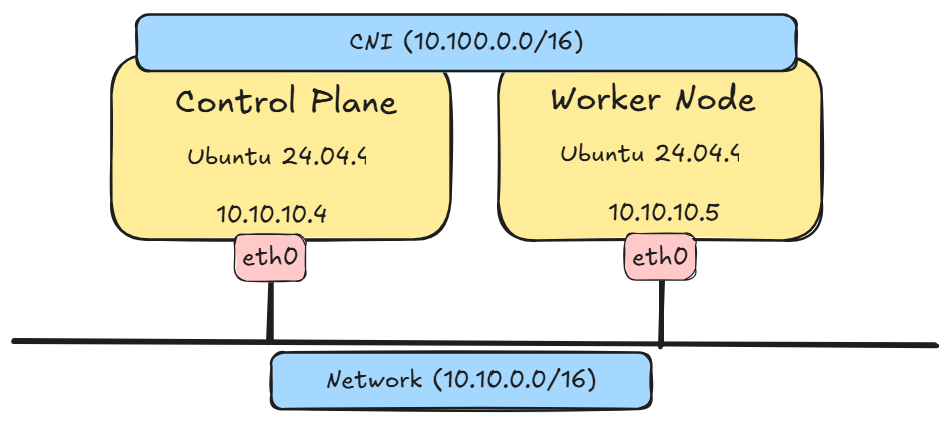
Enable forwarding of ip packets
To allow the forwarding of packets for the Pods need to enable it via sysctl.
cat <<EOF | sudo tee /etc/sysctl.d/k8s.conf
net.ipv4.ip_forward = 1
net.ipv6.conf.all.forwarding = 1
EOFApply the changes done in the file.
sudo sysctl --systemThe output should show the applied changes.
dominik@cp:~$ sudo sysctl --system
...
* Applying /etc/sysctl.d/k8s.conf ...
net.ipv4.ip_forward = 1
net.ipv6.conf.all.forwarding = 1
* Applying /etc/sysctl.conf ...Turn swap off
Now we need to turn the swap off or else the kubelet wont start.
sudo swapoff -a
sudo sed -ri '/\sswap\s/s/^#?/#/' /etc/fstabContainer Runtimes
The kubelet itself can’t create container, so we need the container runtimes to create them. In this case we install containerd and runc, which are generally the default. If OpenShift is used then these would be replaced by CRI-O.
- runc: A low-level container runtime responsible for starting and configuring the cgroups for the containers.
- containerd: A high-level container runtime that downloads and manages container images and passes them to runc to create container.
containerd
Download containerd from GitHub and check the binary.
curl -LO https://github.com/containerd/containerd/releases/download/v2.3.3/containerd-2.3.3-linux-amd64.tar.gz
curl -LO https://github.com/containerd/containerd/releases/download/v2.3.3/containerd-2.3.3-linux-amd64.tar.gz.sha256sum
cat containerd-2.3.3-linux-amd64.tar.gz.sha256sum | sha256sum --checkThere should be an output with the value OK.
dominik@cp:~$ cat containerd-2.3.3-linux-amd64.tar.gz.sha256sum | sha256sum --check
containerd-2.3.3-linux-amd64.tar.gz: OKExtract the content and save it to /usr/local/bin.
sudo tar Cxzvf /usr/local containerd-2.3.3-linux-amd64.tar.gzCreate a systemd service for containerd.
curl -LO https://raw.githubusercontent.com/containerd/containerd/main/containerd.service
sudo mkdir -p /usr/local/lib/systemd/system/
sudo mv containerd.service /usr/local/lib/systemd/system/containerd.serviceActivate the new systemd service. You can exit the systemctl view with q.
sudo systemctl daemon-reload
sudo systemctl enable --now containerd
systemctl status containerd.serviceContainerd should now run.
dominik@cp:~$ systemctl status containerd.service
● containerd.service - containerd container runtime
Loaded: loaded (/usr/local/lib/systemd/system/containerd.service; enabled; preset: enabled)
Active: active (running) since Mon 2026-09-07 21:04:33 UTC; 37ms ago
Docs: https://containerd.io
Process: 1863 ExecStartPre=/sbin/modprobe overlay (code=exited, status=0/SUCCESS)
Main PID: 1865 (containerd)
Tasks: 6
Memory: 15.1M (peak: 18.9M)
CPU: 58ms
CGroup: /system.slice/containerd.service
└─1865 /usr/local/bin/containerdCreate a configuration for containerd.
sudo mkdir -p /etc/containerd

containerd config default | sudo tee /etc/containerd/config.toml

sudo sed -e 's/SystemdCgroup = false/SystemdCgroup = true/g' -i /etc/containerd/config.toml
Apply the new configuration.
sudo systemctl restart containerd.serviceCheck if containerd works.
containerd -vYou should get an output which shows the version v2.3.3.
dominik@cp:~$ containerd -v
containerd github.com/containerd/containerd/v2 v2.3.3 aad11006b869517fcd3009450b6f82da282e1a9brunc
Download runc and check the hash of the binary.
curl -LO https://github.com/opencontainers/runc/releases/download/v1.5.0/runc.amd64
curl -LO https://github.com/opencontainers/runc/releases/download/v1.5.0/runc.sha256sum
cat runc.sha256sum | grep runc.amd64 | sha256sum --checkThere should be an output with the value OK.
dominik@cp:~$ cat runc.sha256sum | grep runc.amd64 | sha256sum --check
runc.amd64: OKInstall runc under /usr/local/bin.
sudo install -m 755 runc.amd64 /usr/local/bin/runcCheck if it works.
runc -vYou should get an output which shows the version 1.5.0.
dominik@cp:~$ runc -v
runc version 1.5.0
commit: v1.5.0-0-gc4bb59526
spec: 1.3.0
go: go1.25.11
libseccomp: 2.6.0
libpathrs: 0.2.5Install kubectl, kubeadm and kubelet
Add the Kubernetes repository with the version v1.37.
sudo apt-get update
sudo apt-get install -y apt-transport-https ca-certificates curl gpg conntrack
sudo mkdir -p -m 755 /etc/apt/keyrings
curl -fsSL https://pkgs.k8s.io/core:/stable:/v1.37/deb/Release.key | sudo gpg --dearmor -o /etc/apt/keyrings/kubernetes-apt-keyring-v1.37.gpg
echo 'deb [signed-by=/etc/apt/keyrings/kubernetes-apt-keyring-v1.37.gpg] https://pkgs.k8s.io/core:/stable:/v1.37/deb/ /' | sudo tee /etc/apt/sources.list.d/kubernetesv1.37.listUpdate the repository.
sudo apt-get updateYou should get an output which shows the new Kubernetes repo.
dominik@cp:~$ sudo apt-get update
Hit:1 http://azure.archive.ubuntu.com/ubuntu noble InRelease
Hit:2 http://azure.archive.ubuntu.com/ubuntu noble-updates InRelease
Hit:3 http://azure.archive.ubuntu.com/ubuntu noble-backports InRelease
Hit:4 http://azure.archive.ubuntu.com/ubuntu noble-security InRelease
Get:5 https://prod-cdn.packages.k8s.io/repositories/isv:/kubernetes:/core:/stable:/v1.37/deb InRelease [1227 B]
Get:6 https://prod-cdn.packages.k8s.io/repositories/isv:/kubernetes:/core:/stable:/v1.37/deb Packages [3121 B]
Fetched 4348 B in 1s (5151 B/s)
Reading package lists... DoneWith the command “apt-cache madison kubelet” you can see all the available versions for the kubelet.
dominik@cp:~$ apt-cache madison kubelet | grep 1.37
kubelet | 1.37.0-1.1 | https://pkgs.k8s.io/core:/stable:/v1.37/deb PackagesIn our case we don’t want a specific patch version so we use the * to install the latest version. Additionally we hold the programms, so that these can’t be upgraded.
sudo apt install -y kubectl=1.37* kubeadm=1.37* kubelet=1.37*
sudo apt-mark hold kubelet kubeadm kubectlLatest version gets installed.
dominik@cp:~$ sudo apt install -y kubectl=1.37* kubeadm=1.37* kubelet=1.37*
sudo apt-mark hold kubelet kubeadm kubectl
Reading package lists... Done
Building dependency tree... Done
Reading state information... Done
Selected version '1.37.0-1.1' (isv:kubernetes:core:stable:v1.37:pkgs.k8s.io [amd64]) for 'kubectl'
Selected version '1.37.0-1.1' (isv:kubernetes:core:stable:v1.37:pkgs.k8s.io [amd64]) for 'kubeadm'
Selected version '1.37.0-1.1' (isv:kubernetes:core:stable:v1.37:pkgs.k8s.io [amd64]) for 'kubelet'Enable the kubelet systemd service
sudo systemctl enable --now kubeletIf you check the kubelet systemd service with systemctl status kubelet, you will see that the service is not running. This is normal. In the next steps, we will run kubeadm to configure kubelet so that it can start and run properly.
dominik@cp:~$ systemctl status kubelet.service
● kubelet.service - kubelet: The Kubernetes Node Agent
Loaded: loaded (/usr/lib/systemd/system/kubelet.service; enabled; preset: enabled)
Drop-In: /usr/lib/systemd/system/kubelet.service.d
└─10-kubeadm.conf
Active: activating (auto-restart) (Result: exit-code) since Mon 2026-09-07 21:10:36 UTC; 9s ago
Docs: https://kubernetes.io/docs/
Process: 3202 ExecStart=/usr/bin/kubelet $KUBELET_KUBECONFIG_ARGS $KUBELET_CONFIG_ARGS $KUBELET_KUBE>
Main PID: 3202 (code=exited, status=1/FAILURE)
CPU: 39msCheck the versions
kubectl version
kubeadm version
kubelet --versionAll the right versions should be installed.
dominik@cp:~$ kubectl version
kubeadm version
kubelet --version
Client Version: v1.37.0
Kustomize Version: v5.8.1
The connection to the server localhost:8080 was refused - did you specify the right host or port?
kubeadm version: &version.Info{Major:"1", Minor:"37", EmulationMajor:"", EmulationMinor:"", MinCompatibilityMajor:"", MinCompatibilityMinor:"", GitVersion:"v1.37.0", GitCommit:"f54c212e3a2f75d674b717a9b29052b20b60aefc", GitTreeState:"clean", BuildDate:"2026-08-26T10:47:17Z", GoVersion:"go1.26.6", Compiler:"gc", Platform:"linux/amd64"}
Kubernetes v1.37.0Controle Plane
Now, there are some additional commands which only need to be executed on the Control Plane. To create the cluster, we simply use kubeadm init to install all the required components and configure the system.
Initialize the Kubernetes cluster.
sudo kubeadm init --pod-network-cidr=10.100.0.0/16The kubeadm init command should provide output like below.
dominik@cp:~$ sudo kubeadm init --pod-network-cidr=10.100.0.0/16
[init] Using Kubernetes version: v1.37.0
[preflight] Running pre-flight checks
[preflight] Pulling images required for setting up a Kubernetes cluster
[preflight] This might take a minute or two, depending on the speed of your internet connection
[preflight] You can also perform this action beforehand using 'kubeadm config images pull'
[certs] Using certificateDir folder "/etc/kubernetes/pki"
[certs] Generating "ca" certificate and key
[certs] Generating "apiserver" certificate and key
[certs] apiserver serving cert is signed for DNS names [cp kubernetes kubernetes.default kubernetes.default.svc kubernetes.default.svc.cluster.local] and IPs [10.96.0.1 10.10.10.4]
[certs] Generating "apiserver-kubelet-client" certificate and key
[certs] Generating "front-proxy-ca" certificate and key
[certs] Generating "front-proxy-client" certificate and key
[certs] Generating "etcd/ca" certificate and key
[certs] Generating "etcd/server" certificate and key
[certs] etcd/server serving cert is signed for DNS names [cp localhost] and IPs [10.10.10.4 127.0.0.1 ::1]
[certs] Generating "etcd/peer" certificate and key
[certs] etcd/peer serving cert is signed for DNS names [cp localhost] and IPs [10.10.10.4 127.0.0.1 ::1]
[certs] Generating "etcd/healthcheck-client" certificate and key
[certs] Generating "apiserver-etcd-client" certificate and key
[certs] Generating "sa" key and public key
[kubeconfig] Using kubeconfig folder "/etc/kubernetes"
[kubeconfig] Writing "admin.conf" kubeconfig file
[kubeconfig] Writing "super-admin.conf" kubeconfig file
[kubeconfig] Writing "kubelet.conf" kubeconfig file
[kubeconfig] Writing "controller-manager.conf" kubeconfig file
[kubeconfig] Writing "scheduler.conf" kubeconfig file
[etcd] Creating static Pod manifest for local etcd in "/etc/kubernetes/manifests"
[control-plane] Using manifest folder "/etc/kubernetes/manifests"
[control-plane] Creating static Pod manifest for "kube-apiserver"
[control-plane] Creating static Pod manifest for "kube-controller-manager"
[control-plane] Creating static Pod manifest for "kube-scheduler"
[kubelet-start] Writing kubelet environment file with flags to file "/var/lib/kubelet/kubeadm-flags.env"
[kubelet-start] Writing kubelet configuration to file "/var/lib/kubelet/instance-config.yaml"
[patches] Applied patch of type "application/strategic-merge-patch+json" to target "kubeletconfiguration"
[kubelet-start] Writing kubelet configuration to file "/var/lib/kubelet/config.yaml"
[kubelet-start] Starting the kubelet
[wait-control-plane] Waiting for the kubelet to boot up the control plane as static Pods from directory "/etc/kubernetes/manifests"
[kubelet-check] Waiting for a healthy kubelet at http://127.0.0.1:10248/healthz. This can take up to 4m0s
[kubelet-check] The kubelet is healthy after 858.073µs
[control-plane-check] Waiting for healthy control plane components. This can take up to 4m0s
[control-plane-check] Checking kube-apiserver at https://10.10.10.4:6443/livez
[control-plane-check] Checking kube-controller-manager at https://127.0.0.1:10257/healthz
[control-plane-check] Checking kube-scheduler at https://127.0.0.1:10259/livez
[control-plane-check] kube-controller-manager is healthy after 5.145785ms
[control-plane-check] kube-scheduler is healthy after 7.706021ms
[control-plane-check] kube-apiserver is healthy after 2.003301857s
[upload-config] Storing the configuration used in ConfigMap "kubeadm-config" in the "kube-system" Namespace
[kubelet] Creating a ConfigMap "kubelet-config" in namespace kube-system with the configuration for the kubelets in the cluster
[upload-certs] Skipping phase. Please see --upload-certs
[mark-control-plane] Marking the node cp as control-plane by adding the labels: [node-role.kubernetes.io/control-plane node.kubernetes.io/exclude-from-external-load-balancers]
[mark-control-plane] Marking the node cp as control-plane by adding the taints [node-role.kubernetes.io/control-plane:NoSchedule]
[bootstrap-token] Using token: s0wr1j.7mr9umilzt5g3ja0
[bootstrap-token] Configuring bootstrap tokens, cluster-info ConfigMap, RBAC Roles
[bootstrap-token] Configured RBAC rules to allow Node Bootstrap tokens to get nodes
[bootstrap-token] Configured RBAC rules to allow Node Bootstrap tokens to post CSRs in order for nodes to get long term certificate credentials
[bootstrap-token] Configured RBAC rules to allow the csrapprover controller automatically approve CSRs from a Node Bootstrap Token
[bootstrap-token] Configured RBAC rules to allow certificate rotation for all node client certificates in the cluster
[bootstrap-token] Configured RBAC rules to allow the API server kubelet client certificate to access the kubelet API
[bootstrap-token] Creating the "cluster-info" ConfigMap in the "kube-public" namespace
[kubelet-finalize] Updating "/etc/kubernetes/kubelet.conf" to point to a rotatable kubelet client certificate and key
[addons] Applied essential addon: CoreDNS
[addons] Applied essential addon: kube-proxy
Your Kubernetes control-plane has initialized successfully!
To start using your cluster, you need to run the following as a regular user:
mkdir -p $HOME/.kube
sudo cp -i /etc/kubernetes/admin.conf $HOME/.kube/config
sudo chown $(id -u):$(id -g) $HOME/.kube/config
Alternatively, if you are the root user, you can run:
export KUBECONFIG=/etc/kubernetes/admin.conf
You should now deploy a pod network to the cluster.
Run "kubectl apply -f [podnetwork].yaml" with one of the options listed at:
https://kubernetes.io/docs/concepts/cluster-administration/addons/
Then you can join any number of worker nodes by running the following on each as root:
kubeadm join 10.10.10.4:6443 --token s0wr1j.7mr9umilzt5g3ja0 \
--discovery-token-ca-cert-hash sha256:892aef47efd5f0fcb451b791e820800c9c0afadabb8eef6ee126e48ab101f37dAfter some time, the cluster will be ready, and we can access it using the configuration file. Be mindful with the following commands, as it will copy the configuration file of the Kubernetes admin user. This means every action we take will be performed as an administrator. For now, this is fine. In a later article, we will explore how to add users to the Kubernetes cluster.
Copy the kube-config file.
mkdir -p $HOME/.kube
sudo cp -i /etc/kubernetes/admin.conf $HOME/.kube/config
sudo chown $(id -u):$(id -g) $HOME/.kube/configCheck the Cluster connection
kubectl get nodeIf everything is configured correctly you should see some output.
dominik@cp:~$ kubectl get node
NAME STATUS ROLES AGE VERSION
cp NotReady control-plane 76s v1.37.0Now, the Kubernetes cluster is ready… almost. You should see a Control-Plane Node in the “NotReady” state. Why is it not ready?
Check the Node events
kubectl get event | grep CIDRAs you can see from the events, there is a problem with CIDRNotAvailable. When using the kubeadm command, we set the CIDR range for the Pods, but there is no entity that enforces this.
dominik@cp:~$ kubectl get event | grep CIDR
17s Normal CIDRNotAvailable node/cp Node cp status is now: CIDRNotAvailableTo solve this problem we need to install a CNI (Container Networking Interface) plugin to enable proper networking and enforce the CIDR configuration.
CNI
A CNI is responsible for all Pod-to-Pod related network tasks, such as assigning IP addresses. There is a fairly large list of different CNI providers to choose from.
For this use case, we will use a quite popular CNI called Calico. In later articles, we will dive into different CNIs and their advantages, but for now, Calico is more than enough for our needs.
Install the Calico Operator and the Custom Resource Definitions (CRDs).
kubectl create -f https://raw.githubusercontent.com/projectcalico/calico/v3.32.1/manifests/tigera-operator.yamlDownload the resources and change the Pod CIDR to the value we defined in the kubeadm init command above.
curl -LO https://raw.githubusercontent.com/projectcalico/calico/v3.32.0/manifests/custom-resources.yaml
sleep 2
sed -i 's/cidr: 192.168.0.0\/16/cidr: 10.100.0.0\/16/' custom-resources.yaml
kubectl apply -f custom-resources.yamlAfter a few seconds the status of the Control Plane should switch from NotRready to Ready.
dominik@cp:~$ kubectl get node
NAME STATUS ROLES AGE VERSION
cp Ready control-plane 3m52s v1.37.0Now we have a running Kubernetes cluster with one Control Plane. The next step is to extend it with a Worker Node to run workloads.
Worker Node
To create a Worker Node for the Kubernetes cluster we first need to do a basic configuation of the VM. Like the Control Plane we need to:
- Enable packet forwarding
- Disable swap
- Install containterd and runc
- Install kubectl, kubeadm and kubelet
Run the commands from the code box below to configure the VM.
# enable packet forwarding
cat <<EOF | sudo tee /etc/sysctl.d/k8s.conf
net.ipv4.ip_forward = 1
net.ipv6.conf.all.forwarding = 1
EOF
sudo sysctl --system
# disable swap
sudo swapoff -a
sudo sed -ri '/\sswap\s/s/^#?/#/' /etc/fstab
# install containerd
curl -LO https://github.com/containerd/containerd/releases/download/v2.3.3/containerd-2.3.3-linux-amd64.tar.gz
sudo tar Cxzvf /usr/local containerd-2.3.3-linux-amd64.tar.gz
curl -LO https://raw.githubusercontent.com/containerd/containerd/main/containerd.service
sudo mkdir -p /usr/local/lib/systemd/system/
sudo mv containerd.service /usr/local/lib/systemd/system/containerd.service
sudo systemctl daemon-reload
sudo systemctl enable --now containerd
sudo mkdir -p /etc/containerd
containerd config default | sudo tee /etc/containerd/config.toml
sed -e 's/SystemdCgroup = false/SystemdCgroup = true/g' -i /etc/containerd/config.toml
sudo systemctl restart containerd.service
# install runc
curl -LO https://github.com/opencontainers/runc/releases/download/v1.5.0/runc.amd64
sudo install -m 755 runc.amd64 /usr/local/bin/runc
# install kubectl, kubeadm and kubelet
sudo apt-get update
sudo apt-get install -y apt-transport-https ca-certificates curl gpg conntrack
sudo mkdir -p -m 755 /etc/apt/keyrings
curl -fsSL https://pkgs.k8s.io/core:/stable:/v1.37/deb/Release.key | sudo gpg --dearmor -o /etc/apt/keyrings/kubernetes-apt-keyring-v1.37.gpg
echo 'deb [signed-by=/etc/apt/keyrings/kubernetes-apt-keyring-v1.37.gpg] https://pkgs.k8s.io/core:/stable:/v1.37/deb/ /' | sudo tee /etc/apt/sources.list.d/kubernetesv1.37.list
sudo apt-get update
sudo apt install -y kubectl=1.37* kubeadm=1.37* kubelet=1.37*
sudo apt-mark hold kubelet kubeadm kubectl
sudo systemctl enable --now kubeletCheck if the programms are installed.
containerd -v
runc -v
kubectl version
kubeadm version
kubelet --versionThe output should look like below.
dominik@worker:~$ containerd -v
runc -v
kubectl version
kubeadm version
kubelet --version
containerd github.com/containerd/containerd/v2 v2.3.3 aad11006b869517fcd3009450b6f82da282e1a9b
runc version 1.5.0
commit: v1.5.0-0-gc4bb59526
spec: 1.3.0
go: go1.25.11
libseccomp: 2.6.0
libpathrs: 0.2.5
Client Version: v1.37.0
Kustomize Version: v5.8.1
The connection to the server localhost:8080 was refused - did you specify the right host or port?
kubeadm version: &version.Info{Major:"1", Minor:"37", EmulationMajor:"", EmulationMinor:"", MinCompatibilityMajor:"", MinCompatibilityMinor:"", GitVersion:"v1.37.0", GitCommit:"f54c212e3a2f75d674b717a9b29052b20b60aefc", GitTreeState:"clean", BuildDate:"2026-08-26T10:47:17Z", GoVersion:"go1.26.6", Compiler:"gc", Platform:"linux/amd64"}
Kubernetes v1.37.0To add the newly configured VM to the cluster we need to create a join command on the Conrtol Plane.
sudo kubeadm token create --print-join-commandThe output should look like below.
dominik@cp:~$ sudo kubeadm token create --print-join-command
kubeadm join 10.10.10.4:6443 --token w85fbl.0c4qiq0cxkqiq4lj --discovery-token-ca-cert-hash sha256:892aef47efd5f0fcb451b791e820800c9c0afadabb8eef6ee126e48ab101f37dNow we can runt the kubeadm join command on the Worker Node with sudo.
sudo kubeadm join 10.10.10.4:6443 --token w85fbl.0c4qiq0cxkqiq4lj --discovery-token-ca-cert-hash sha256:892aef47efd5f0fcb451b791e820800c9c0afadabb8eef6ee126e48ab101f37dIf everything is setup correctly the VM will joint the cluster as a Worker Node.
dominik@worker:~$ sudo kubeadm join 10.10.10.4:6443 --token w85fbl.0c4qiq0cxkqiq4lj --discovery-token-ca-cert-hash sha256:892aef47efd5f0fcb451b791e820800c9c0afadabb8eef6ee126e48ab101f37d
[preflight] Running pre-flight checks
[preflight] Reading configuration from the "kubeadm-config" ConfigMap in namespace "kube-system"...
[preflight] Use 'kubeadm init phase upload-config kubeadm --config your-config-file' to re-upload it.
[kubelet-start] Writing kubelet configuration to file "/var/lib/kubelet/instance-config.yaml"
[patches] Applied patch of type "application/strategic-merge-patch+json" to target "kubeletconfiguration"
[kubelet-start] Writing kubelet configuration to file "/var/lib/kubelet/config.yaml"
[kubelet-start] Writing kubelet environment file with flags to file "/var/lib/kubelet/kubeadm-flags.env"
[kubelet-start] Starting the kubelet
[kubelet-check] Waiting for a healthy kubelet at http://127.0.0.1:10248/healthz. This can take up to 4m0s
[kubelet-check] The kubelet is healthy after 501.676171ms
[kubelet-start] Waiting for the kubelet to perform the TLS Bootstrap
This node has joined the cluster:
* Certificate signing request was sent to apiserver and a response was received.
* The Kubelet was informed of the new secure connection details.
Run 'kubectl get nodes' on the control-plane to see this node join the cluster.On the Control Plan we can check if it worked. If the Worker has the status NotReady, then wait a few minutes till it switches to Ready.
dominik@cp:~$ kubectl get node
NAME STATUS ROLES AGE VERSION
cp Ready control-plane 8m18s v1.37.0
worker Ready <none> 61s v1.37.0Test the Cluster
With everything set up we can now test the cluster.
kubectl run tester --image=nginx
kubectl get pod
sleep 10
kubectl get podAs we can see a new Pod was created.
dominik@cp:~$ kubectl run tester --image=nginx
kubectl get pod
sleep 5
kubectl get pod
pod/tester created
NAME READY STATUS RESTARTS AGE
tester 0/1 ContainerCreating 0 0s
NAME READY STATUS RESTARTS AGE
tester 1/1 Running 0 10sTo delete the newly created Pod run the following command.
kubectl delete pod testerThe Pod is now removed.
dominik@cp:~$ kubectl delete pod tester
pod "tester" deletedCongratulations! You now have a fully functioning Kubernetes cluster to play with.
dominik@cp:~$ kubectl get node -o wide
NAME STATUS ROLES AGE VERSION INTERNAL-IP EXTERNAL-IP OS-IMAGE KERNEL-VERSION CONTAINER-RUNTIME
cp Ready control-plane 11m v1.37.0 10.10.10.4 <none> Ubuntu 24.04.4 LTS 6.17.0-1022-azure (amd64) containerd://2.3.3
worker Ready <none> 4m19s v1.37.0 10.10.10.5 <none> Ubuntu 24.04.4 LTS 6.17.0-1022-azure (amd64) containerd://2.3.3Installation overview
For a better overview here are the installation steps to create a Kubernetes cluster.
Control Plane
  1. Enable packet forwarding (sysctl)
  2. Turn swap off
  3. Install containerd (High Level Container Runtime)
  4. Install runc (Low Level Container Runtime)
  5. Install kubectl, kubeadm and kubelet
  6. kubadm init (Create Cluster)
  7. Install CNI (Container Networking Interface)

Worker Node
  1. Enable packet forwarding (sysctl)
  2. Turn swap off
  3. Install containerd (High Level Container Runtime)
  4. Install runc (Low Level Container Runtime)
  5. Install kubectl, kubeadm and kubelet
6. kubadm join (Extend Cluster)Next Article
In the following article, we will explore how to add a CSI (Container Storage Interface) to the cluster, enabling us to store data persistently across different Nodes.
Contact
For further questions contact me at: blog [@] dominiklandau.de