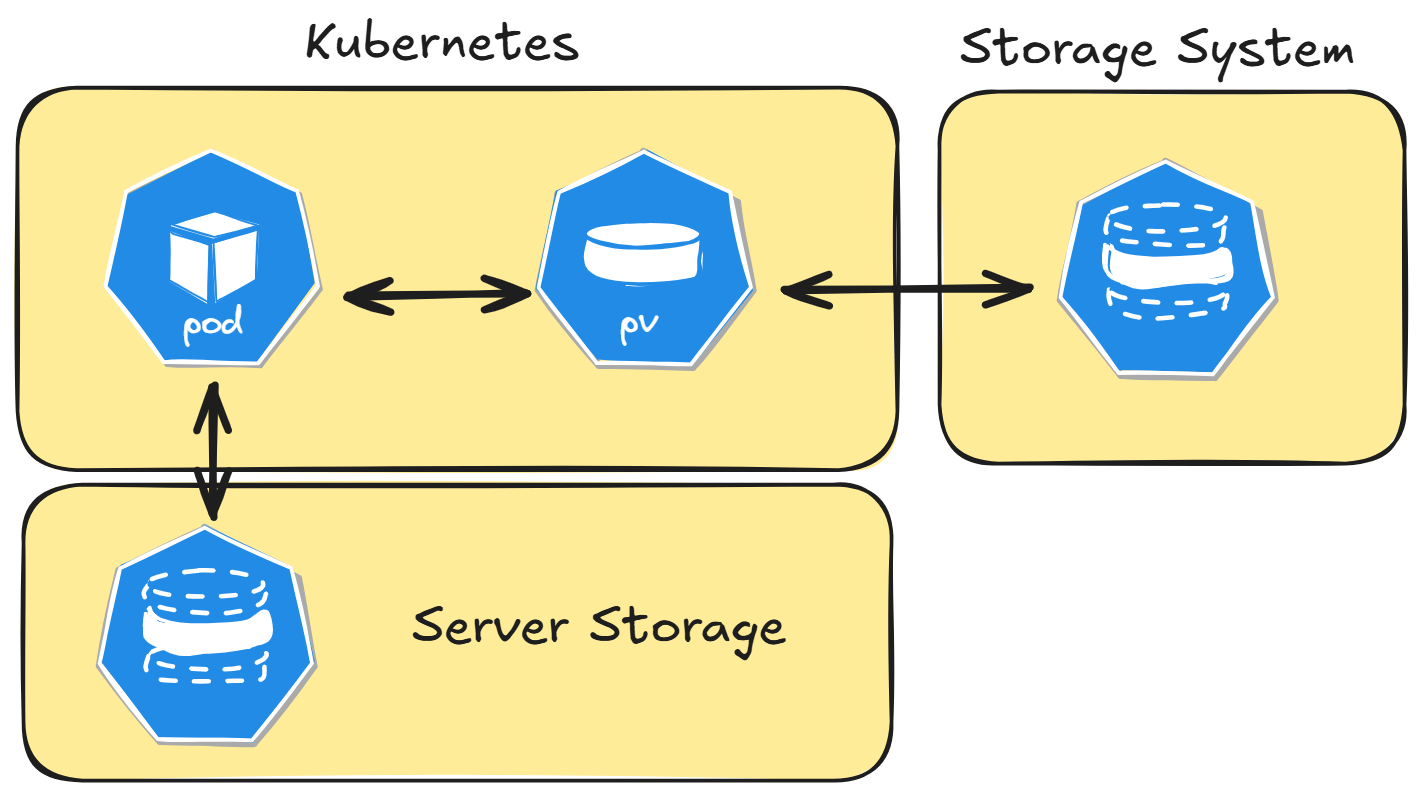
After the previous article, you should now have a running Kubernetes Cluster: Kubernetes Part 1. Now, we will dive into storage and how to add it to a Pod in the cluster. We will first start with simple volume mounting using storage from the underlying server, and then dive deeper into CSI drivers. This guide works with any Kubernetes version greater than v1.20.
Get Data into a Pod
By default, Containers and therefore Pods, are ephemeral, which means that all data inside a Pod is lost when it is deleted. With the help of volumes and volumeMounts you can persist data.
Here is a simple example for a Pod with an external mount directly to the underlying host. With this configuration, the path /data inside of the Container is mounted to the path /mnt/data on the host.
apiVersion: v1
kind: Pod
metadata:
  name: mypod
spec:
  containers:
  - name: nginx
    image: nginx
    volumeMounts:
    - name: myvol       # internal name
      mountPath: /data  # mount path
      readOnly: false
  volumes:
  - name: myvol         # internal name
    hostPath:           # volume source
      path: /mnt/data   # external mount
type: DirectoryOrCreateWith the Pod definition above you can create the Pod.
kubectl apply -f pod.yaml When using the -o wide option, you can see on which Node the Pod is running on. Here it is running on the Worker, so we need to connect to this Node to view the mounted path.
dominik@cp:~$ kubectl apply -f pod.yaml
pod/mypod created
dominik@cp:~$ kubectl get pod -o wide
NAME    READY   STATUS    RESTARTS   AGE   IP              NODE     NOMINATED NODE
mypod 1/1 Running 0 6s 10.100.171.66 worker <none> On the Worker Node you can see a newly created directory under /mnt, which is directly mounted into the container.
dominik@worker:~$ ls /mnt/
data Volume Sources in a Pod
With this first example out of the way, we can now take a closer look at the different options for mounting external storage. To get an overview of the available options, we can use the kubectl explain command, as shown below.
kubectl explain pod.spec.volumesAs you can see in the output below, there are a many different Volume Sources to choose from, but be careful, some of the are deprecated. An official list of the available Volume Sources can be found in the Kubernetes documentation here. Additionally, I will list the most important ones in the table below
kubectl explain pod.spec.volumes
KIND:       Pod
VERSION:    v1

FIELD: volumes <[]Volume>


DESCRIPTION:
    List of volumes that can be mounted by containers belonging to the pod. More
    info: https://kubernetes.io/docs/concepts/storage/volumes
    Volume represents a named volume in a pod that may be accessed by any
    container in the pod.

FIELDS:
  awsElasticBlockStore  <AWSElasticBlockStoreVolumeSource>
    awsElasticBlockStore represents an AWS Disk resource that is attached to a
    kubelet's host machine and then exposed to the pod. Deprecated:
    AWSElasticBlockStore is deprecated. All operations for the in-tree
    awsElasticBlockStore type are redirected to the ebs.csi.aws.com CSI driver.
    More info:
    https://kubernetes.io/docs/concepts/storage/volumes#awselasticblockstore

  azureDisk     <AzureDiskVolumeSource>
    azureDisk represents an Azure Data Disk mount on the host and bind mount to
    the pod. Deprecated: AzureDisk is deprecated. All operations for the in-tree
    azureDisk type are redirected to the disk.csi.azure.com CSI driver.
...In the table below, I have grouped the different sources that can be used. Depending on the source, you may have only read access to the data, as with a configMap or secret.
| Volume Source | Description |
|---|---|
| hostPath or local | Mount a directory or file on the host |
| emptyDir | Temporary local volume on the host to share data between container |
| persistentVolumeClaim | Working with PVC and PV |
| configMap | (read only) Mount ConfigMaps as volumes |
| secret | (read only) Mount Secrets as volumes |
| downwardAPI | (read only) Expose Pod field into the running container |
| projected | (read only) Expose multiple sources into one folder. Mainly used for mounting ServiceAccount token and the Kubernetes CA Certificate |
| image | (read only) Mount a container image to access data inside of it |
In the following sections, we will start with the concepts of PersistentVolumes (PV) and PersistentVolumeClaims (PVC), which are the main use cases for storage in Kubernetes. A later article will be focused on the other options available, but for now we dive into the PVCs.
Storage Concept (PVC)
When talking about storage in Kubernetes the typical use case involves assigning storage from an external storage system to a Pod. For this to work we need to create a PersistentVolume (PV) and a PersistentVolumeClaim (PVC).
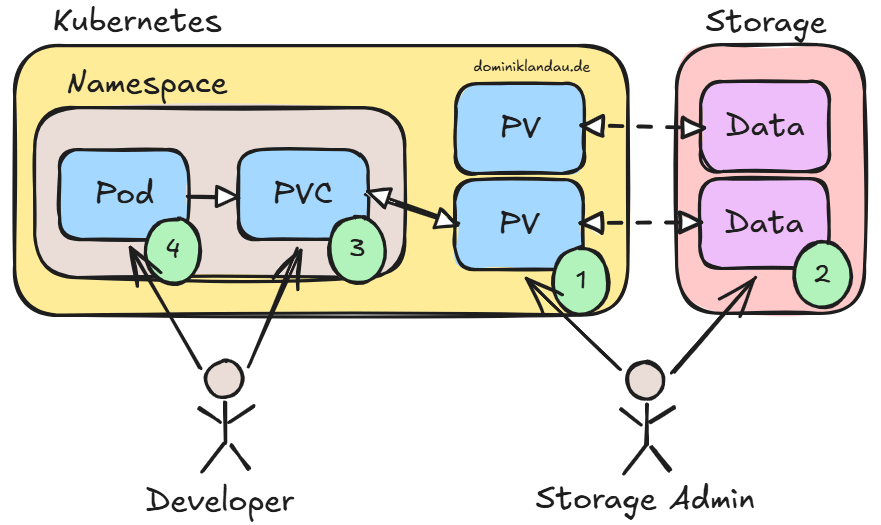
In the picture above we can see the traditional and manual way in Kubernetes assigning storage to a Pod via a PVC.
The PV is a cluster wide resource which is created by a Storage Admin who exposes small chunks of data from his Storage System to Kubernetes. The Developer on the other side creates a PVC and assigns this PVC to a Pod. Kubernetes now has the task to find a fitting PV for the PVC. If there is no match, then the Pod will be stuck in a pending state, till a PV is created.
In modern Kubernetes cluster the role of a Storage Admin is replaced by the CSI driver which creates the PVs on demand. Before looking into this topic we start with the manual way.
Manual Mode (Static Provisioning)
To use storage in Kubernetes, you first need to create a PV with a provider to connect to the storage. In this example, we are using the local provider to create a folder on the Worker Node. Kubernetes currently supports six different provider types (csi, fc, hostPath, iscsi, local, nfs). After that, a PVC is created and connected to the PV. Finally the PVC is added to the Pod.
The final setup is visualized in the picture below.
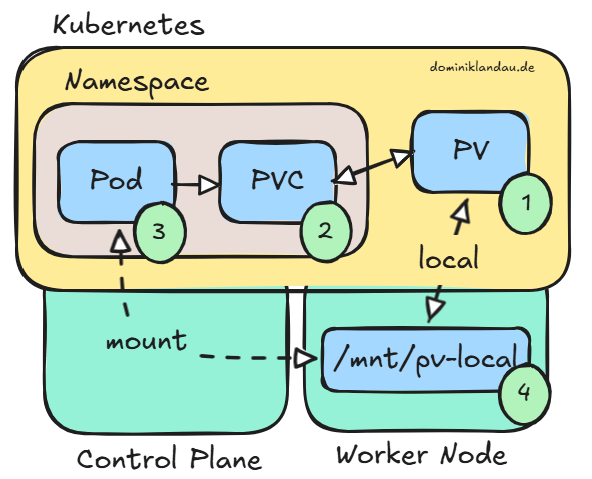
First you create a PV with nodeSelectorTerms, so that it is always connected to the Worker Node.
apiVersion: v1
kind: PersistentVolume
metadata:
  name: pv-local
  labels:
    type: local
spec:
  storageClassName: manual # optinal
  capacity:
    storage: 1Gi
  accessModes:
  - ReadWriteOnce
  nodeAffinity:
    required:
      nodeSelectorTerms:
        - matchExpressions:
            - key: kubernetes.io/hostname
              operator: In
              values:
              - worker  # name of the node
  local:
path: "/mnt/pv-local"To use the newly created PV, you now create a PVC and reference the PV in there. If you would omit the volumeName, Kubernetes would use the request and storageClassName to find an appropriate volume.
apiVersion: v1
kind: PersistentVolumeClaim
metadata:
  name: pvc-local
  namespace: default
spec:
  storageClassName: manual
  volumeName: pv-local # optional
  accessModes:
  - ReadWriteOnce
  resources:
    requests:
storage: 1GiThe PVC now needs to be mounted inside of the Pod under /data.
apiVersion: v1
kind: Pod
metadata:
  name: pod-local-pv
spec:
  containers:
  - name: nginx
    image: nginx
    volumeMounts:
    - name: vol1       # internal name
      mountPath: /data # container mount path
  volumes:
  - name: vol1         # internal name
    persistentVolumeClaim:
claimName: pvc-localIf everything was done correctly, you can list the created resources.
kubectl get pv,pvc,podHere you can see a PV, PVC and a Pod. The PVC is bound to the PV and added to the Pod.
dominik@cp:~$ kubectl get pv,pvc,pod
NAME                        CAPACITY   ACCESS MODES   RECLAIM POLICY   STATUS   CLAIM               STORAGECLASS   VOLUMEATTRIBUTESCLASS   REASON   AGE
persistentvolume/pv-local   1Gi        RWO            Retain           Bound    default/pvc-local   manual         <unset>                          8m26s

NAME                              STATUS   VOLUME     CAPACITY   ACCESS MODES   STORAGECLASS   VOLUMEATTRIBUTESCLASS   AGE
persistentvolumeclaim/pvc-local   Bound    pv-local   1Gi        RWO            manual         <unset>                 8m15s

NAME               READY   STATUS    RESTARTS   AGE
pod/pod-local-pv 1/1 Running 0 17sWith the -o wide option you get the Node on which the Pod is started.
kubectl get pod -o wideHere you can see, that the Pod runs on the Worker Node.
dominik@cp:~$ kubectl get pod -o wide
NAME           READY   STATUS    RESTARTS   AGE   IP              NODE     NOMINATED NODE   READINESS GATES
pod-local-pv 1/1 Running 0 32s 10.100.171.70 worker <none> With the following command you can create a file inside of the Pod under the mounted path.
kubectl exec pod-local-pv -- bash -c "echo 'from Pod' > /data/pod.txt"If you connect to the Worker Node and look into the folder referenced in the PV, you can see the file, which was created inside of the container.
sudo cat /mnt/data/pod.txtHere you can see, that the file and its content is there.
dominik@worker:~$ sudo cat /mnt/data/pod.txt
from PodConfigure NFS
In the previous example we used the local provider in the PV, which limits us to the Node where the Pod is assigned. To use the storage in the whole cluster we use nfs. For this to work, we need to install some packages and do some configuration.
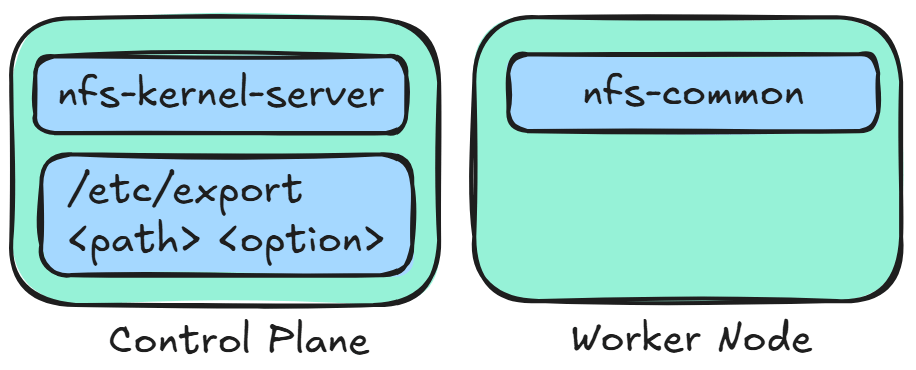
In the first step we configure the Control Plane and install the nfs server.
sudo apt update
sudo apt install nfs-kernel-server -yNow the packages should be present.
dominik@cp:~$ sudo apt install nfs-kernel-server
Reading package lists... Done
Building dependency tree... Done
Reading state information... Done
The following additional packages will be installed:
  libnfsidmap1 nfs-common rpcbind
Suggested packages:
  watchdog
The following NEW packages will be installed:
  libnfsidmap1 nfs-common nfs-kernel-server rpcbind
0 upgraded, 4 newly installed, 0 to remove and 6 not upgraded.
Need to get 512 kB of archives.
After this operation, 1849 kB of additional disk space will be used.On the Worker Node we install the nfs common package.
sudo apt update
sudo apt install nfs-common -yNow the packages should be present on the worker too.
dominik@worker:~$ sudo apt install nfs-common -y
Reading package lists... Done
Building dependency tree... Done
Reading state information... Done
The following additional packages will be installed:
  libnfsidmap1 rpcbind
Suggested packages:
  watchdog
The following NEW packages will be installed:
  libnfsidmap1 nfs-common rpcbind
0 upgraded, 3 newly installed, 0 to remove and 6 not upgraded.
Need to get 343 kB of archives.
After this operation, 1243 kB of additional disk space will be used.To use nfs you need to define a folder, which should contain the data. Here you can use /var/nfs/kubernetes on the Control Plane.
sudo mkdir /var/nfs/kubernetes -p
sudo chown nobody:nogroup /var/nfs/kubernetes

sudo ls -l /var/nfs/The folder is created and available.
dominik@cp:~$ sudo ls -l /var/nfs/
total 4
drwxr-xr-x 2 nobody nogroup 4096 Aug 13 14:32 kubernetesTo be able to access this folder from other machines you need to configure the /etc/exports.
sudo nano /etc/exportsAdd the following line to the exports file. Only the last line is needed!
# /etc/exports: the access control list for filesystems which may be exported
#               to NFS clients.  See exports(5).
#
# Example for NFSv2 and NFSv3:
# /srv/homes       hostname1(rw,sync,no_subtree_check) hostname2(ro,sync,no_subtree_che>
#
# Example for NFSv4:
# /srv/nfs4        gss/krb5i(rw,sync,fsid=0,crossmnt,no_subtree_check)
# /srv/nfs4/homes  gss/krb5i(rw,sync,no_subtree_check)
#
/var/nfs/kubernetes *(rw,sync,subtree_check,no_root_squash)
Restart the systemd service.
sudo systemctl restart nfs-kernel-server
sudo systemctl status nfs-kernel-serverThe output should look like below.
dominik@cp:~$ sudo systemctl status nfs-kernel-server
● nfs-server.service - NFS server and services
     Loaded: loaded (/usr/lib/systemd/system/nfs-server.service; enabled; preset: enabl>
     Active: active (exited) since Thu 2026-08-13 14:37:09 UTC; 22ms ago
    Process: 528198 ExecStartPre=/usr/sbin/exportfs -r (code=exited, status=0/SUCCESS)
    Process: 528200 ExecStart=/usr/sbin/rpc.nfsd (code=exited, status=0/SUCCESS)
   Main PID: 528200 (code=exited, status=0/SUCCESS)
        CPU: 10ms
Now we need to apply the changes to the /etc/exports and check if the paths are available.
sudo exportfs -a
sudo exportfsOur configuration allows anybody to connect to the exposed folder.
dominik@cp:~$ sudo exportfs
/var/nfs/kubernetes   <world>
With this configuration out of the way. we can now create the Kubernetes objects. The picture below shows the final setup. So we need to create a PV, a PVC and a Pod.
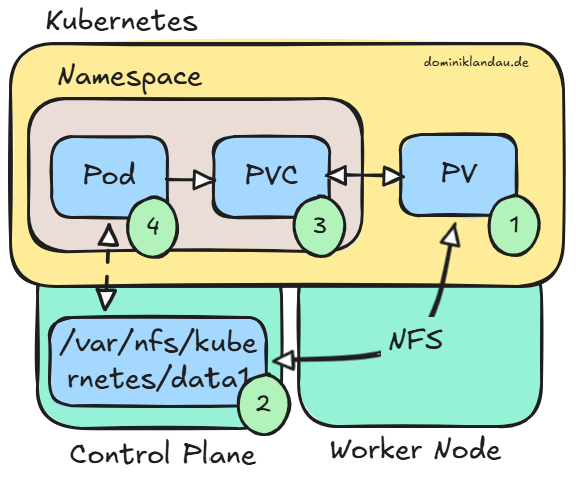
In the first step we need to create a PV and set the server and path variable.
apiVersion: v1
kind: PersistentVolume
metadata:
  name: pv-nfs
  labels:
    type: nfs
spec:
  storageClassName: manual # optinal
  capacity:
    storage: 1Gi
  accessModes:
  - ReadWriteOnce
  nfs:
    server: 10.10.10.6              # Replace with your NFS server IP
path: /var/nfs/kubernetes/data1 # Replace with your NFS export pathNow we need to create the folder, which we defined in the PV above.
sudo mkidr -p /var/nfs/kubernetes/data1This should look like below.
dominik@cp:~$ ls -l /var/nfs/kubernetes/
total 4
drwxr-xr-x 2 root root 4096 Aug 13 14:56 data1
Like in the first example we need to connect the PV with the PVC.
apiVersion: v1
kind: PersistentVolumeClaim
metadata:
  name: pvc-nfs
  namespace: default
spec:
  storageClassName: manual # if it was set on the PV
  volumeName: pv-nfs # optional
  accessModes:
  - ReadWriteOnce
  resources:
    requests:
storage: 1GiNow the PVC is mounted inside of the Pod under /data.
apiVersion: v1
kind: Pod
metadata:
  name: pod-nfs-pv
spec:
  containers:
  - name: nginx
    image: nginx
    volumeMounts:
    - name: vol1       # internal name
      mountPath: /data # container mount path
  volumes:
  - name: vol1         # internal name
    persistentVolumeClaim:
claimName: pvc-nfsTo test if everything works, we create a file inside of the Pod.
kubectl exec pod-nfs-pv -- bash -c "echo 'from Pod' > /data/pod.txt"
cat /var/nfs/kubernetes/data1/pod.txt The file we created in the previous step can be found on the Control Plane under our exported path.
dominik@cp:~$ kubectl exec pod-nfs-pv -- bash -c "echo 'from Pod' > /data/pod.txt"
dominik@cp:~$ cat /var/nfs/kubernetes/data1/pod.txt
from Pod
Dynamic Mode (Dynamic Provisioning)
As you can see, with the manual mode there are a lot of steps to get a PV into a Pod. To simplify this whole process, we will use a CSI (Container Storage Interface) plugin. This plugin will manage the configuration and creation of the PVs. So we only need to request a PVC and an appropriate PV will be created. To automate the PV creation we need to install the CSI plugin for the Storage System.
There are a few GitHub Repositories where you can find CSI plugins:
- https://github.com/kubernetes-csi
- https://kubernetes-csi.github.io/docs/drivers.html#drivers
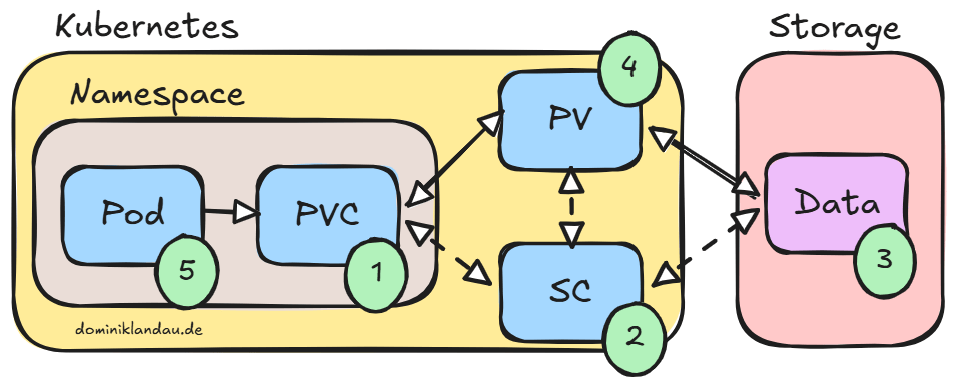
The picture above shows the simplified working of a CSI driver. Everything starts with the creation of a PVC, which has an StorageClass (SC) assigned to it. The StorageClass has all the information which are needed to connect and authenticate against the Storage System to provide storage. This storage will be linked to the PV and then the PV is bound to the PVC. In the end only the PVC will be referenced by the Pod, all the other things were done automatically.
Install NFS CSI
In this example, we will use our Control Plane as a NFS server and install the NFS CSI plugin. The nfs configuration was done in the step before, so finish this befor continuing.
Install Helm
Before installing the CSI plugin we need to have Helm, a package manager for Kubernetes, available. Use the commands below to install it.
curl -fsSL -o get_helm.sh https://raw.githubusercontent.com/helm/helm/main/scripts/get-helm-4
chmod 700 get_helm.sh
./get_helm.shNow Helm should be available.
dominik@cp:~$ curl -fsSL -o get_helm.sh https://raw.githubusercontent.com/helm/helm/main/scripts/get-helm-4
chmod 700 get_helm.sh
./get_helm.sh
Downloading https://get.helm.sh/helm-v4.2.4-linux-amd64.tar.gz
Verifying checksum... Done.
Preparing to install helm into /usr/local/bin
helm installed into /usr/local/bin/helm
Configure Kubernetes
To use the NFS CSI plugin via helm we first need to add the helm repository.
helm repo add csi-driver-nfs https://raw.githubusercontent.com/kubernetes-csi/csi-driver-nfs/master/charts
helm repo updateThe output should look like below.
dominik@cp:~$ helm repo add csi-driver-nfs https://raw.githubusercontent.com/kubernetes-csi/csi-driver-nfs/master/charts
helm repo update
"csi-driver-nfs" has been added to your repositories
Hang tight while we grab the latest from your chart repositories...
...Successfully got an update from the "csi-driver-nfs" chart repository
Update Complete. ⎈Happy Helming!⎈
Now we can install the NFS CSI plugin into the Kubernetes cluster with the command below.
helm install csi-driver-nfs csi-driver-nfs/csi-driver-nfs --namespace nfs --version 4.13.4 --create-namespaceIf the installation was successful, the output should look like below.
dominik@cp:~$ helm install csi-driver-nfs csi-driver-nfs/csi-driver-nfs --namespace nfs --version 4.13.4 --create-namespace
NAME: csi-driver-nfs
LAST DEPLOYED: Fri Aug 14 07:42:22 2026
NAMESPACE: nfs
STATUS: deployed
REVISION: 1
DESCRIPTION: Install complete
TEST SUITE: None
NOTES:
The CSI NFS Driver is getting deployed to your cluster.

To check CSI NFS Driver pods status, please run:

  kubectl --namespace=nfs get pods --selector="app.kubernetes.io/instance=csi-driver-nfs" --watch
After some time all the components should be up and running, which we can test with the following command
kubectl --namespace=nfs get pods --selector="app.kubernetes.io/instance=csi-driver-nfs"Continue when all the Pods are in a running state like below.
dominik@cp:~$ kubectl --namespace=nfs get pods --selector="app.kubernetes.io/instance=csi-driver-nfs"
NAME                                  READY   STATUS    RESTARTS   AGE
csi-nfs-controller-66658bb975-4mgqg   5/5     Running   0          36s
csi-nfs-node-cqk8v                    3/3     Running   0          36s
csi-nfs-node-lgcpn                    3/3     Running   0          36s
To create a StorageClass in the next step we first need to find the right CSIDriver.
kubectl get CSIDriverIn our case the CSIDriver will be nfs.csi.k8s.io. The other one is provided by our CNI Calico.
dominik@cp:~$ kubectl get CSIDriver
NAME             ATTACHREQUIRED   PODINFOONMOUNT   STORAGECAPACITY   TOKENREQUESTS   REQUIRESREPUBLISH   MODES        AGE
csi.tigera.io    true             true             false             <unset>         false               Ephemeral    44h
nfs.csi.k8s.io   false            false            false             <unset>         false               Persistent   8m6s
Create a StorageClass
To use the CSI, we need to define a SC with the right parameters like below.
apiVersion: storage.k8s.io/v1
kind: StorageClass
metadata:
  name: nfs-csi
  annotations:
    storageclass.kubernetes.io/is-default-class: "true"
provisioner: nfs.csi.k8s.io # should be the same
parameters:
  server: 10.10.10.6         # need to be changed
  share: /var/nfs/kubernetes # need to be changed
reclaimPolicy: Delete
volumeBindingMode: Immediate
allowVolumeExpansion: true
mountOptions:
- nfsvers=4.1After applying the configuration, there should be a new StorageClass available.
kubectl apply -f sc.yaml
kubectl get scHere we can see the right StorageClass with its configuration.
dominik@cp:~$ kubectl apply -f sc.yaml
storageclass.storage.k8s.io/nfs-csi created
dominik@cp:~$ kubectl get sc
NAME                PROVISIONER      RECLAIMPOLICY   VOLUMEBINDINGMODE   ALLOWVOLUMEEXPANSION   AGE
nfs-csi (default)   nfs.csi.k8s.io   Delete          Immediate           true
        5s
Create a PVC
Now we create a PVC and reference the SC in the storageClassName option.
apiVersion: v1
kind: PersistentVolumeClaim
metadata:
  name: pvc-nfs-dynamic
  namespace: default
spec:
  accessModes:
    - ReadWriteMany
  resources:
    requests:
      storage: 1Gi
storageClassName: nfs-csi # Reference SCWhen applying the yaml a new PVC will be created which is automatically bound to a PV.
kubectl get pv,pvcHere we see the new PV which was created by the CSI.
dominik@cp:~$ kubectl get pv,pvc
NAME                                                        CAPACITY   ACCESS MODES   RECLAIM POLICY   STATUS   CLAIM                     STORAGECLASS   VOLUMEATTRIBUTESCLASS   REASON   AGE
persistentvolume/pvc-d03f38d4-4902-4886-abf1-3e71c7718c23   1Gi        RWX            Delete           Bound    default/pvc-nfs-dynamic   nfs-csi        <unset>
          88s

NAME                                    STATUS   VOLUME
    CAPACITY   ACCESS MODES   STORAGECLASS   VOLUMEATTRIBUTESCLASS   AGE
persistentvolumeclaim/pvc-nfs-dynamic   Bound    pvc-d03f38d4-4902-4886-abf1-3e71c7718c23   1Gi        RWX            nfs-csi        <unset>                 88s
Investigate the automatically created PV.
kubectl describe pvThe source of the PV is now the CSI.
dominik@cp:~$ kubectl describe pv
Name:            pvc-d03f38d4-4902-4886-abf1-3e71c7718c23
Labels:          <none>
Annotations:     pv.kubernetes.io/provisioned-by: nfs.csi.k8s.io
                 volume.kubernetes.io/provisioner-deletion-secret-name:
                 volume.kubernetes.io/provisioner-deletion-secret-namespace:
Finalizers:      [external-provisioner.volume.kubernetes.io/finalizer kubernetes.io/pv-protection]
StorageClass:    nfs-csi
Status:          Bound
Claim:           default/pvc-nfs-dynamic
Reclaim Policy:  Delete
Access Modes:    RWX
VolumeMode:      Filesystem
Capacity:        1Gi
Node Affinity:   <none>
Message:
Source:
    Type:              CSI (a Container Storage Interface (CSI) volume source)
    Driver:            nfs.csi.k8s.io
    FSType:
    VolumeHandle:      10.10.10.6#var/nfs/kubernetes#pvc-d03f38d4-4902-4886-abf1-3e71c7718c23##
    ReadOnly:          false
    VolumeAttributes:      csi.storage.k8s.io/pv/name=pvc-d03f38d4-4902-4886-abf1-3e71c7718c23
                           csi.storage.k8s.io/pvc/name=pvc-nfs-dynamic
                           csi.storage.k8s.io/pvc/namespace=default
                           server=10.10.10.6
                           share=/var/nfs/kubernetes
                           storage.kubernetes.io/csiProvisionerIdentity=1786693361788-4911-nfs.csi.k8s.io
                           subdir=pvc-d03f38d4-4902-4886-abf1-3e71c7718c23
Events:                <none>
If you connect to the Control Plane, you can see a folder with the same name as the PV.
ls -l /var/nfs/kubernetes/The name always starts with pvc and has an uuid appended.
dominik@cp:~$ ls -l /var/nfs/kubernetes/
total 8
drwxr-xr-x 2 root root 4096 Aug 13 15:04 data1
drwxr-xr-x 2 root root 4096 Aug 14 07:52 pvc-d03f38d4-4902-4886-abf1-3e71c7718c23
Add the PVC to a Pod
Here we create a simple Nginx Container, which will mount the PVC.
apiVersion: v1
kind: Pod
metadata:
  name: pod-nfs-pvc
spec:
  containers:
  - name: nginx
    image: nginx
    volumeMounts:
    - name: vol1
      mountPath: /data
  volumes:
  - name: vol1
    persistentVolumeClaim:
claimName: pvc-nfs-dynamicNow we create a file at the mounted path and check if it is in the nfs folder.
kubectl exec pod-nfs-pvc -- bash -c "echo 'from Pod' > /data/pod.txt"
ls -R /var/nfs/kubernetes/pvc*Everything worked and the file was created.
dominik@cp:~$ kubectl exec pod-nfs-pvc -- bash -c "echo 'from Pod' > /data/pod.txt"
dominik@cp:~$ ls -R /var/nfs/kubernetes/pvc*
/var/nfs/kubernetes/pvc-d03f38d4-4902-4886-abf1-3e71c7718c23:
pod.txt
I hope you now have a general understanding about Storage in Kubernetes.
Next Article
In the following article, we will explore users in Kubernetes and how to manage these. Currently we only work with our Admin Kubeconfig.
Contact
For further questions contact me at: blog [@] dominiklandau.de