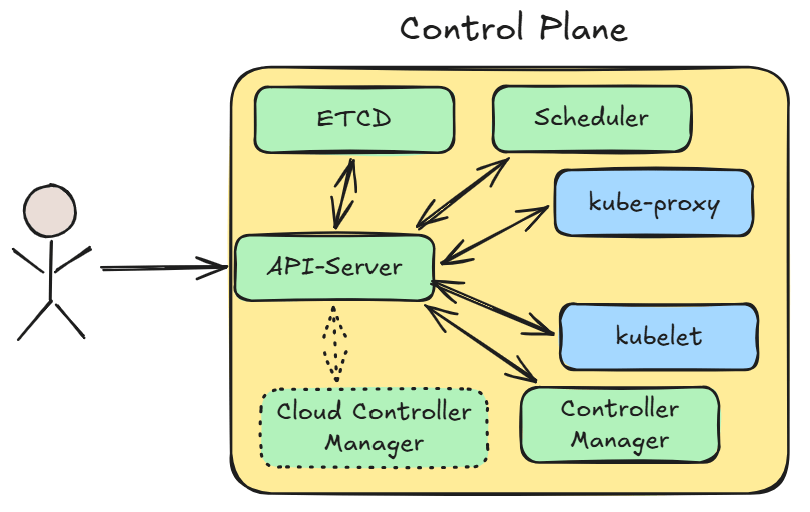
After the previous article, you should now have a running Kubernetes cluster: Kubernetes Part 1. Now we take a look at the user management in Kubernetes and how internal communication works. Additionally we talk about adding a new user to our cluster.
Kubernetes Default User
After creating a Kubernetes cluster with kubeadm we copied the /etc/kubernetes/admin.conf to ~/.kube/config. With this we are now able to communicate with Kubernetes. To see our current user we use the kubectl auth whoami command.
ATTRIBUTE                                           VALUE
Username                                            kubernetes-admin
Groups                                              [kubeadm:cluster-admins system:authenticated]
Extra: authentication.kubernetes.io/credential-id   [X509SHA256=570e83294e0b3d4379800320b431dd4d3d400b2458227228aba2e238f79b3579]
From the output we can see, that we are currently the kubernetes-admin user with the group kubeadm:cluster-admins. This user is encoded into the certificate in the ~/.kube/config file.
We can extract this information with the following command.
sudo grep certificate-data /etc/kubernetes/admin.conf | cut -d' ' -f6 | base64 -d > admin.crt

openssl x509 -in admin.crt -text -nooutThe command first cuts the certificate out and then decode it to plain text. After this we can look at the certificate data with the openssl command.
dominik@cp:~$ openssl x509 -in admin.crt -text -noout
Certificate:
    Data:
        Version: 3 (0x2)
        Serial Number: 5327516273465214286 (0x49ef23d30701c54e)
        Signature Algorithm: sha256WithRSAEncryption
        Issuer: CN = kubernetes
        Validity
            Not Before: Aug 12 11:29:47 2026 GMT
            Not After : Aug 12 11:34:47 2027 GMT
        Subject: O = kubeadm:cluster-admins, CN = kubernetes-admin
        Subject Public Key Info:
            Public Key Algorithm: rsaEncryption
                Public-Key: (2048 bit)
                Modulus:
                    00:c9:a7:2c:2a:c8:25:aa:61:89:8d:44:a3:52:77:
                    56:d6:32:7c:52:47:1b:95:36:8c:e3:ca:cb:4c:bc:
                    0d:94:43:b4:1b:a1:14:e6:e3:20:11:13:5a:89:6f:
                    03:21:bd:b4:fd:c3:68:14:2c:99:ef:96:1c:4a:6c:
                    03:3b:d9:cb:72:97:8b:c8:d1:c3:8e:82:73:33:b5:
                    14:fa:ab:97:a4:00:b8:40:77:43:aa:d9:b7:5a:41:
                    ff:31:9e:83:ed:53:42:07:a1:5f:4b:7f:ee:64:c3:
                    d5:7f:8d:ee:dd:81:21:9f:66:38:a1:95:c4:92:e0:
                    47:e2:f0:0e:99:da:e6:08:93:70:8f:a9:e0:4b:d7:
                    69:8d:d5:d7:e9:d2:2e:36:a8:e8:ed:e2:a6:37:28:
                    1b:bd:48:44:5b:1f:f7:57:73:d4:cb:70:ec:9a:20:
                    7a:91:c4:2c:45:6f:1e:5d:ec:ca:0a:32:1b:a7:c7:
                    3d:35:5d:bf:a3:54:14:ac:a0:8d:9a:24:1d:61:7e:
                    ee:c0:04:69:36:77:f4:fd:fd:6c:5f:bb:18:c6:4b:
                    90:35:8a:f0:1b:30:6c:f1:46:ee:26:16:91:37:a1:
                    e7:3e:d2:ee:b8:32:b2:8b:2a:ee:8b:4c:25:1f:67:
                    0b:9b:8b:3b:67:8a:64:a5:24:85:06:a0:76:ee:7e:
                    6a:0b
                Exponent: 65537 (0x10001)
        X509v3 extensions:
            X509v3 Key Usage: critical
                Digital Signature, Key Encipherment
            X509v3 Extended Key Usage:
                TLS Web Client Authentication
            X509v3 Basic Constraints: critical
                CA:FALSE
            X509v3 Authority Key Identifier:
                80:9E:E9:4F:32:46:68:CA:78:32:62:31:30:6D:1B:57:EB:D4:8B:E6
    Signature Algorithm: sha256WithRSAEncryption
    Signature Value:
        1d:ab:25:f9:d8:80:e3:5e:75:7b:19:7f:46:c0:19:b6:2b:9c:
        af:25:e7:2d:46:53:f8:09:2c:52:5a:1b:01:f2:95:3a:90:d7:
        2c:f9:58:ad:e4:be:57:fa:04:8b:73:64:e4:b3:46:2f:c6:f2:
        41:12:0a:53:b7:31:b1:8e:9a:20:1d:41:21:5d:71:f3:b8:c2:
        a7:c0:76:fe:5c:82:2d:6d:08:d5:44:38:93:6b:52:25:f6:c6:
        65:6f:d9:9a:29:22:86:ff:5b:c0:ad:a3:43:b0:4b:32:bd:2e:
        cc:43:f7:ff:c4:8c:2d:6f:49:9e:d6:fc:e5:fd:71:75:43:b3:
        ec:82:92:b6:52:73:1e:35:1c:97:6e:15:cd:14:fa:f2:6b:13:
        4f:9d:f7:4d:b4:28:67:29:17:7c:2c:72:c7:42:5b:67:0f:aa:
        b5:e2:c8:74:42:a3:fd:06:a9:46:93:16:04:62:84:cc:09:61:
        77:75:cd:8c:b3:a6:a0:62:e5:83:76:31:19:bd:61:de:52:77:
        25:b3:9d:34:cd:ec:9a:d0:24:9e:a3:d7:35:ef:7a:bb:42:c7:
        1f:8e:6e:33:4e:d6:6e:e4:d8:c0:ee:7d:65:62:84:4a:02:87:
        98:b7:26:7c:c3:16:1e:76:79:63:0b:7f:81:a8:d6:4b:4b:7a:
        3c:95:3f:b5
There is now a lot of output with all the information about the certificate. In our case we are only interested in two lines which are marked in the code box below.
dominik@cp:~$ openssl x509 -in admin.crt -text -noout
Certificate:
    Data:
        ...
        Issuer: CN = kubernetes
        ...
Subject: O = kubeadm:cluster-admins, CN = kubernetes-adminIssurer: The Kubernetes Certificate Authority (/etc/kubernetes/pki/ca*)
Subject: The Identity of the user, O = kubeadm:cluster-admins (group), CN = kubernetes-admin (user)
Kubernetes has a ClusterRole and a ClusterRoleBinding which gives the kubeadm:cluster-admins all access in the cluster.
Here is the ClusterRole cluster-admin.
dominik@cp:~$ kubectl get clusterrole cluster-admin -o yaml
apiVersion: rbac.authorization.k8s.io/v1
kind: ClusterRole
metadata:
  annotations:
    rbac.authorization.kubernetes.io/autoupdate: "true"
  creationTimestamp: "2026-08-12T11:34:53Z"
  labels:
    kubernetes.io/bootstrapping: rbac-defaults
  name: cluster-admin
  resourceVersion: "71"
  uid: ec9ad3fb-3116-4909-bb4b-dbd2def342d6
rules:
- apiGroups:
  - '*'
  resources:
  - '*'
  verbs:
  - '*'
- nonResourceURLs:
  - '*'
  verbs:
  - '*'
Here is the ClusterRoleBinding for the cluster-admin role.
dominik@cp:~$ kubectl get clusterrolebinding kubeadm:cluster-admins -o yaml
apiVersion: rbac.authorization.k8s.io/v1
kind: ClusterRoleBinding
metadata:
  creationTimestamp: "2026-08-12T11:34:52Z"
  name: kubeadm:cluster-admins
  resourceVersion: "33"
  uid: b49aa74d-a6ee-4b6e-b5a2-ea02945c3336
roleRef:
  apiGroup: rbac.authorization.k8s.io
  kind: ClusterRole
  name: cluster-admin
subjects:
- apiGroup: rbac.authorization.k8s.io
  kind: Group
  name: kubeadm:cluster-admins
Other User
Kubernetes has some other users which are used for the internal communication. These user can found in the *conf file under /etc/kubernetes.
dominik@cp:~$ ls -l /etc/kubernetes/*conf
-rw------- 1 root root 5634 Aug 12 11:34 /etc/kubernetes/admin.conf
-rw------- 1 root root 5662 Aug 12 11:34 /etc/kubernetes/controller-manager.conf
-rw------- 1 root root 1934 Aug 12 11:34 /etc/kubernetes/kubelet.conf
-rw------- 1 root root 5606 Aug 12 11:34 /etc/kubernetes/scheduler.conf
-rw------- 1 root root 5658 Aug 12 11:34 /etc/kubernetes/super-admin.conf
The use case of the files:
- admin.conf: Kubernetes admin
- controller-manager.conf: Controller manager user
- kubelet.conf: kubelet user
- scheduler.conf: Scheduler user
- super-admin.conf: Break class admin
All these user are referenced by the different Kubernetes components. For example the contoller-manager.conf is referenced by the controller manager manifest file.
sudo cat /etc/kubernetes/manifests/kube-controller-manager.yaml | head -n
15As we can see from the output this file is referenced by the controller manager.
dominik@cp:~$ sudo cat /etc/kubernetes/manifests/kube-controller-manager.yaml | head -n
15
apiVersion: v1
kind: Pod
metadata:
  labels:
    component: kube-controller-manager
    tier: control-plane
  name: kube-controller-manager
  namespace: kube-system
spec:
  containers:
  - command:
    - kube-controller-manager
    - --allocate-node-cidrs=true
    - --authentication-kubeconfig=/etc/kubernetes/controller-manager.conf  # here
    - --authorization-kubeconfig=/etc/kubernetes/controller-manager.conf   # here
Create a new user
Kubernetes itself doesn’t have the possible to directly create a new user. There is no management pane to create one. As we saw in the article it is possible to create a user and group by signing a certificate by the Kubernetes CA. But this approach is not recommended for normal user because Kubernetes doesn’t track the signing of certificates. There is also no possibility to revoke a signed certificate, so if somebody gets a signed certificate he is always able to authenticate (AuthN) himself against Kubernetes. For informational purposes I created a tutorial for creating a user with an x509 certificate here.
So with this knowledge the question persists: How can we create a new user?
The answer here is an external Identity Provider (IdP). Kubernetes support OIDC (Open Id Connect) to use external systems as a source for the users and groups. So it is possible to use tools like KeyCloak or Entra ID for the user management.
But what is with LDAP?
If you can’t use OIDC for the connection and instead relay on LDAP you need some sort of connector like Dex. Dex supports all kind of external protocols to hand through the users to Kubernetes.
Next Article
Now you should know a lot about the user management in Kubernetes. As a follow-up I would recommend my next article about all the important paths in Kuberntes.
Contact
For further questions contact me at: blog [@] dominiklandau.de